| ID |
Date |
Author |
Subject |
|
708
|
Sat May 31 10:46:42 2025 |
TD | Run 38 - remote monitoring |
11.40 DAQ continues
      File G22-205/R38

      ASIC settings
       slow comparator 0x32 all FEE64s

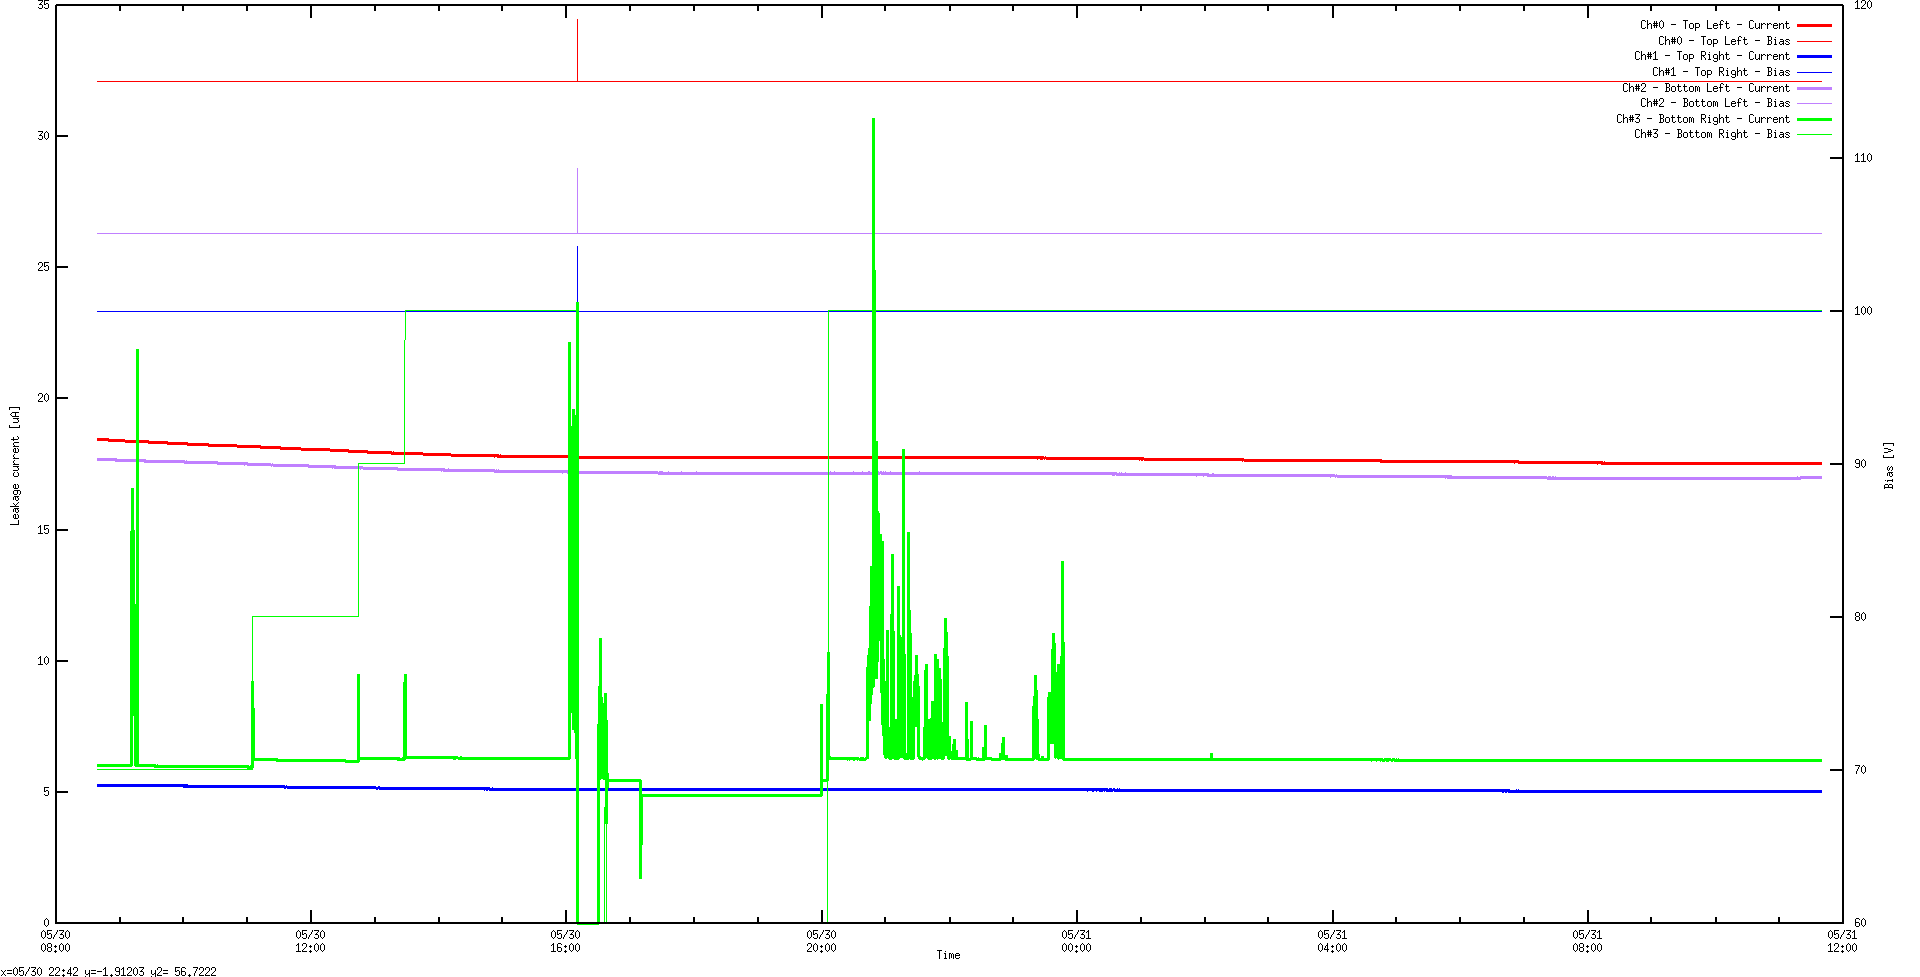
      DSSSD bias & leakage current OK - attachments 1-2

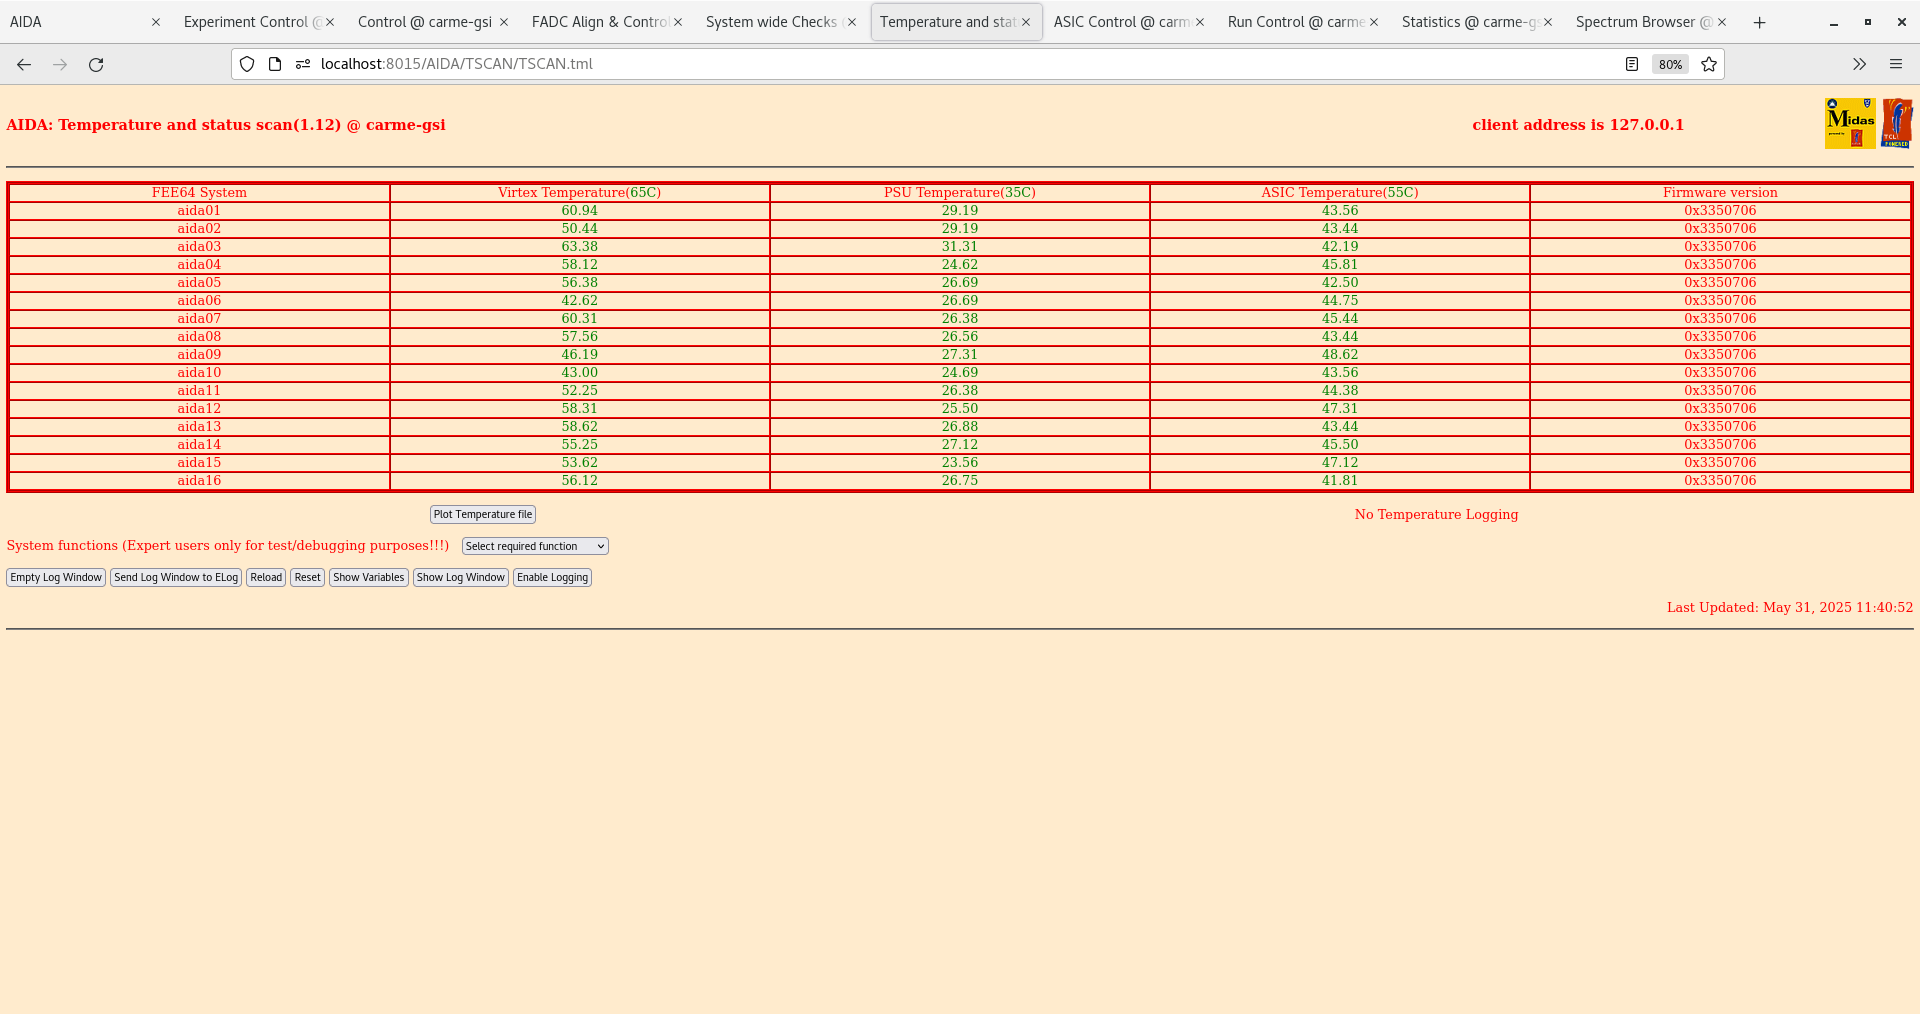
      FEE64 temps OK - attachment 3

      ADC data item stats OK - attachment 4

      WR timestamps OK - attachment 5

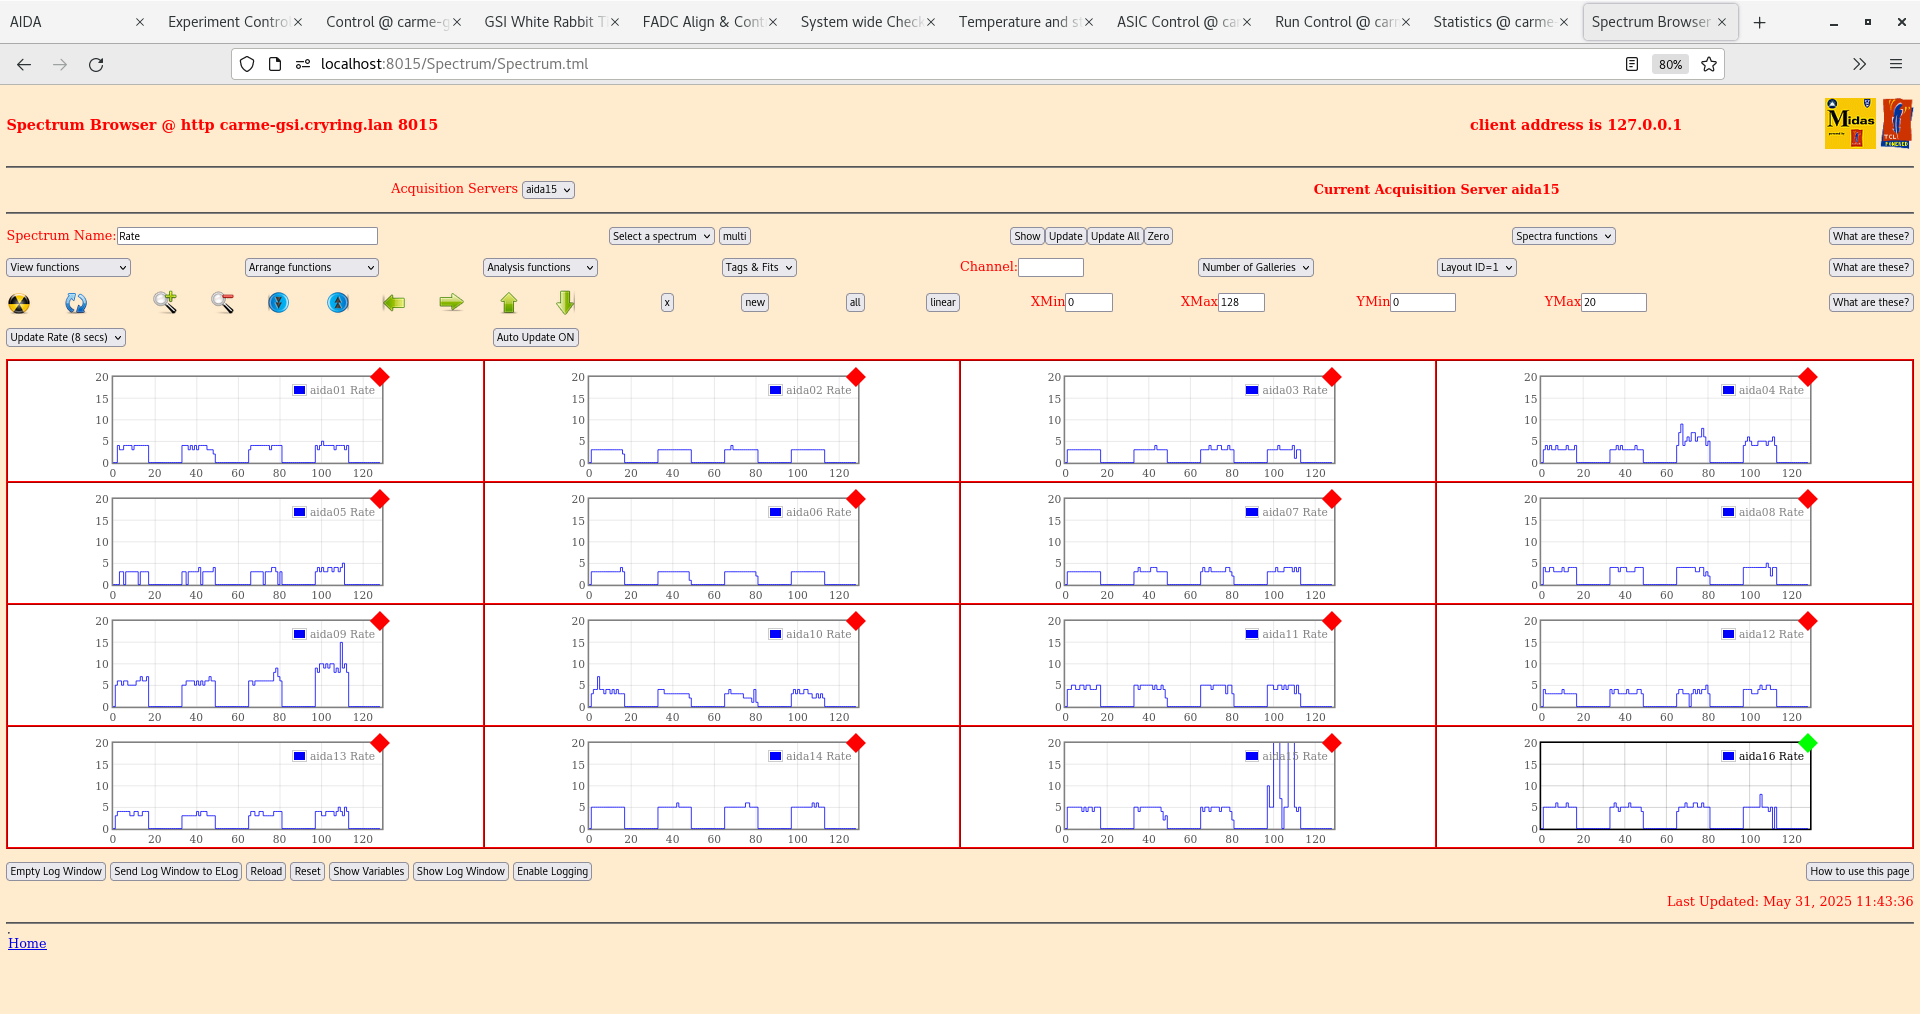
      per FEE64 Rate spectra - attachment 6

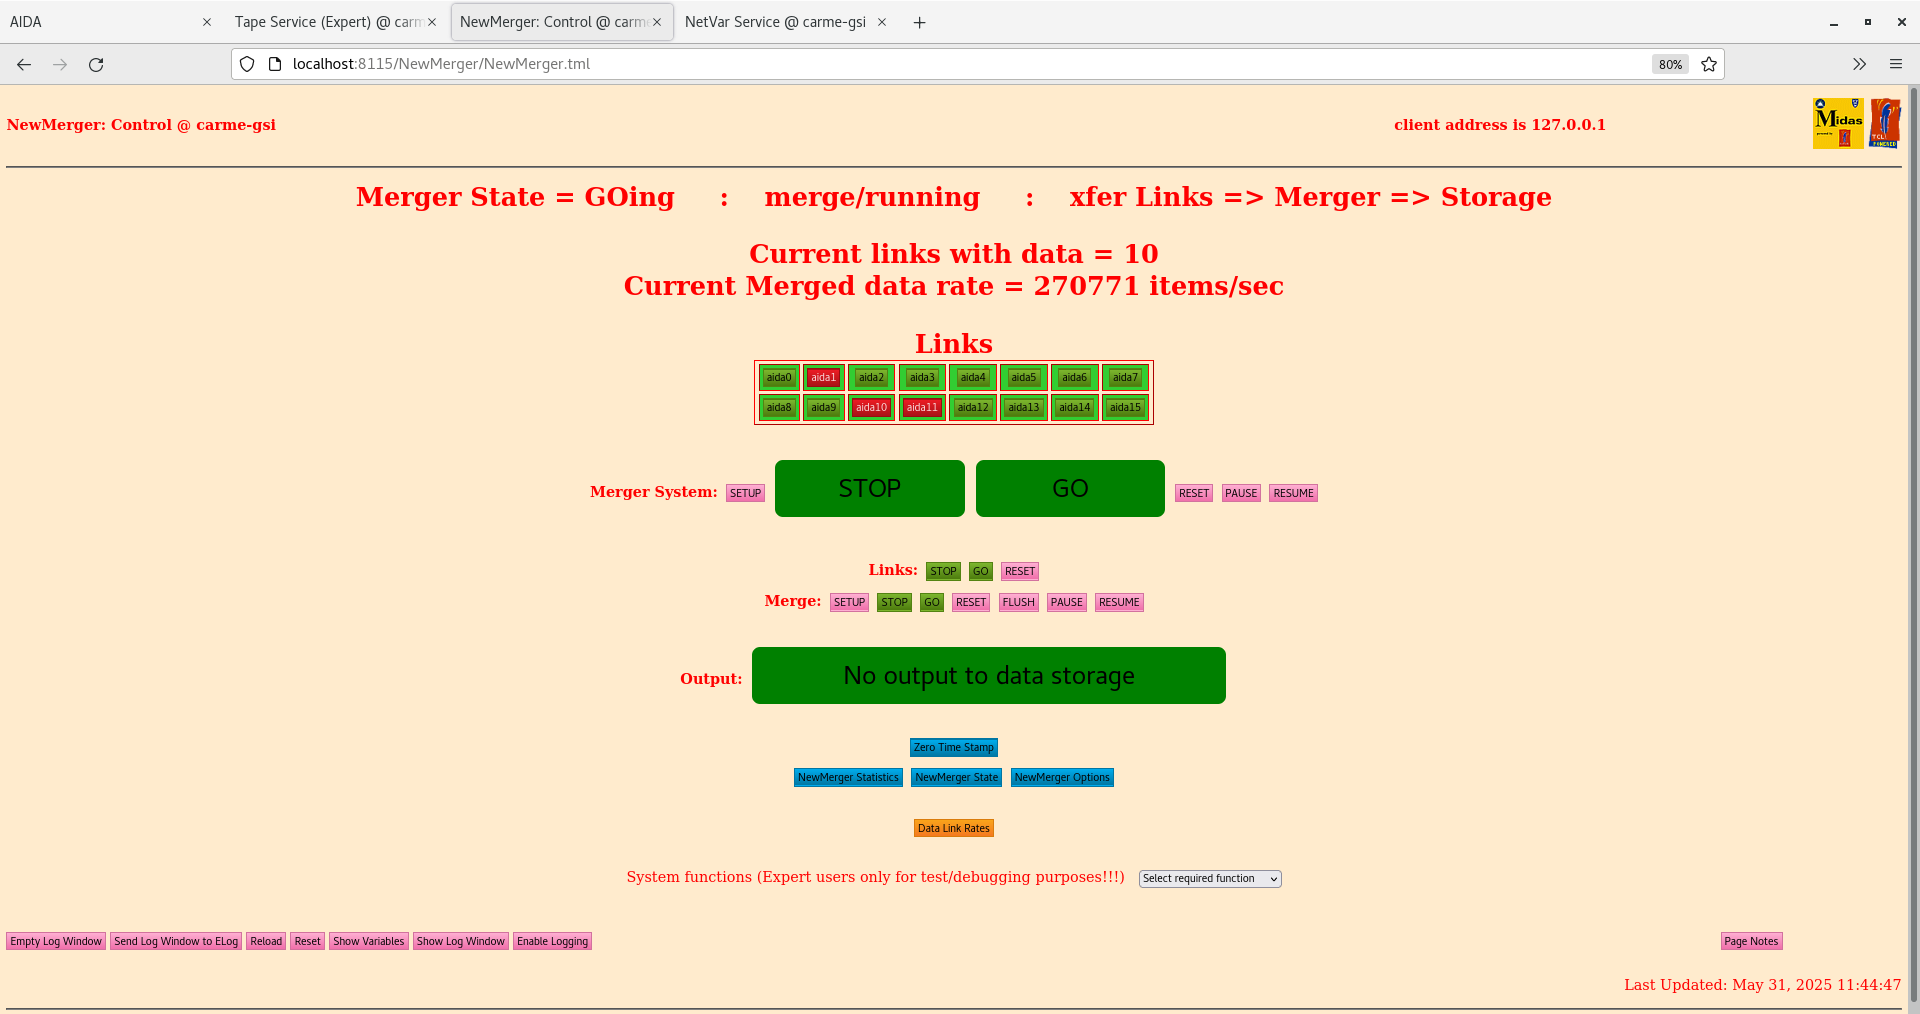
      Merger & Tape Server - attachments 7-8
       filesystem /mnt/data1 4.7Tb remaining

      Online analysis - per DSSSD energy spectra - elastic peak max count / channel c. 250-300Hz - attachment 9

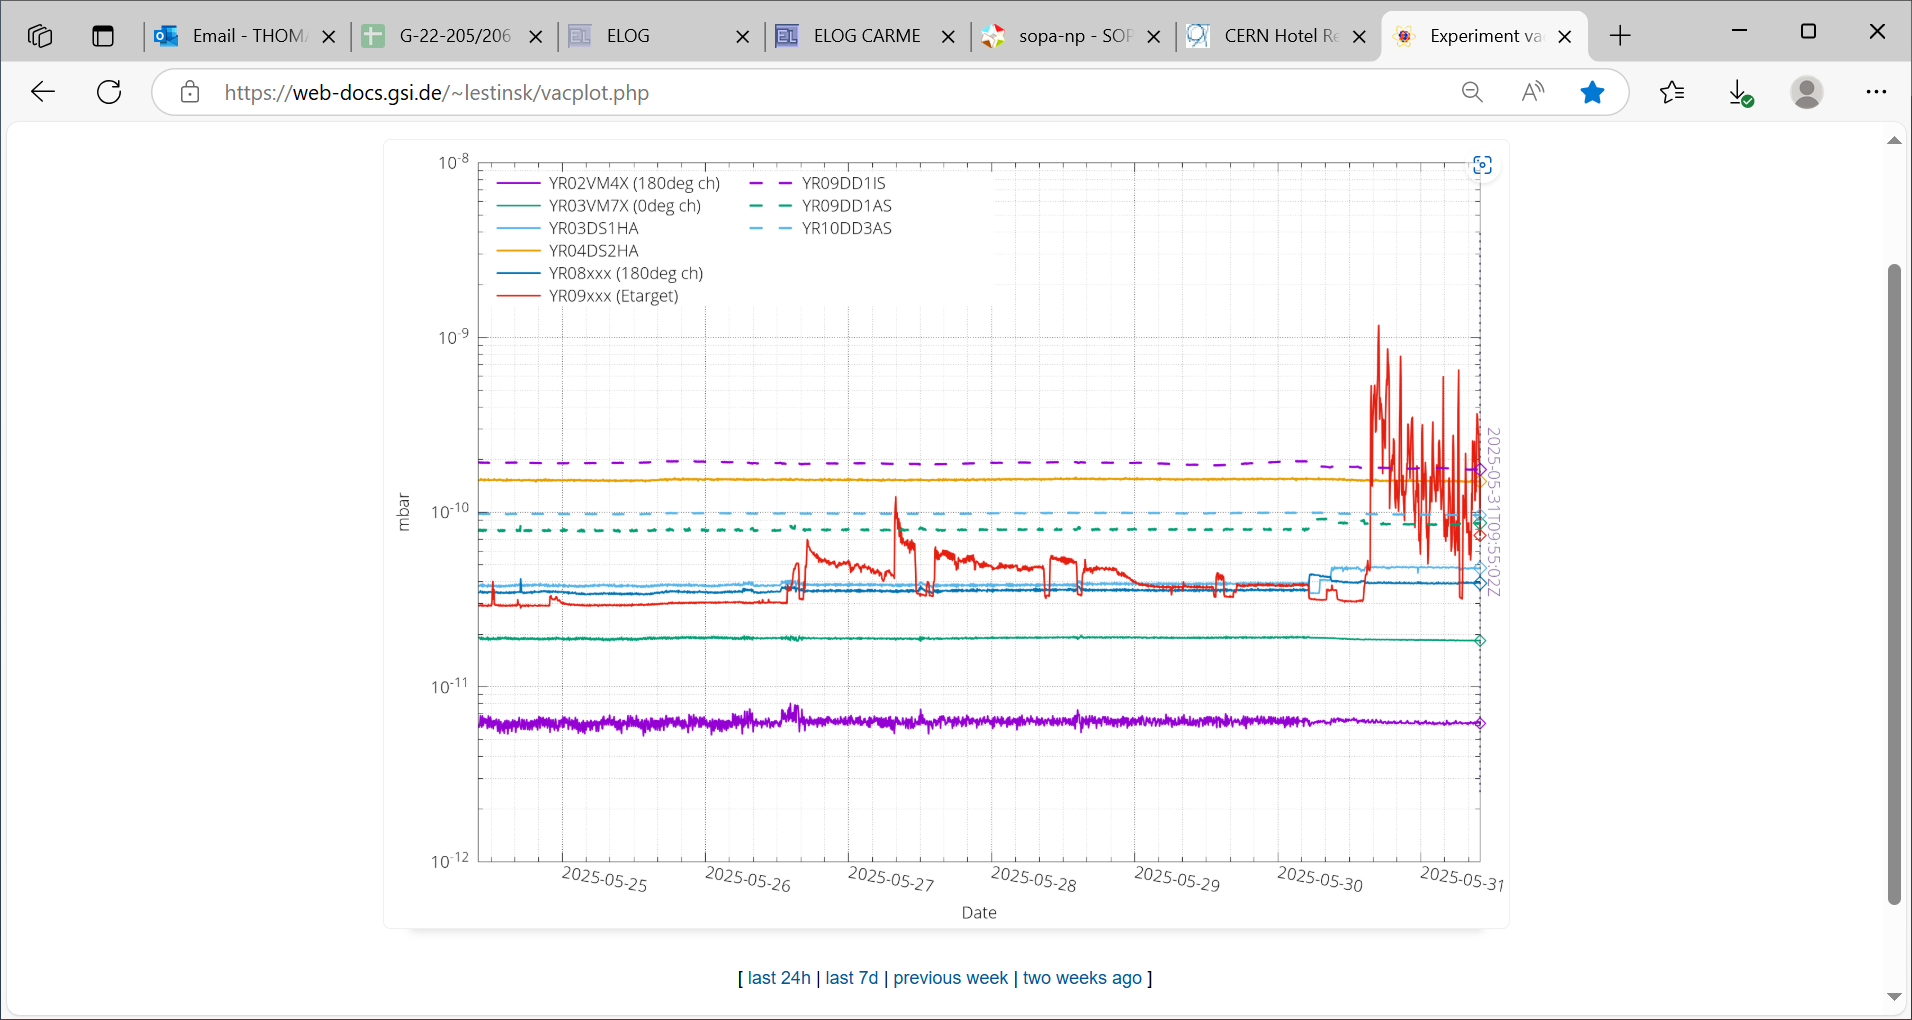
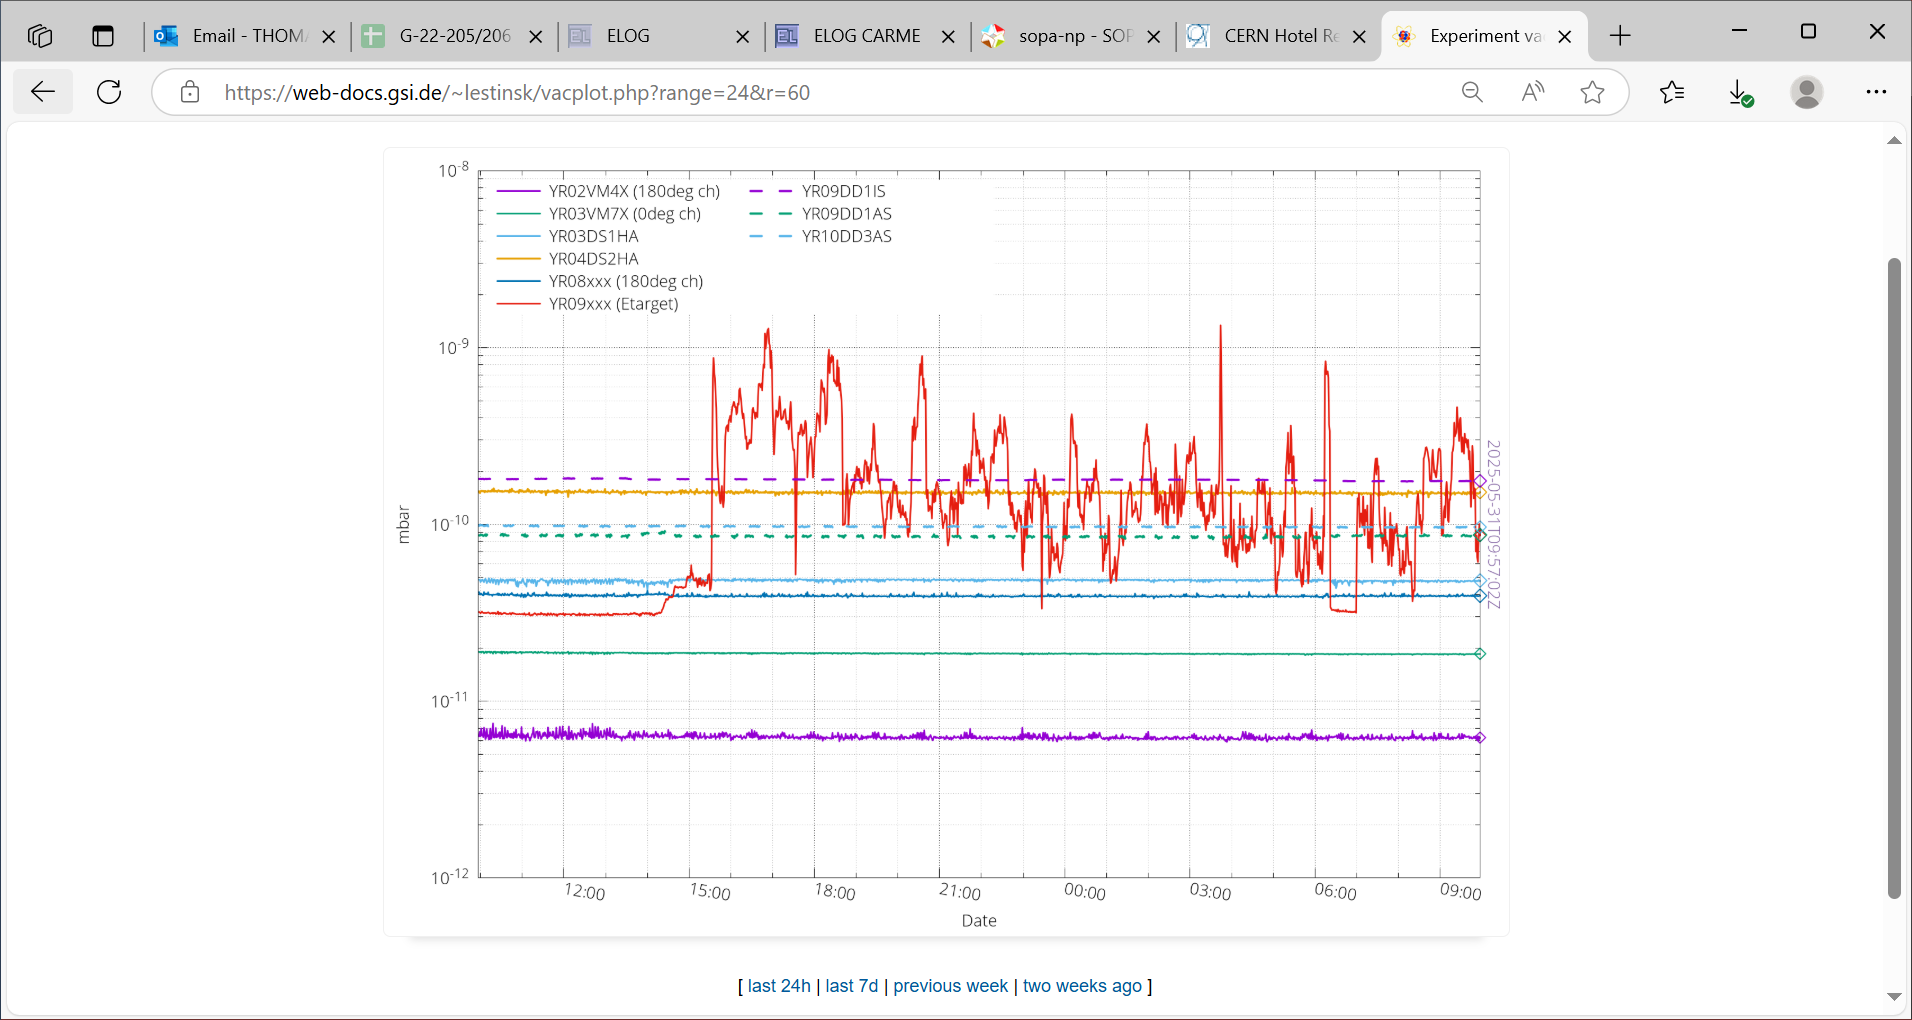
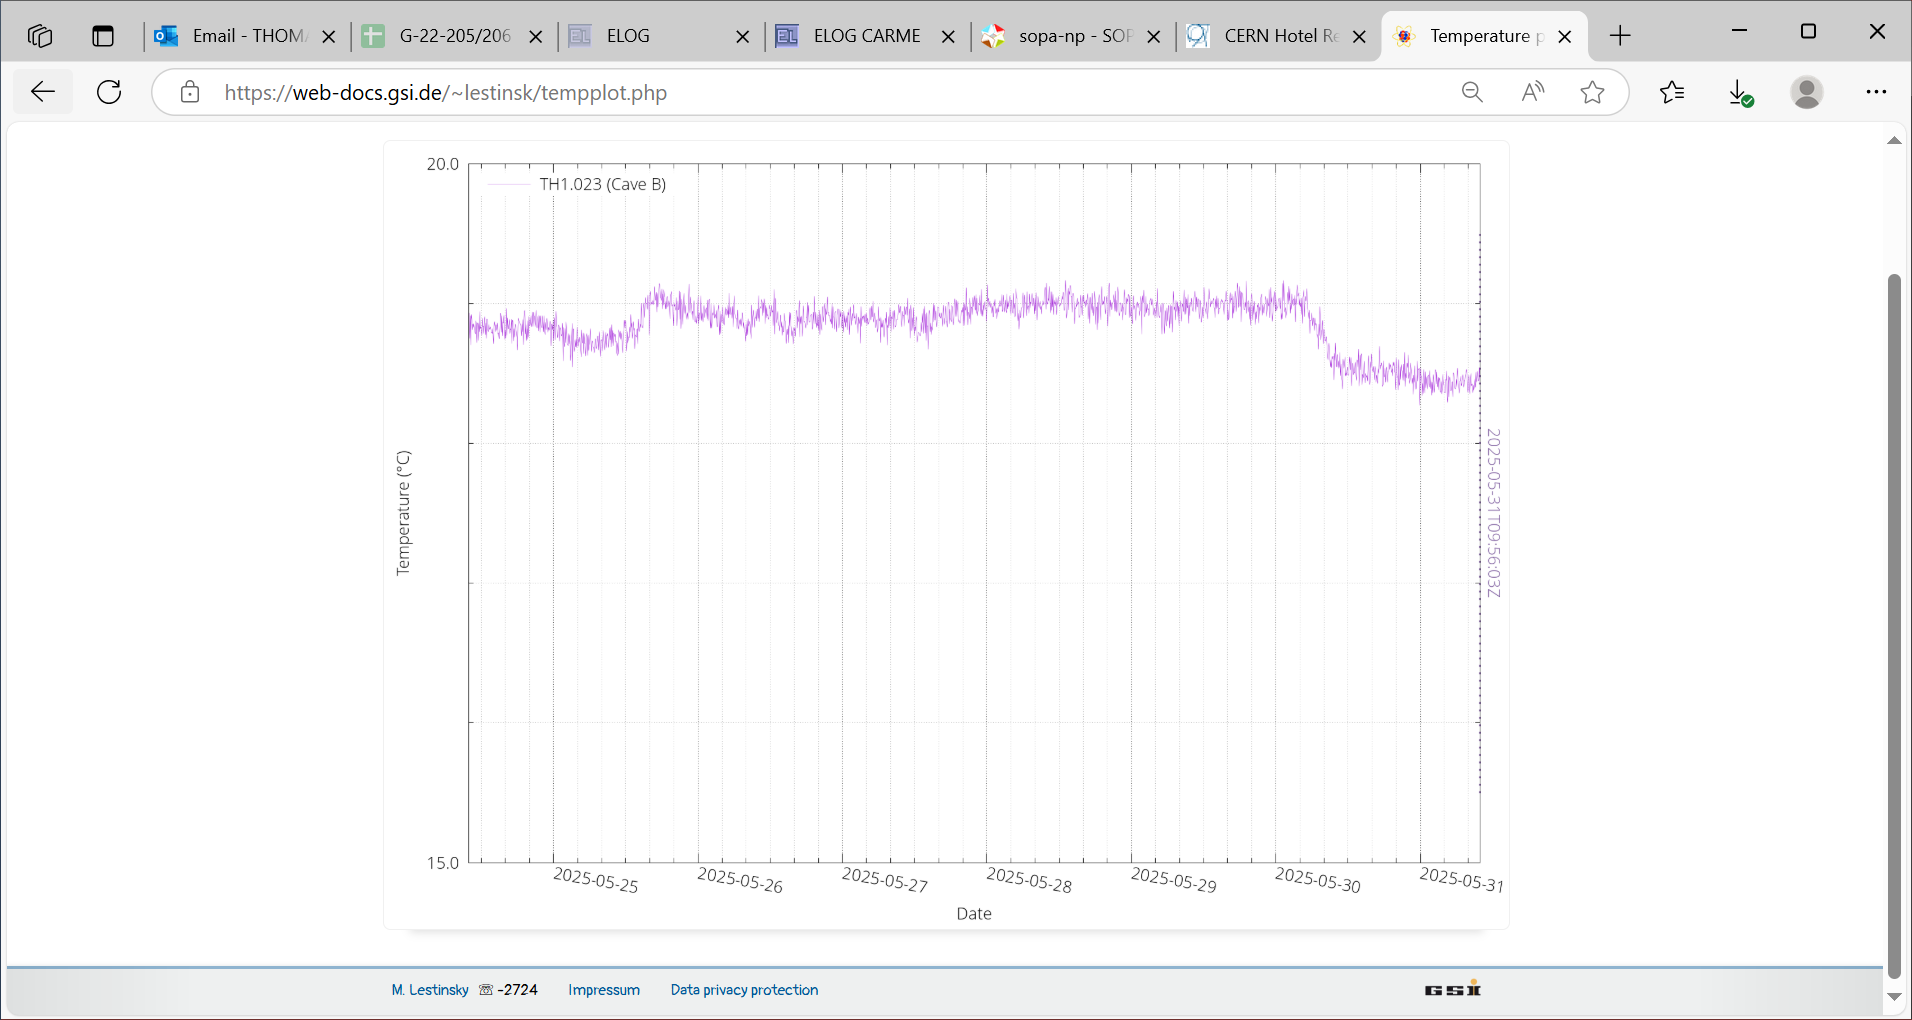
      CRYRING vacuum & temperature - attachments 10-12
       YR09 e-target gauge indicates vacuum transients from high e-11 to low e-9mbar presumably due to high density D2 target

11.42 All histograms & stats zero'd


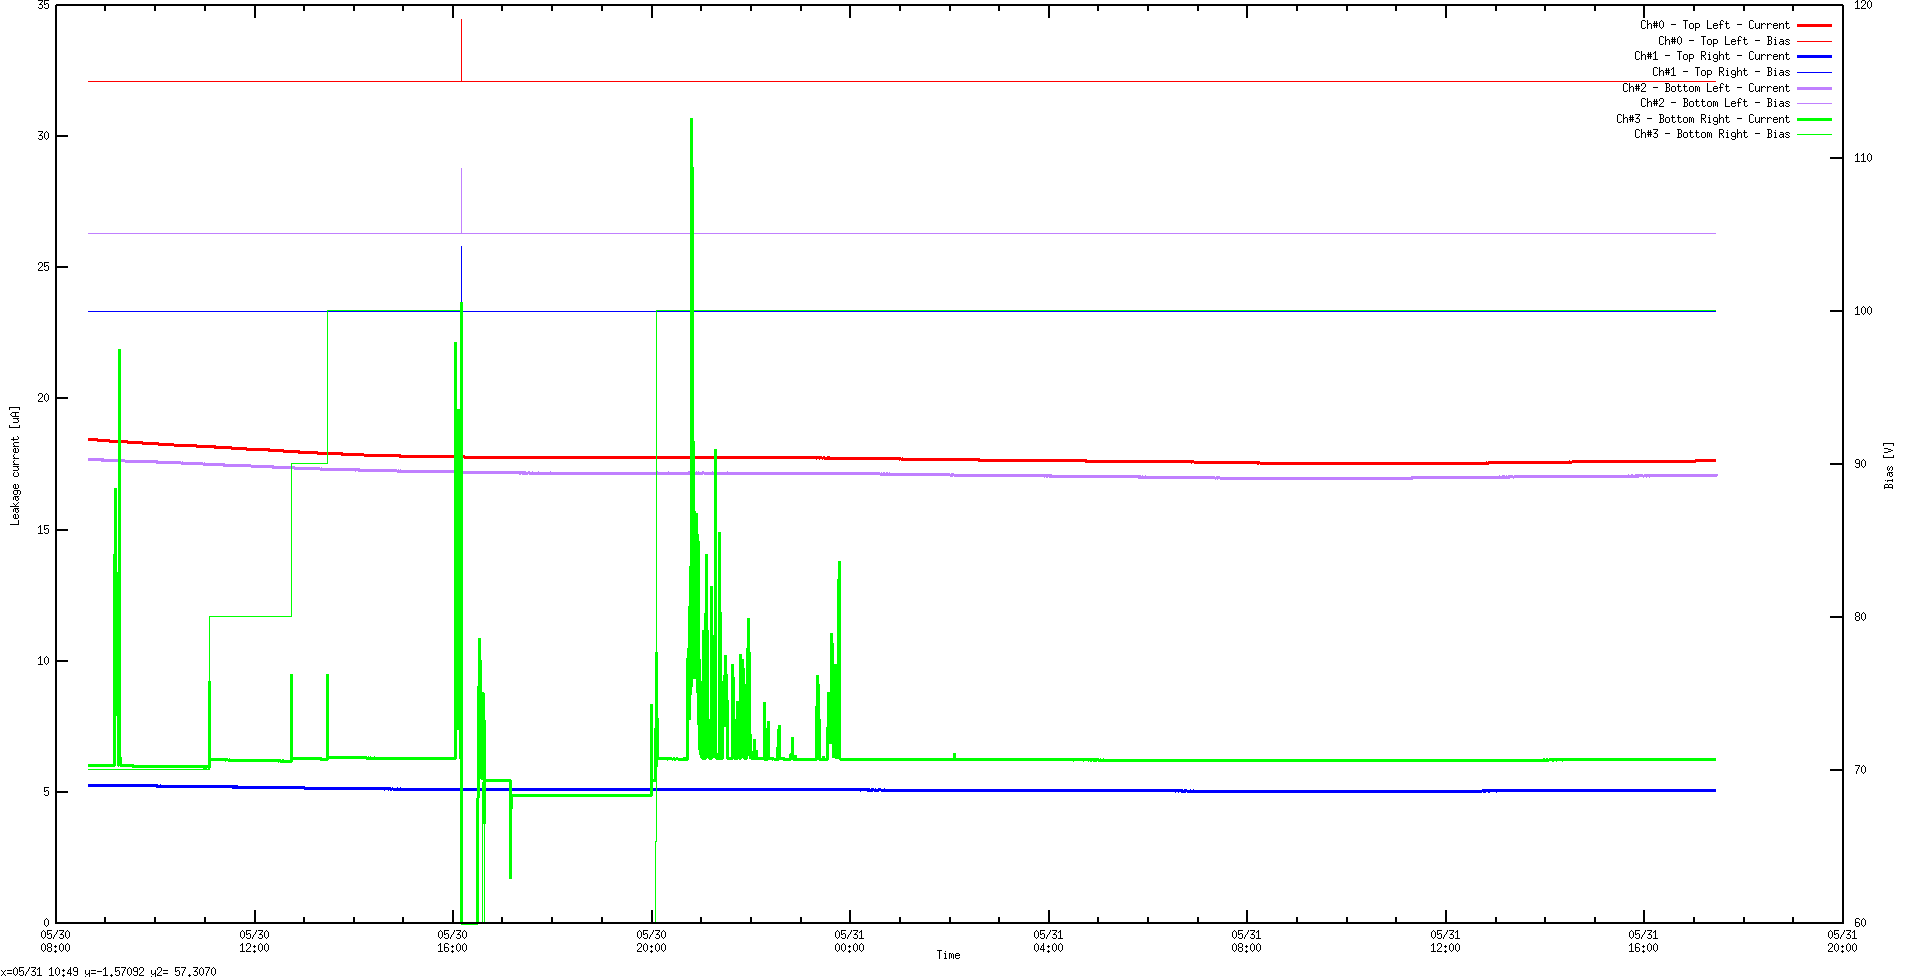
17.36 DSSSD bias & leakage current OK - attachments 13-14

      FEE64 temps OK - attachment 15

      ADC data item stats OK - attachment 16

      per FEE64 Rate spectra - attachment 17

      per FEE64 1.8.L spectra - attachments 18-19
       aida11 p+n pulser peak width 63 ch FWHM
       aida03 n+n pulser peak width 85 ch FWHM

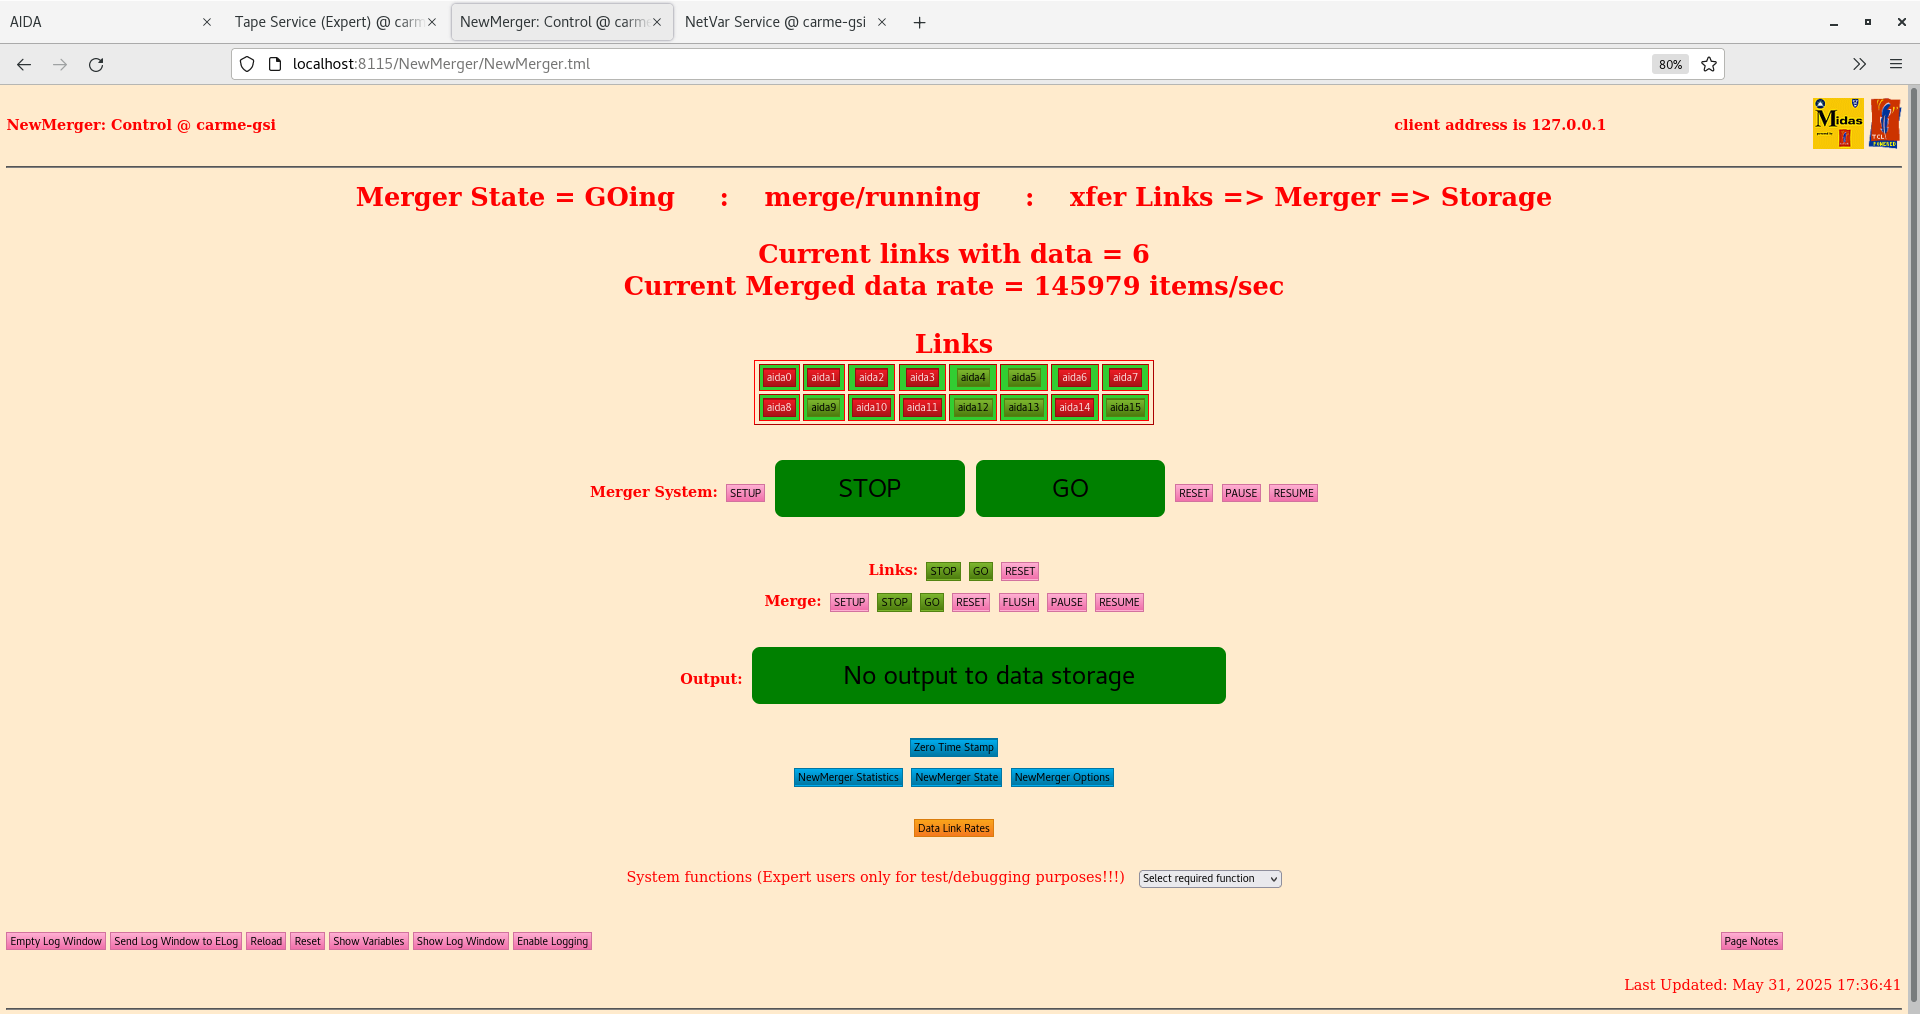
      Merger - attachment 20

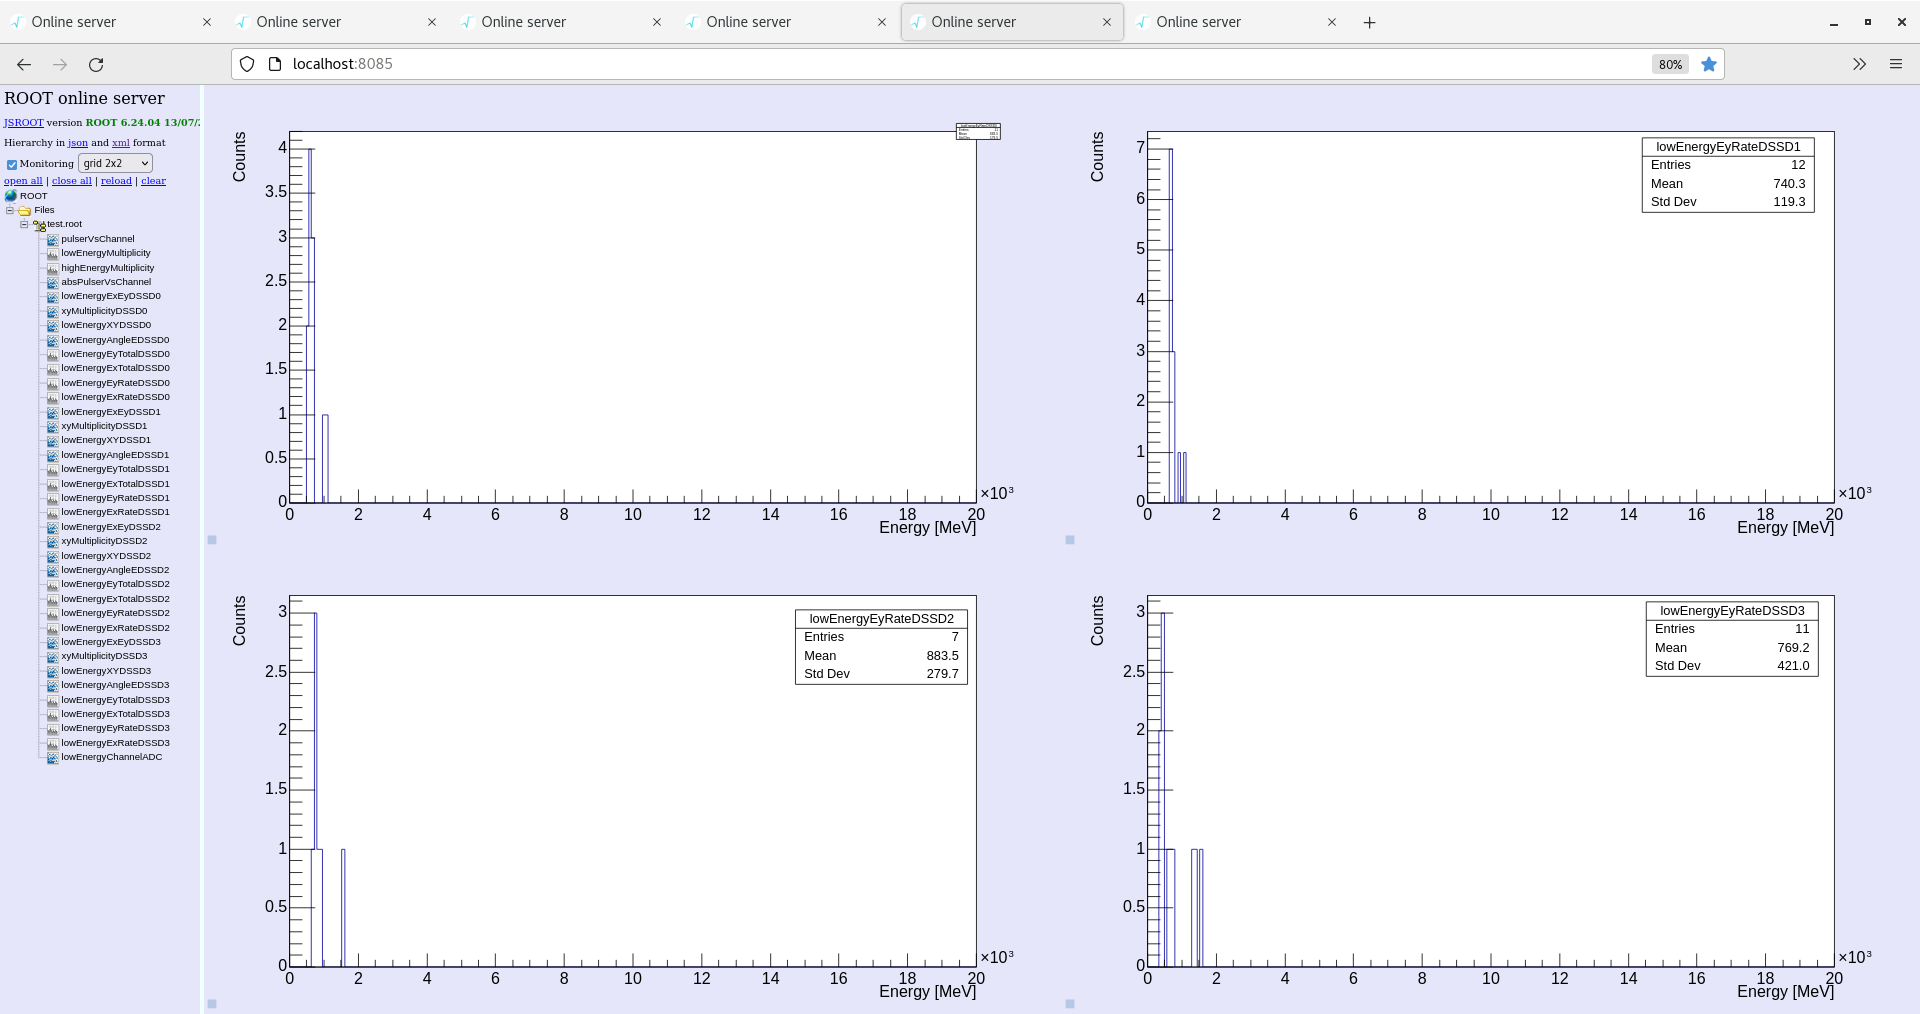
      Online analysis spectra - elastic peak max count / channel c. few Hz - attachment 21
rates much lower than earlier - no beam and/or no target - alert JM |
| Attachment 1: Screenshot_from_2025-05-31_11-40-15.png
|

|
| Attachment 2: Screenshot_from_2025-05-31_11-40-34.png
|
|
| Attachment 3: Screenshot_from_2025-05-31_11-41-01.png
|
|
| Attachment 4: Screenshot_from_2025-05-31_11-41-18.png
|

|
| Attachment 5: Screenshot_from_2025-05-31_11-42-27.png
|

|
| Attachment 6: Screenshot_from_2025-05-31_11-43-50.png
|
|
| Attachment 7: Screenshot_from_2025-05-31_11-44-54.png
|
|
| Attachment 8: Screenshot_from_2025-05-31_11-45-10.png
|

|
| Attachment 9: Screenshot_from_2025-05-31_11-46-08.png
|

|
| Attachment 10: Capture.PNG
|
|
| Attachment 11: Capture_2.PNG
|
|
| Attachment 12: Capture_3.PNG
|
|
| Attachment 13: Screenshot_from_2025-05-31_17-26-17.png
|
|
| Attachment 14: Screenshot_from_2025-05-31_17-03-49.png
|

|
| Attachment 15: Screenshot_from_2025-05-31_17-03-18.png
|
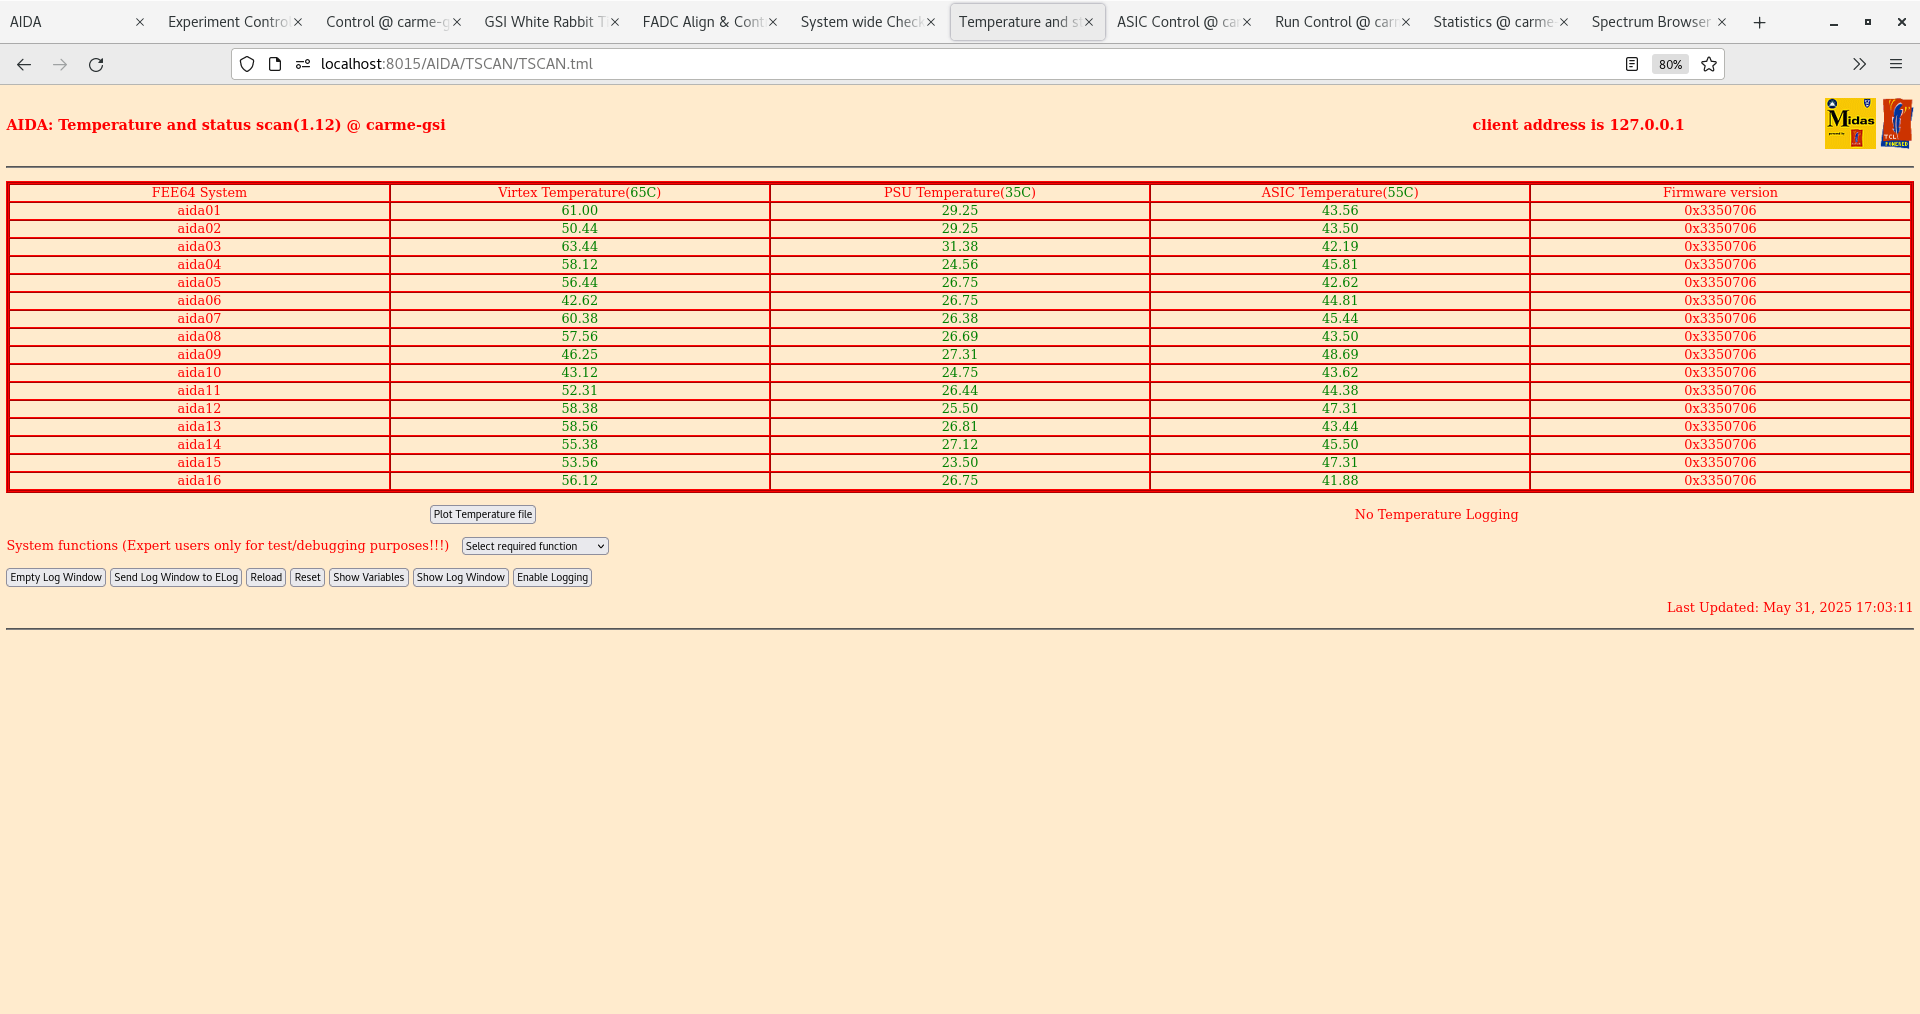
|
| Attachment 16: Screenshot_from_2025-05-31_17-03-38.png
|
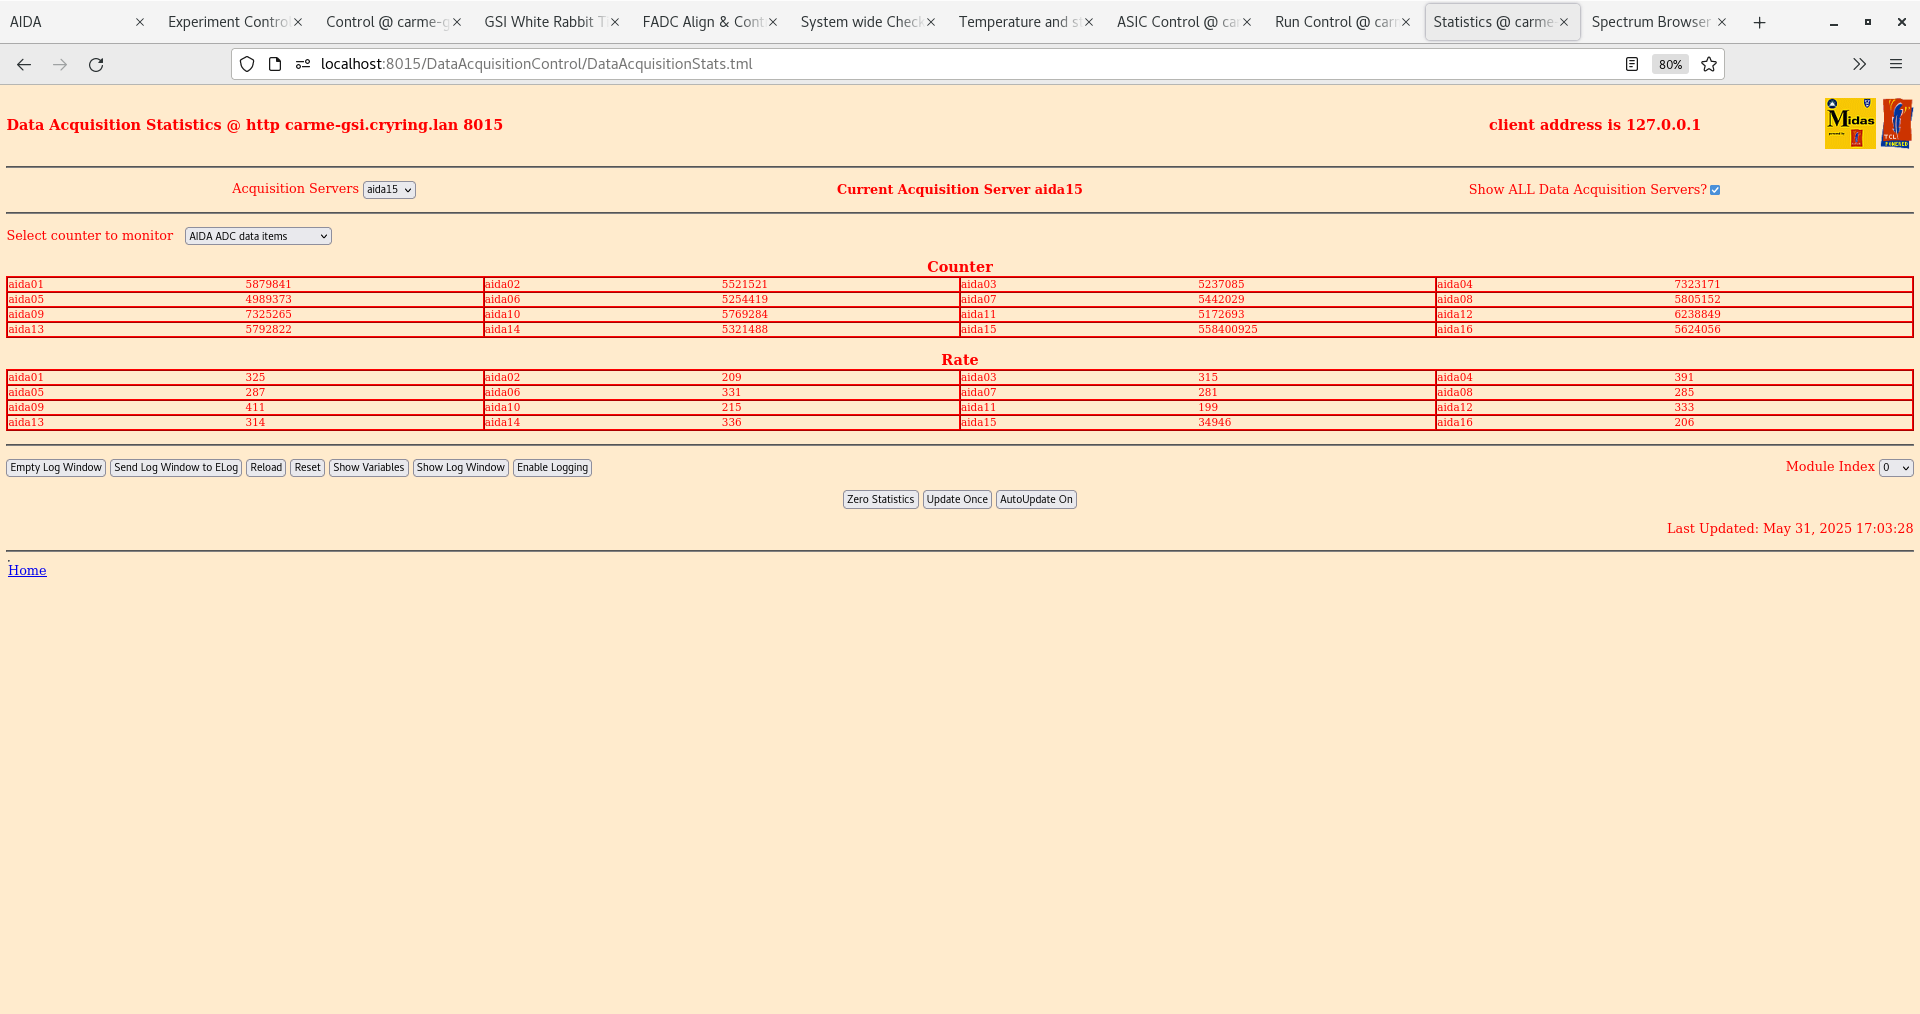
|
| Attachment 17: Screenshot_from_2025-05-31_17-26-42.png
|
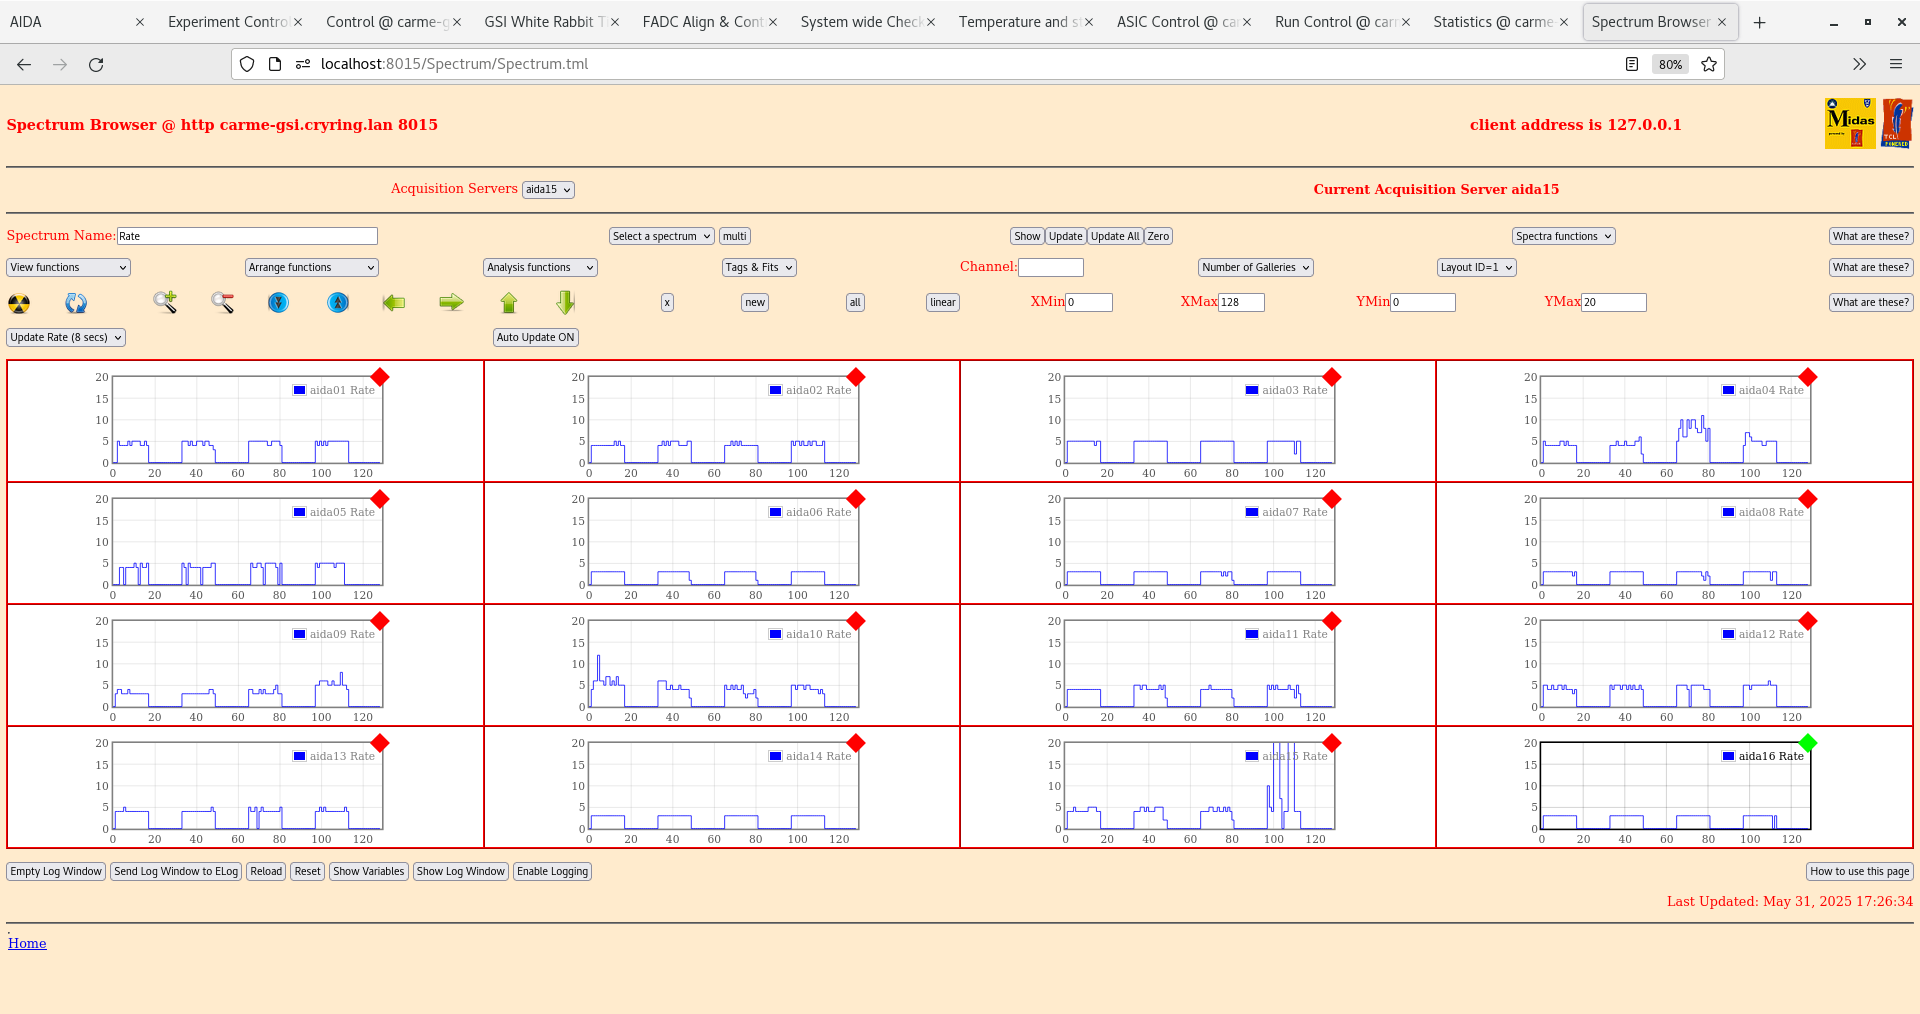
|
| Attachment 18: Screenshot_from_2025-05-31_17-27-39.png
|
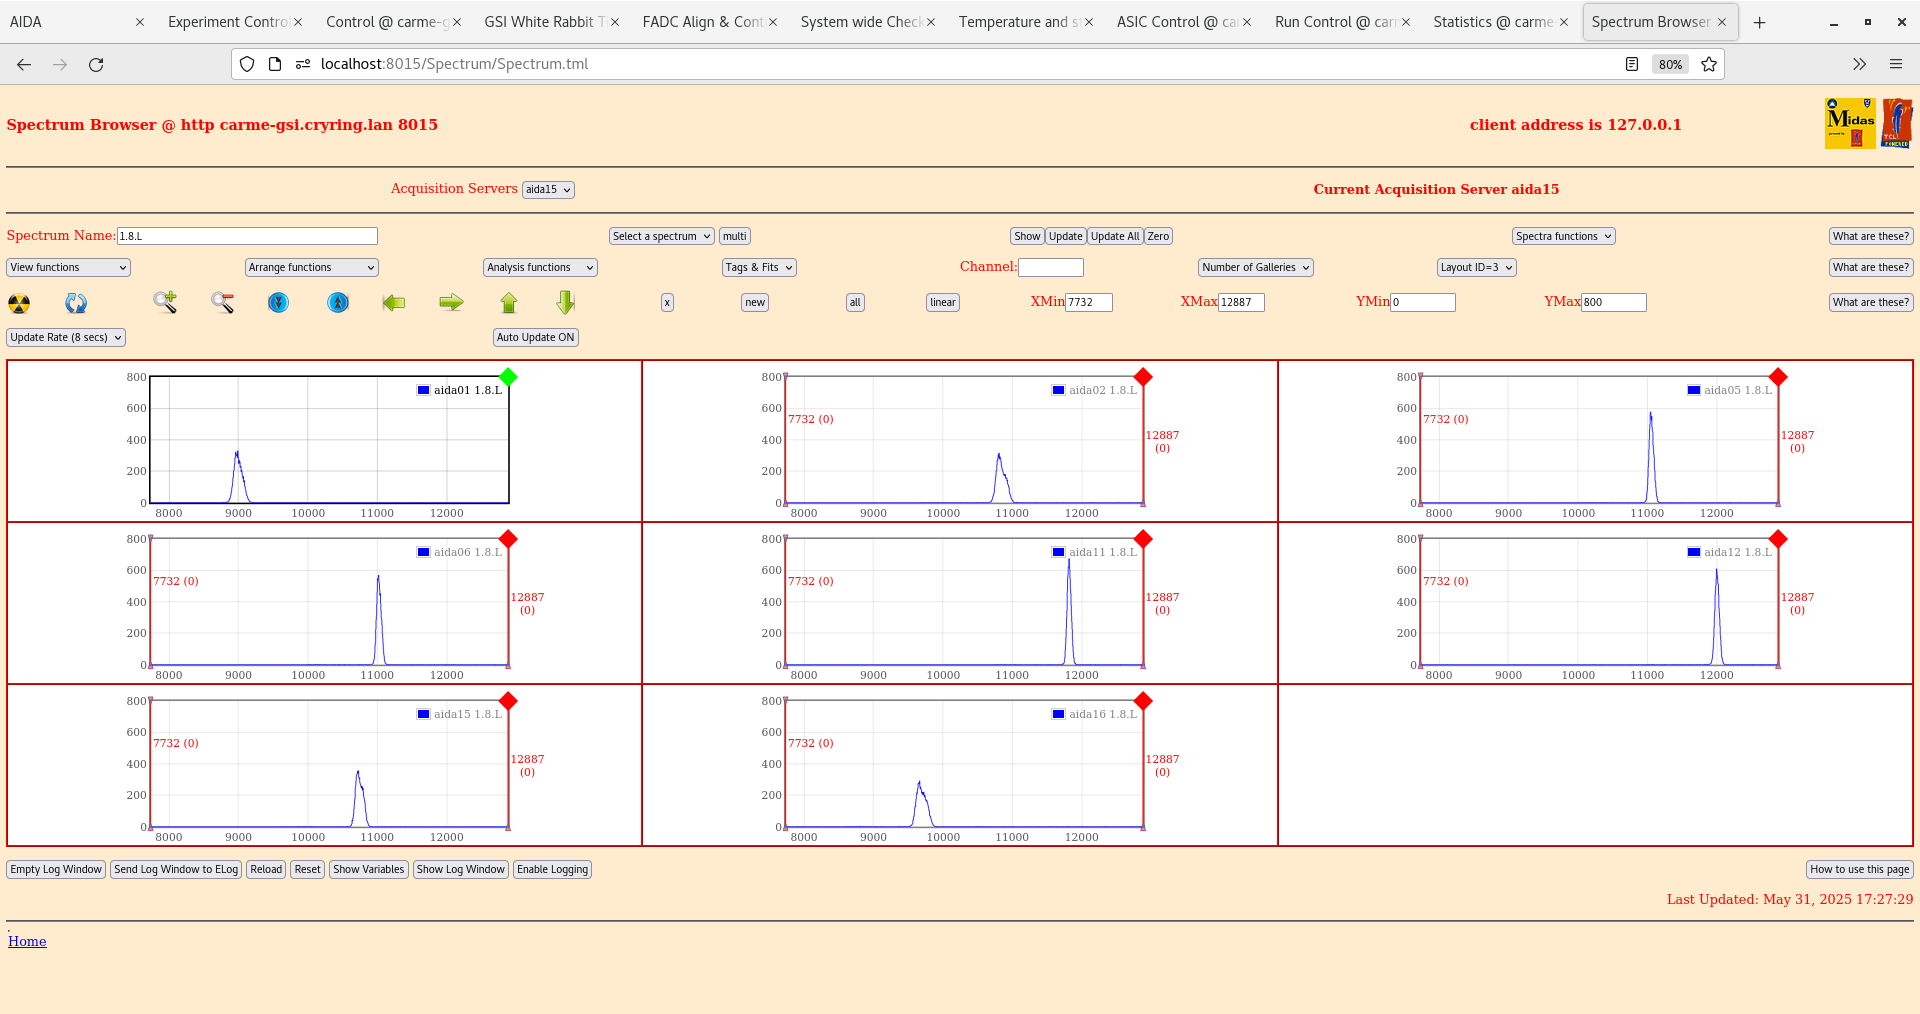
|
| Attachment 19: Screenshot_from_2025-05-31_17-27-39.png
|

|
| Attachment 20: Screenshot_from_2025-05-31_17-36-49.png
|
|
| Attachment 21: Screenshot_from_2025-05-31_17-37-07.png
|
|
|
593
|
Thu Jun 6 05:44:45 2024 |
DR YL DB LB CB JM | Run 38 - 15N Tests |
06:45
All system checks OK
Target density 3.4e11
11:50
System checks OK.
No beam in the ring yet. Althoug some injection may be taking place at low intensities
Target density appears much more stable than before.
Density currently just above 1e11 at/cm2
Note maintanace is required to appc025 so anydesk is currently down.
13:13
Merger OK, Tape server OK
ADC data item statistics looks as before. OK
FEE temperatures look OK
System checks OK
Leakage current stable
Attachments 1-5 (also waveforms)
15:00
Merger OK, Tape server OK
ADC data item statistics DO NOT looks as before. NOT OK
FEE temperatures look OK
System checks OK
Leakage current stable
Attachments 6-8
15:16
Notice the statistics for aida01-aida04 (DDSD 0, top left) were counting extremely high in the previous check (attachment 6). Previous rate was 0-1 counts.
We tried ASIC check load three times but not effect on the rate.
We then tried 'shaking the detectors' by moving the left pneumatic in and out again.
Rates go back to normal levels (0-1 counts)
|
| Attachment 1: Screenshot_from_2024-06-06_13-05-55.png
|

|
| Attachment 2: Screenshot_from_2024-06-06_13-06-24.png
|

|
| Attachment 3: Screenshot_from_2024-06-06_13-07-46.png
|

|
| Attachment 4: Screenshot_from_2024-06-06_13-08-40.png
|

|
| Attachment 5: Screenshot_from_2024-06-06_13-09-03.png
|

|
| Attachment 6: Screenshot_from_2024-06-06_14-59-23.png
|

|
| Attachment 7: Screenshot_from_2024-06-06_14-59-34.png
|

|
| Attachment 8: Screenshot_from_2024-06-06_14-59-49.png
|

|
|
707
|
Sat May 31 09:58:21 2025 |
JM | Run 38 |
10:56
Run 38 started.
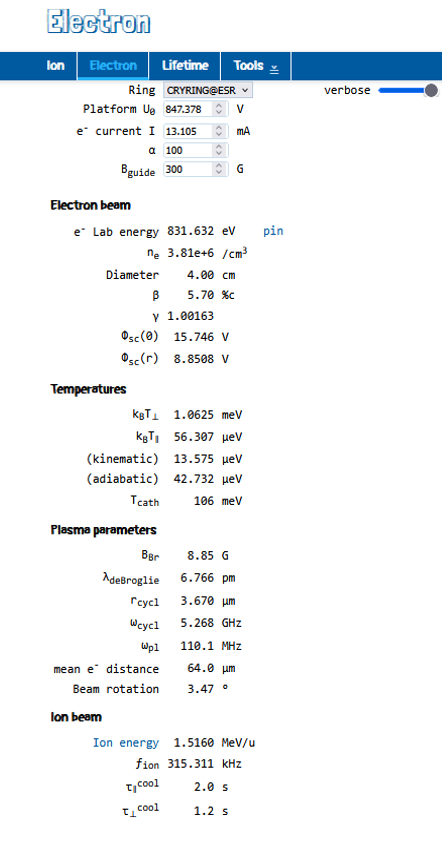
D+ beam deuterium target. D+ beam energy is 1.5 MeV/u. (beam calc calculation is 1.5160 MeV/u)
Beam calc - Attachment 1
Target density is about 8.5e12 at/cm2 after moving nozzle this morning.
All four detectors positioned fully out and stationary.
Left potentiometer = 18.86 mm
Right potentiometer = 19.8 mm
Ring cycle time is 1 minute. Note we see some hydrogen in in the spectrum, this disapears after a few seconds.
Target T1=30K, T2=31.9K.
Nozzle position x=-2.89, z=1.72 mm
YR09-Etarget pressure = 2.37e-10 mbar.
Cooler set value = 846V, 15 mA. Read value = 847.378V, 13.105mA
Detector 4 looks OK at the moment.
Beam position. Vertical =0.0mm , Horizontal=2.5mm
11:05
All checks OK
Data rate is ~300 kB/sec.
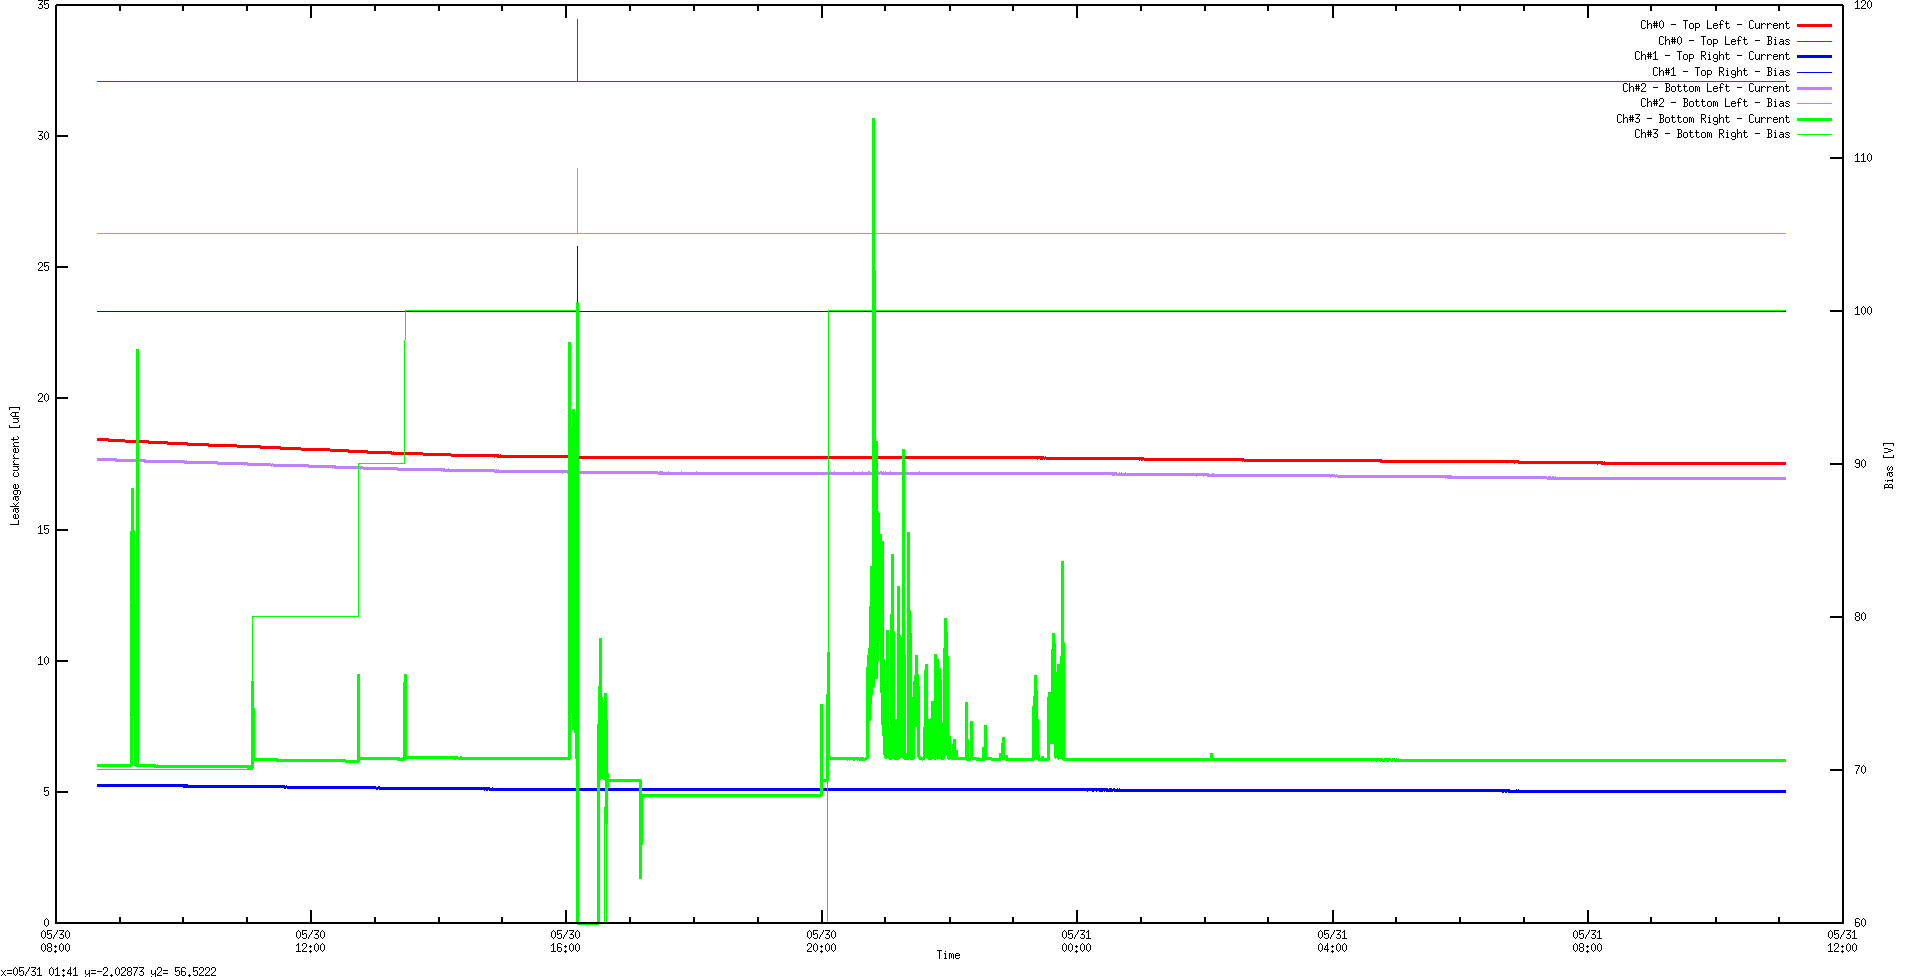
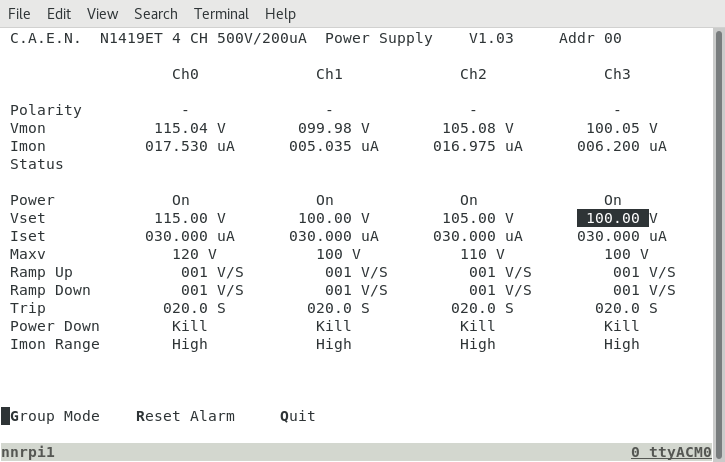
Leakage currents - attachments 2,3
17:56
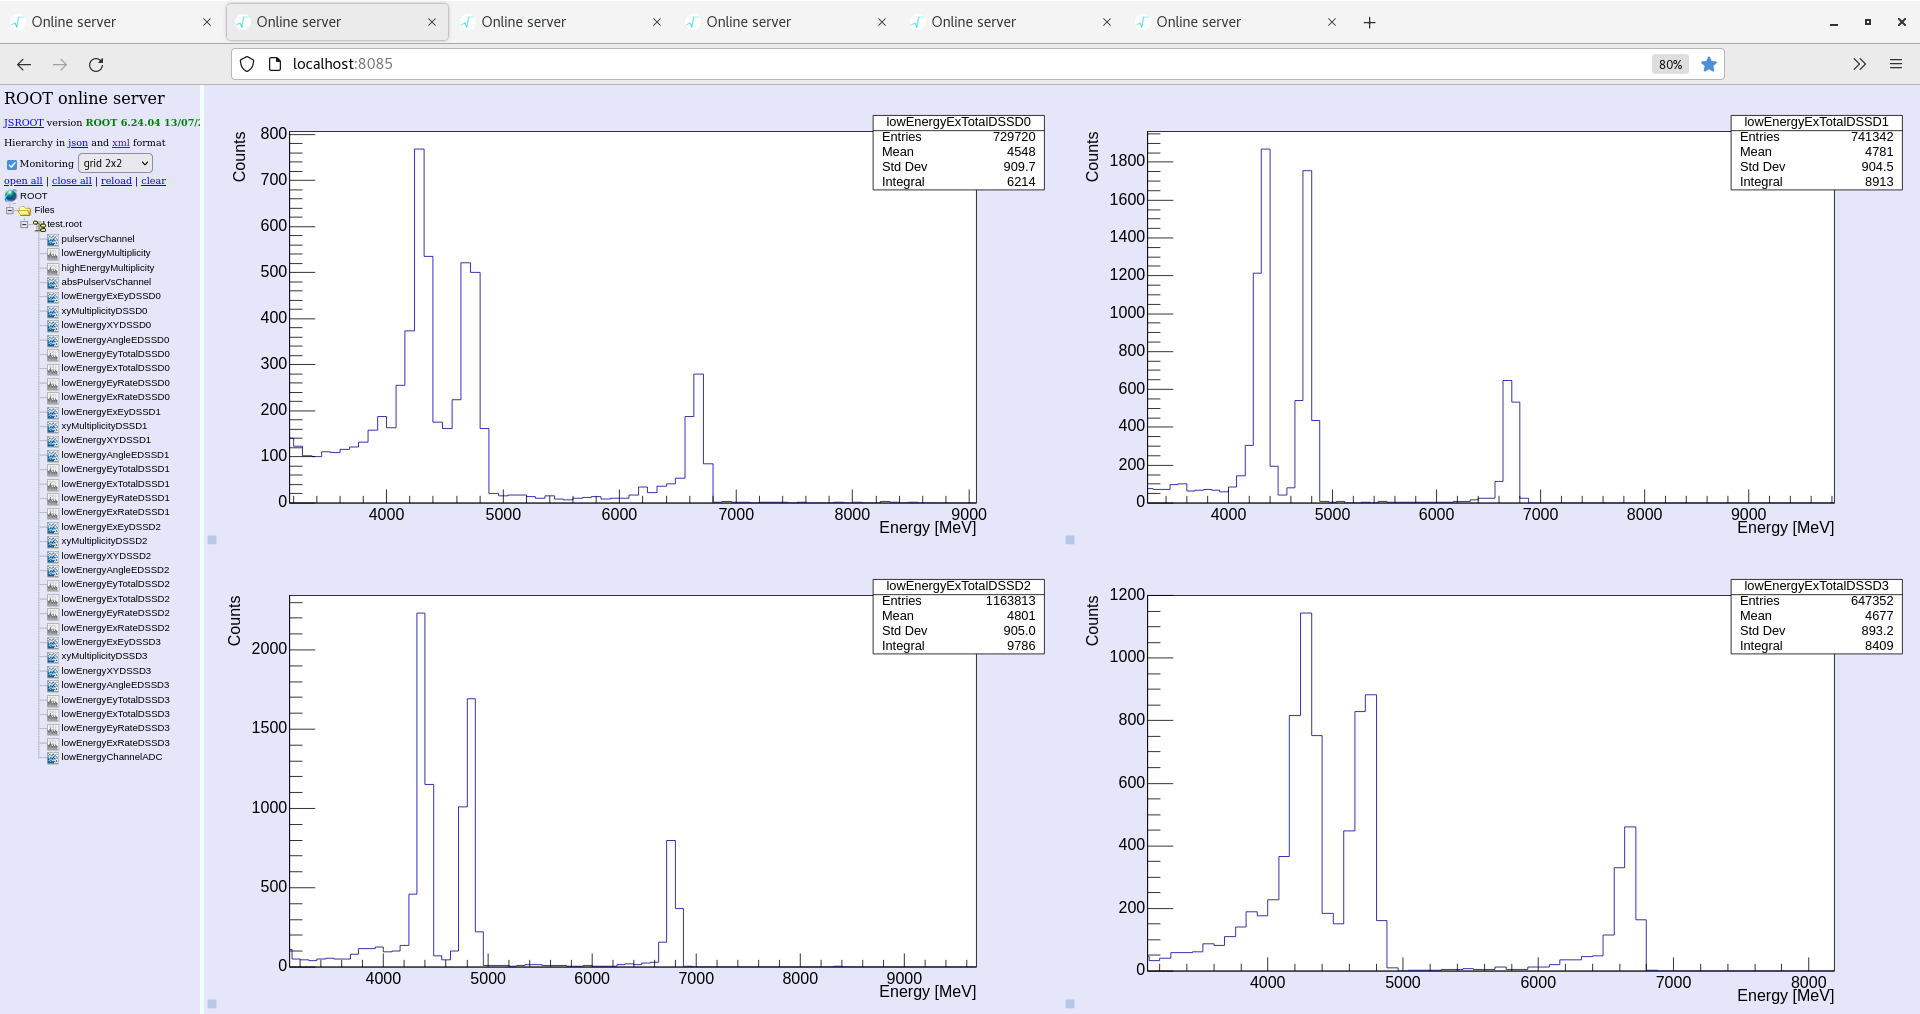
Rates have dropped significantly. Do not see elastics peak. No beam?
18:23
Check in with HKR. The thunder and lightning storm appears to have knocked out the beam from 17:30 until 18:10.
Beam is now back with an intensity of 2e8 pps.
I have also adjusted the nozzle of the gas target slightly and recovered target pressure of 1e13 from 3e11 at/cm2. This has been stable for the last 15 minutes. I think during shifts we will require some nozzle modifications. It is not vital at higher energies but for energies during the week, we will need.
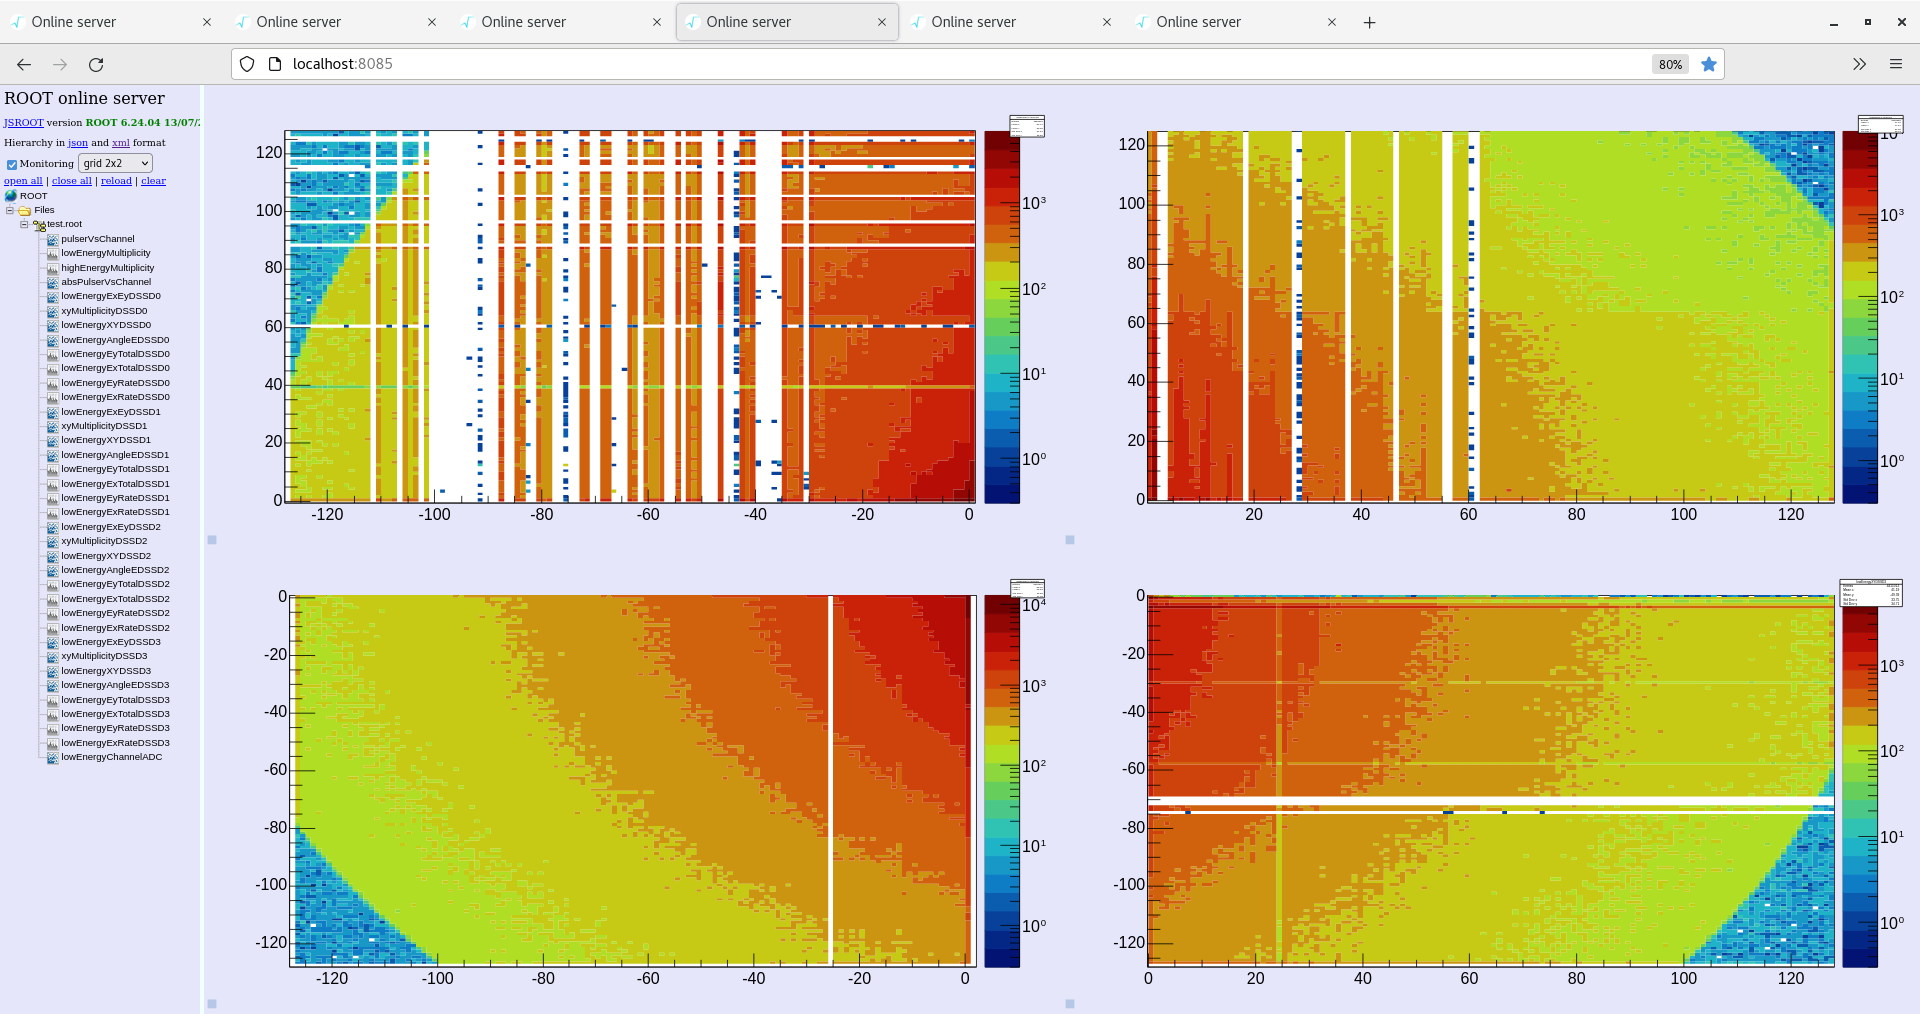
We again see the very nice elastic scattering pattern on our detector. I am concerned we may be some shadowing on our detector giving rise to the observed circle? Attachment 5
20:30
Checks all OK
Target density in last 30 mins ~1e13 at/cm2
DSSD4 still looking good and stable
23:00
All checks OK.
Detectors all stable
Target density still in 1e13 range.
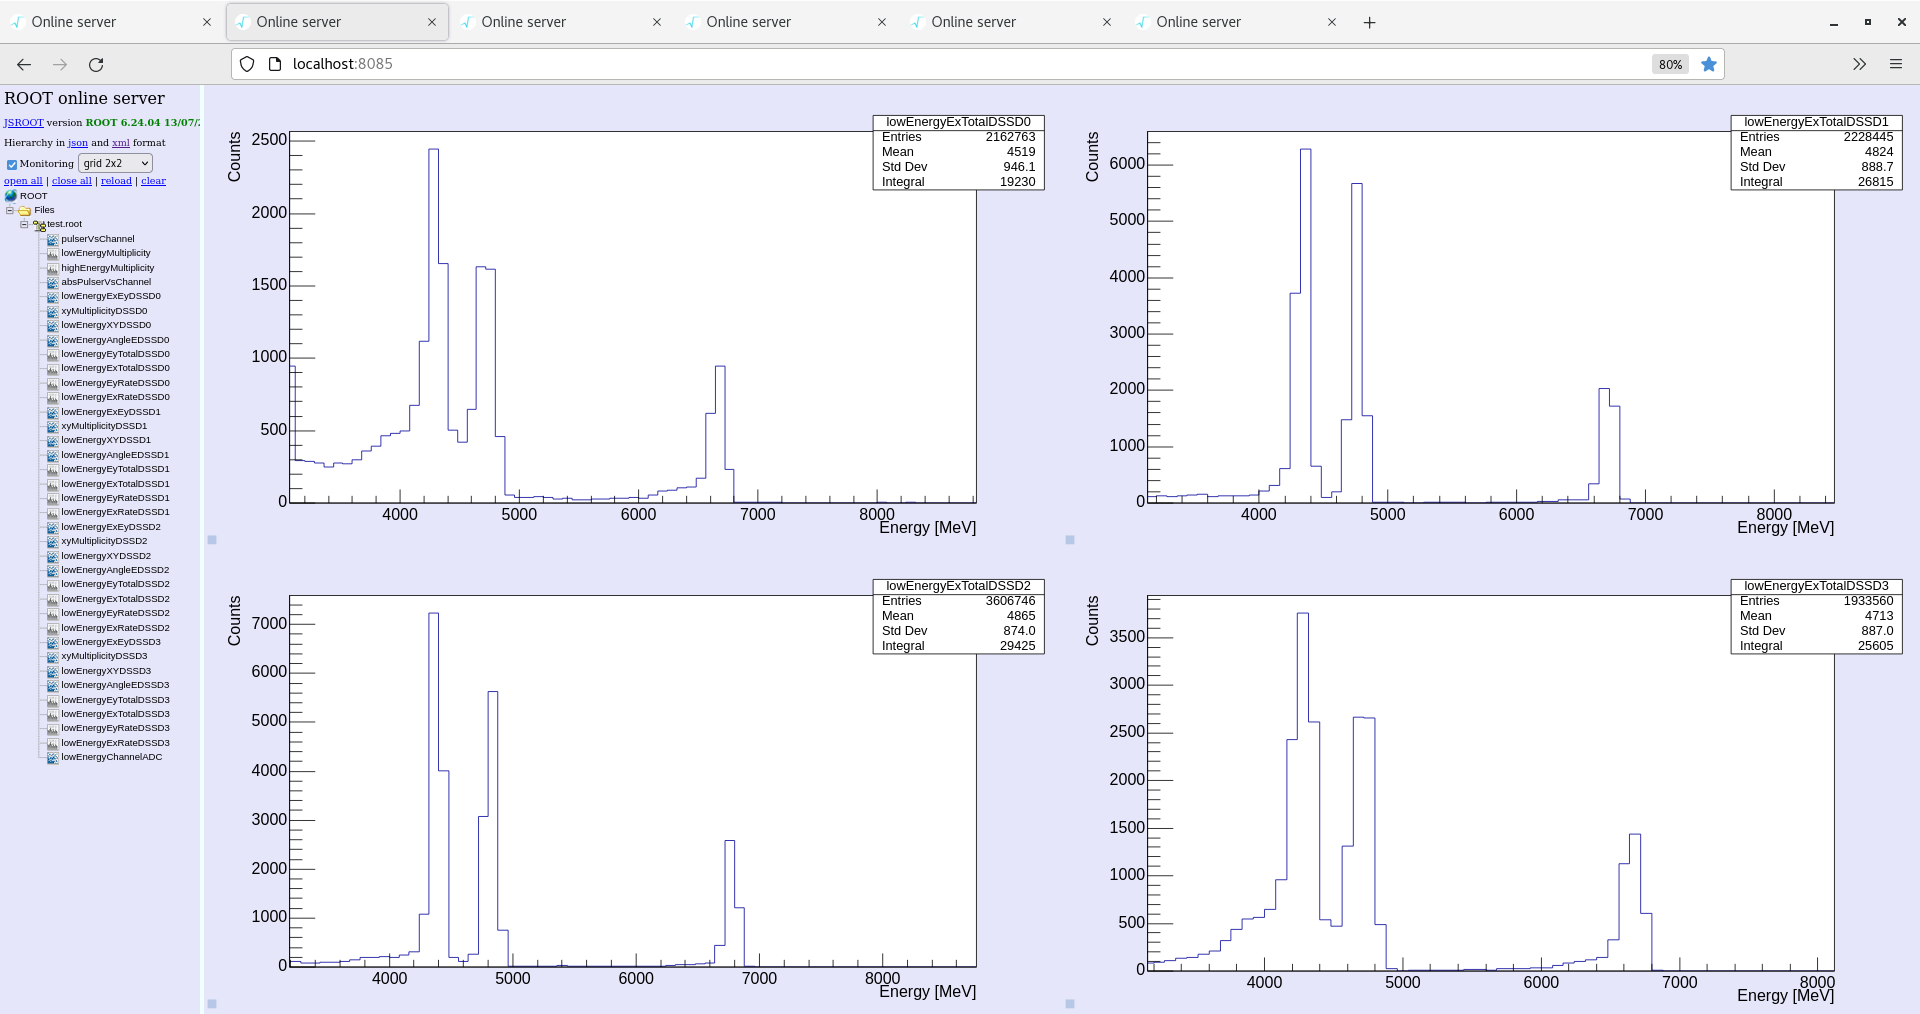
We have accumulated lots of stats! This run should provide an excellent run for energy calibration using elastics and reaction peaks.
We run overnight and change energy in the morning
01:00
All checks OK
Detectors stable
Target density stable 1e13.
05:00
All good still
07:05
Run stopped to change energy. Gas target off.
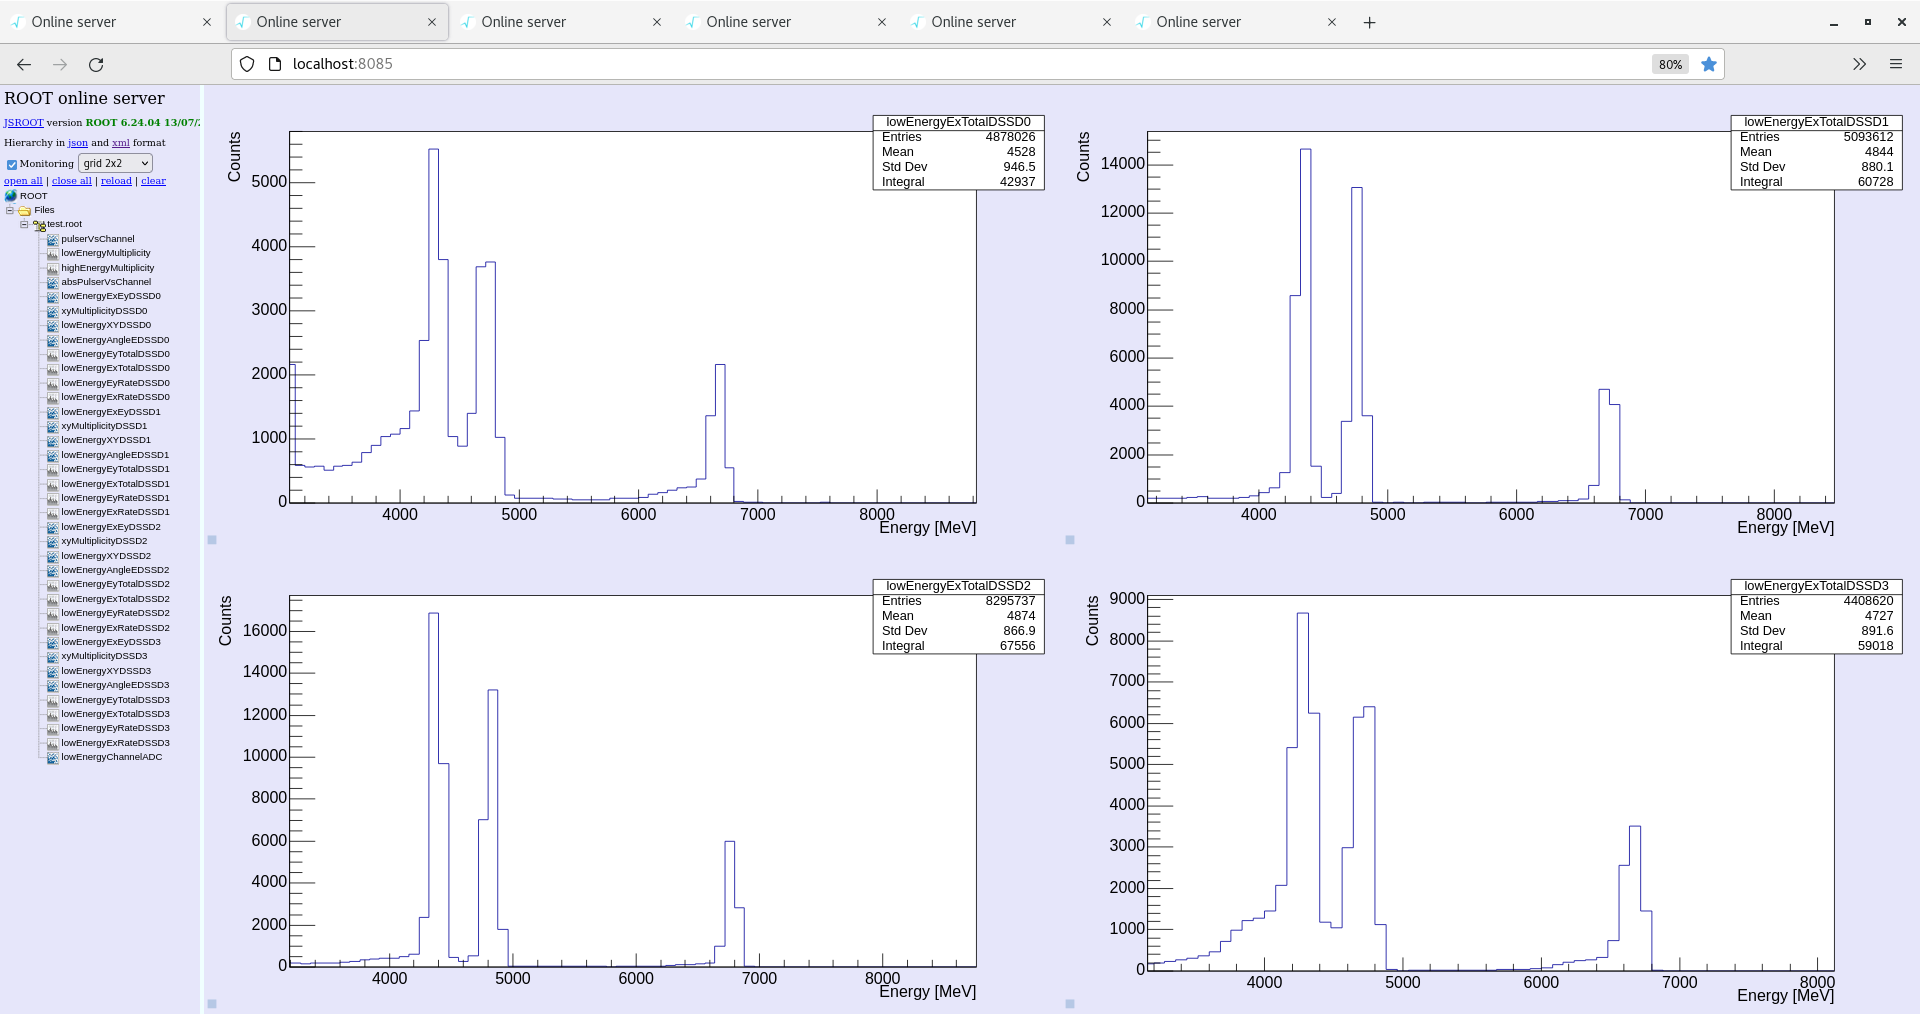
final statistics plot attached.
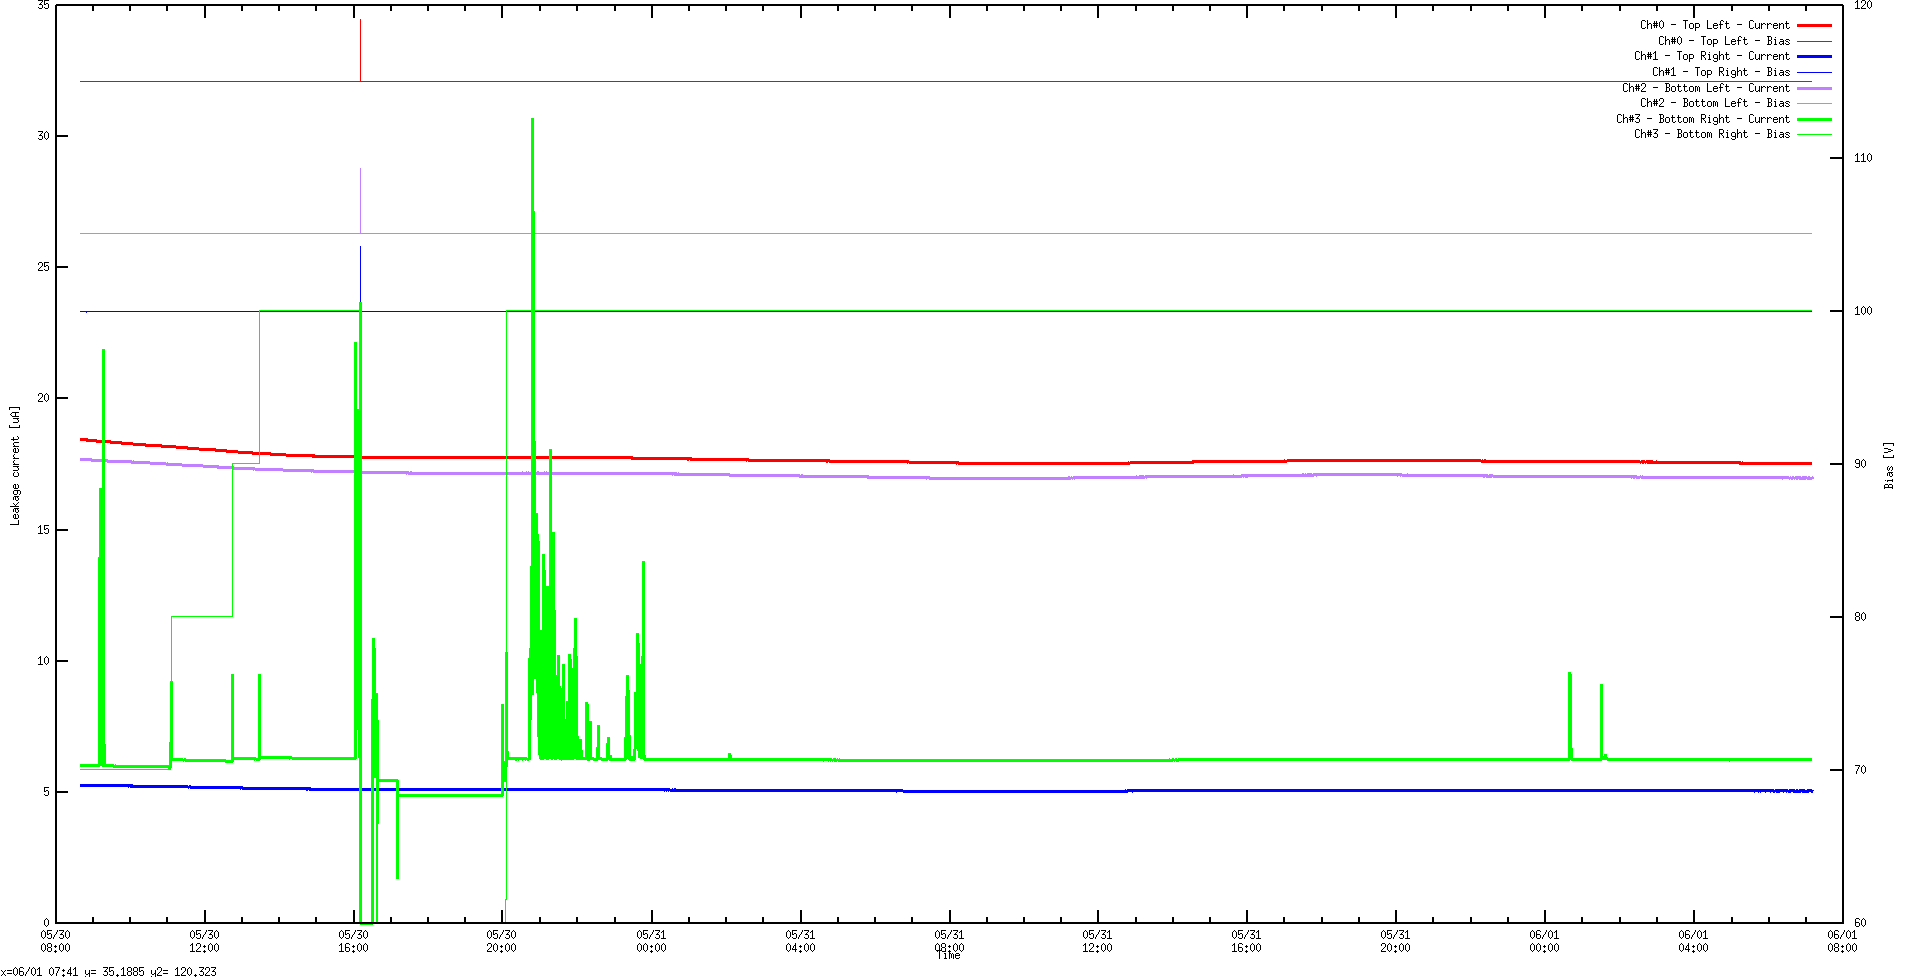
Leakage currents overnight also. DSSD4 had two transients during the night but recovered. |
| Attachment 1: beamCalc-D2.png
|
|
| Attachment 2: Screenshot_from_2025-05-31_11-07-00.png
|
|
| Attachment 3: Screenshot_from_2025-05-31_11-06-50.png
|
|
| Attachment 4: Screenshot_from_2025-05-31_17-55-33_1.png
|
|
| Attachment 5: Screenshot_from_2025-05-31_18-26-29.png
|

|
| Attachment 6: Screenshot_from_2025-05-31_23-04-18.png
|
|
| Attachment 7: Screenshot_from_2025-06-01_07-10-13.png
|

|
| Attachment 8: Screenshot_from_2025-06-01_07-10-21.png
|
|
| Attachment 9: Screenshot_from_2025-06-01_07-10-30.png
|
|
| Attachment 10: Screenshot_from_2025-06-01_07-30-28.png
|
|
|
592
|
Wed Jun 5 13:34:02 2024 |
JM | Run 37 - Change in thresholds |
14:20
Target nozzle currently being replaced. No beam
We have decided to switch to 15N beam from now on.
Beam energy for 15N is significantly higher than deuteron beam so we have increased the thresholds (slow comparator) slightly for all detectors to 500 keV (0x32).
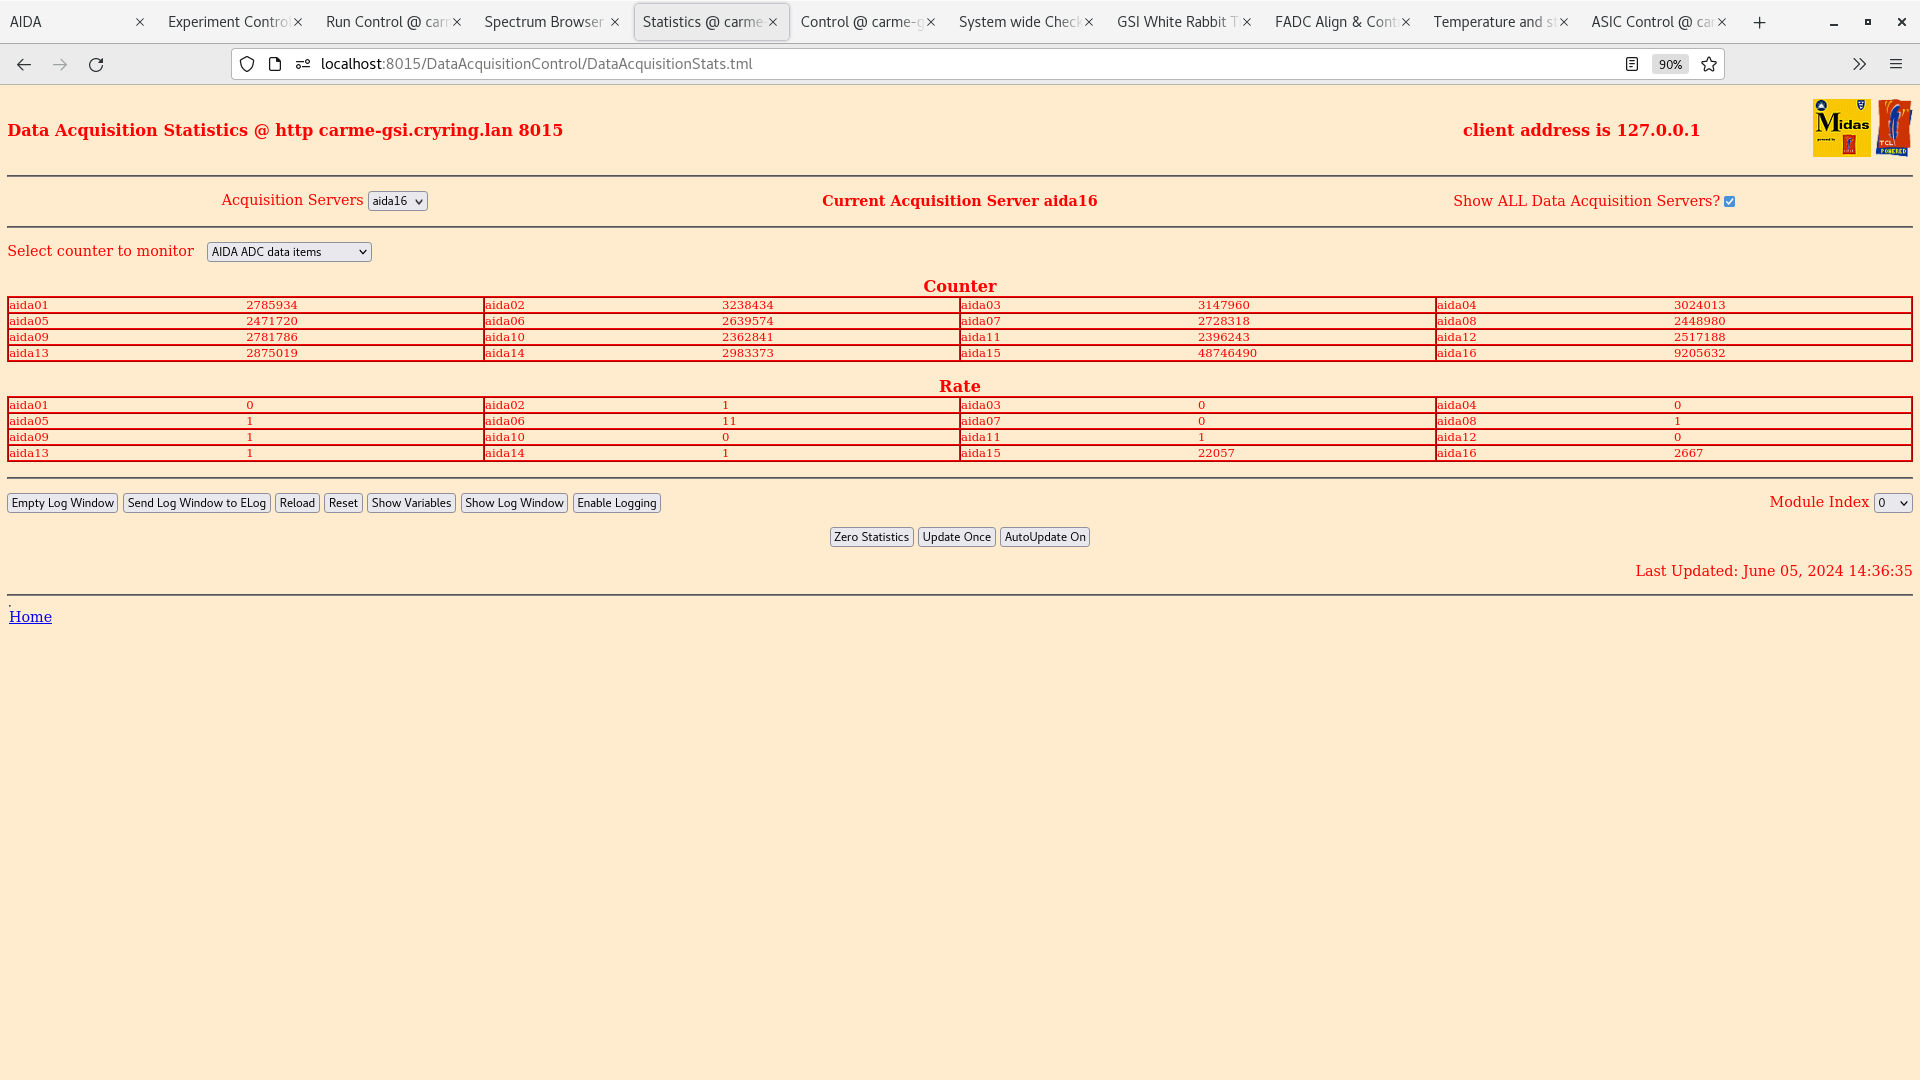
ADC data item rates - attachment 1
Run 37 started. Alpha background
Data rate ~ 200 kb/sec
17:44
All system checks OK
20:00
All system checks OK
23:30
All system checks OK
01:25
All system checks OK
03:25
All system checks OK.
Target is stable at 3.5e11, with T1=29 K
05:30
All system checks OK
Target density has slowly drifted down, and is now 1.2e11 |
| Attachment 1: Screenshot_from_2024-06-05_14-36-44.png
|
|
|
706
|
Fri May 30 21:49:08 2025 |
JM, NP, CB | Run 37 |
22:49
Run 37 started.
D+ beam deuterium target. D+ beam energy is 2 MeV/u. (beam calc calculation is 1.9211 MeV/u)
Target density is about 1.3e12 at/cm2. FLuctuations between 1e12 and 1e13 at/cm2.
All four detectors positioned fully out and stationary.
Left potentiometer = 18.86 mm
Right potentiometer = 19.8 mm
Ring cycle time is 1 minute. Note we see some hydrogen in in the spectrum, this disapears after a few seconds.
Target T1=30K, T2=31.9K.
Nozzle position x=-3.11, z=1.77 mm
YR09-Etarget pressure = 1.04e-10 mbar.
Cooler set value = 1126V, 15 mA. Read value = 1068V, 13.22 mA
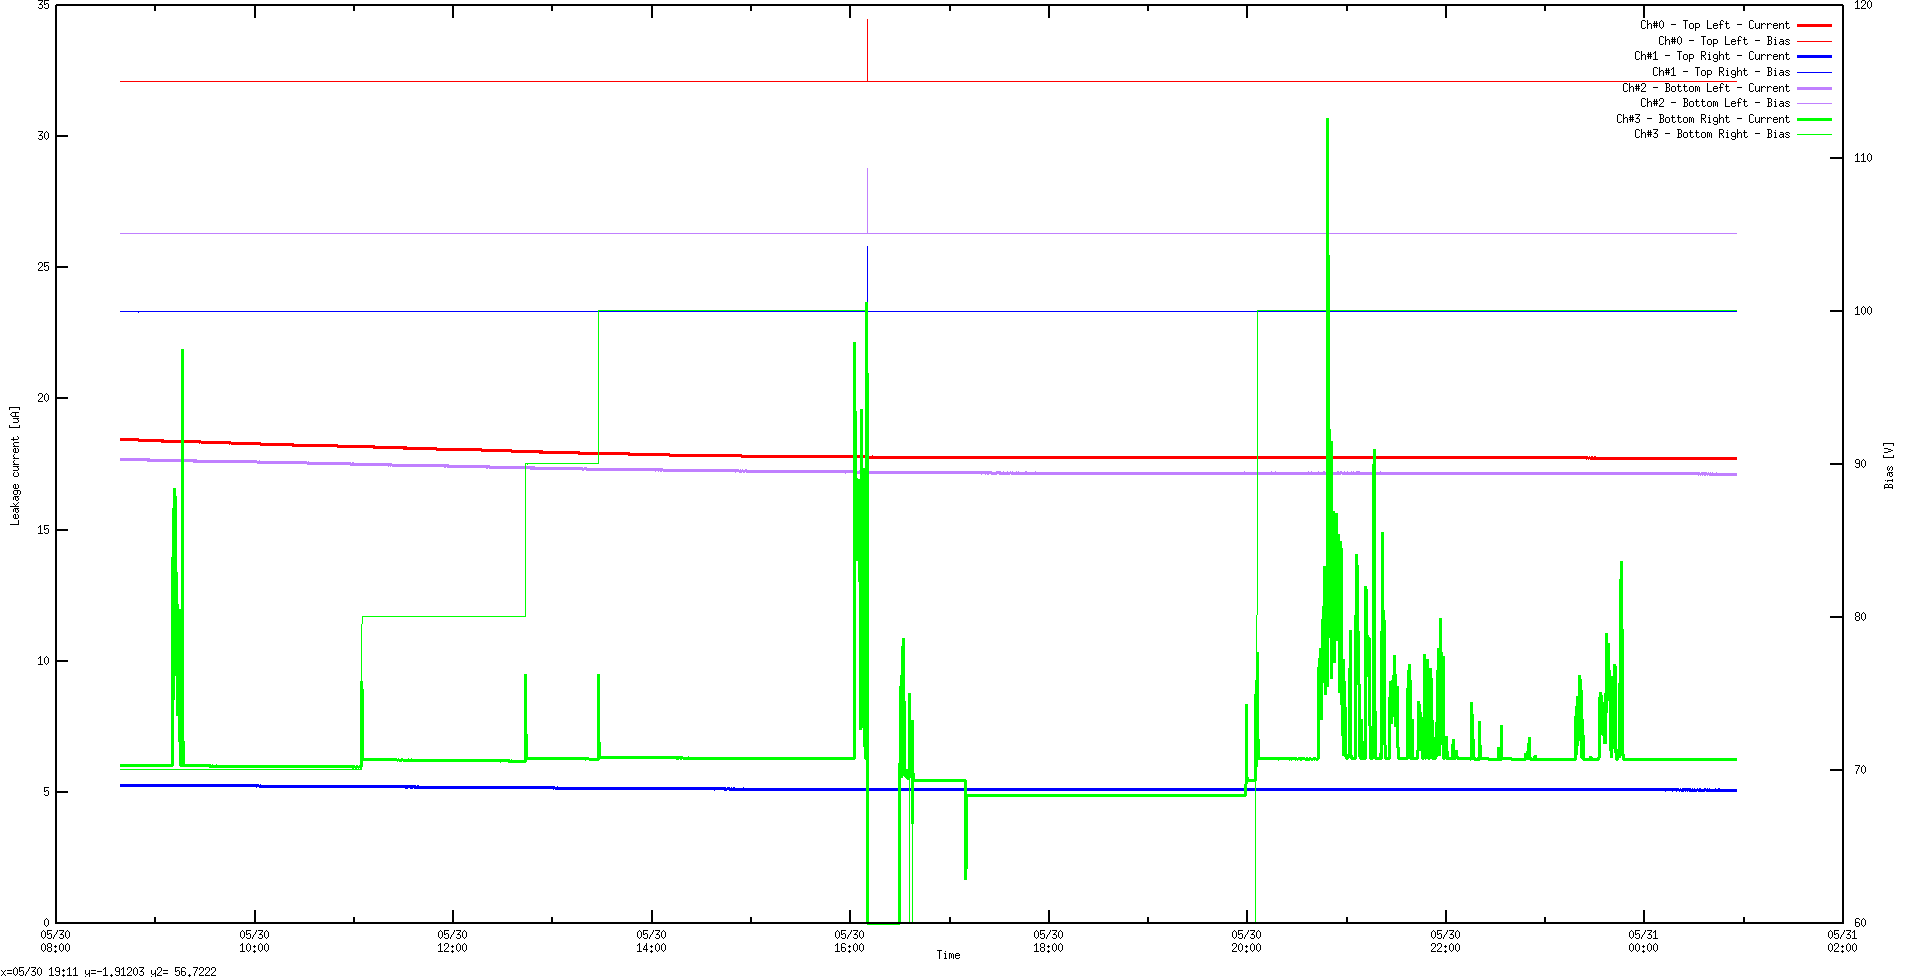
Detector 4 is still a bit unstable in its leakage current but the data coming through looks good. Some crap is periodically written to disk when leakage current spikes. Attachment 1,2 for leakage currents.
23:30
Checks OK - high but managable rates from DSSD4
01:00
Checks OK - DSSD4 has settled down. Leakage current attachment 1
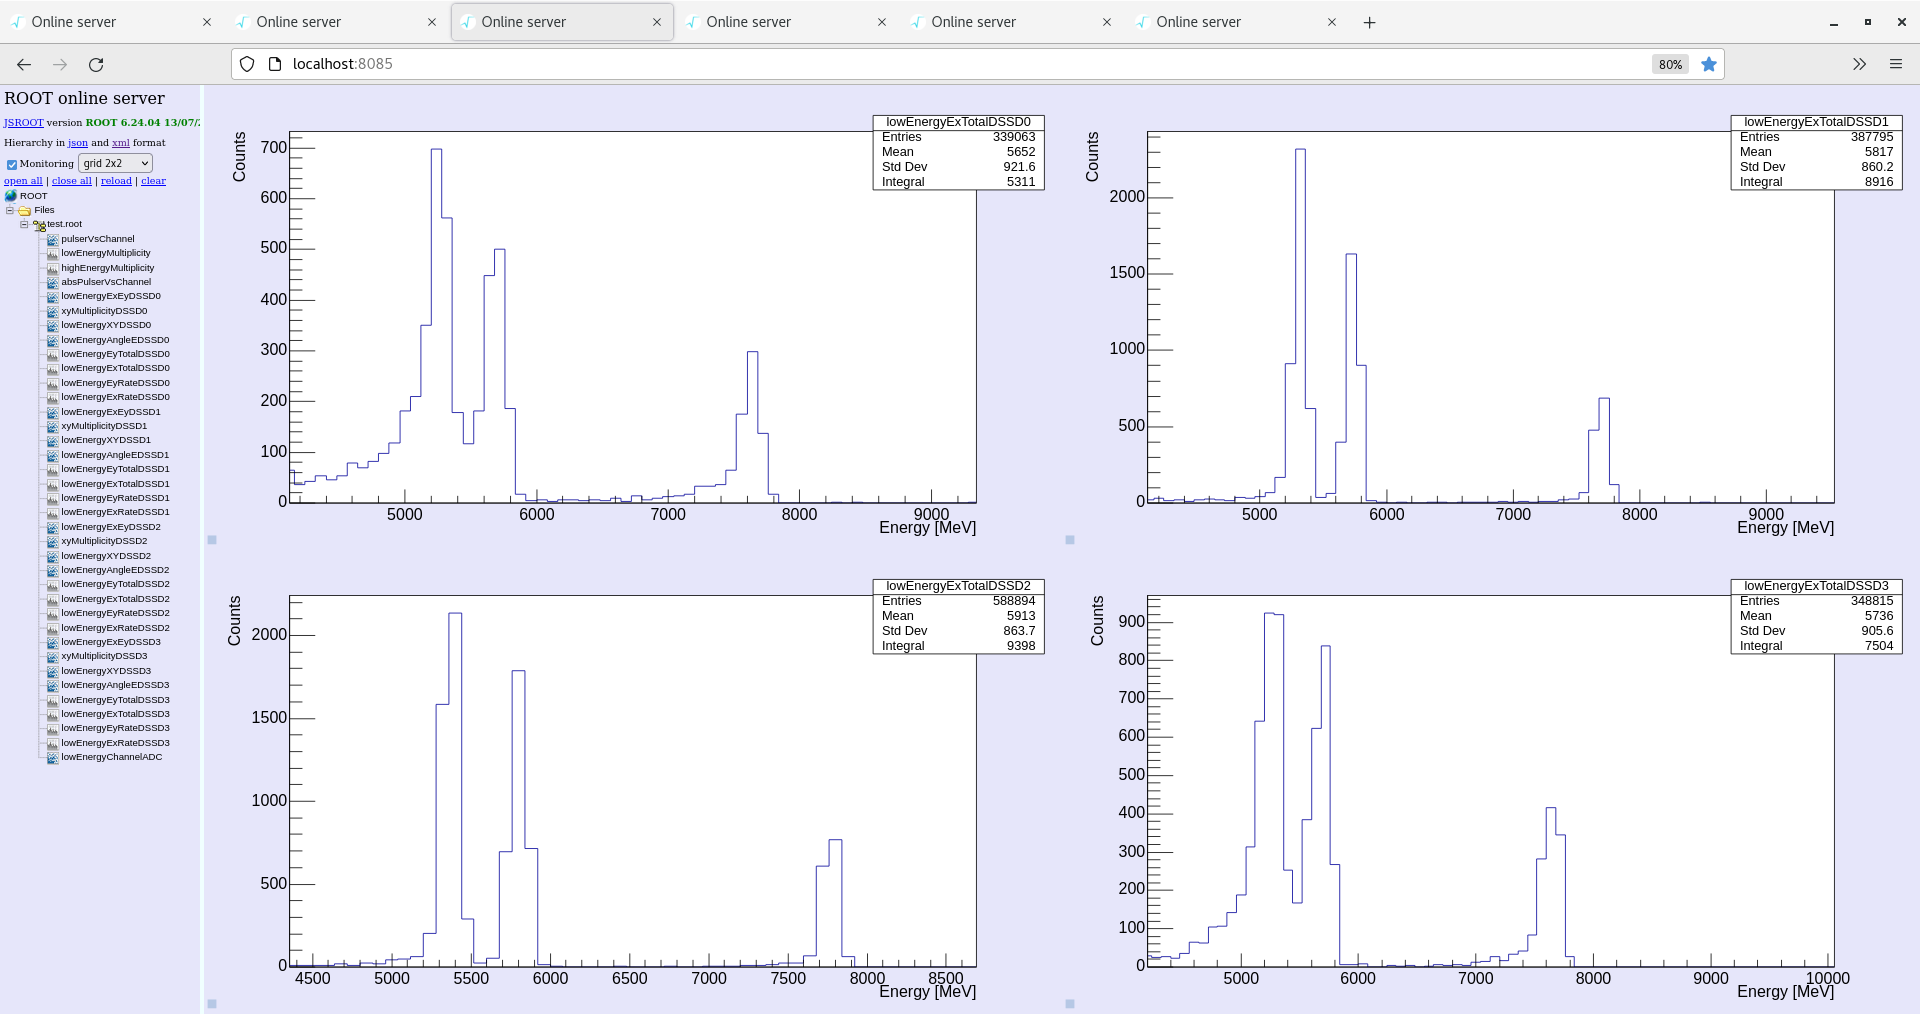
Ex energy histograms - attachment 2
X2go check on gas target shows density has dropped to 5e11 at/cm2 in last half an hour.
03:56
Checks OK
DSSD had more issues but once more settled
Temps OK
Rates OK
DAQ continuing
06:00
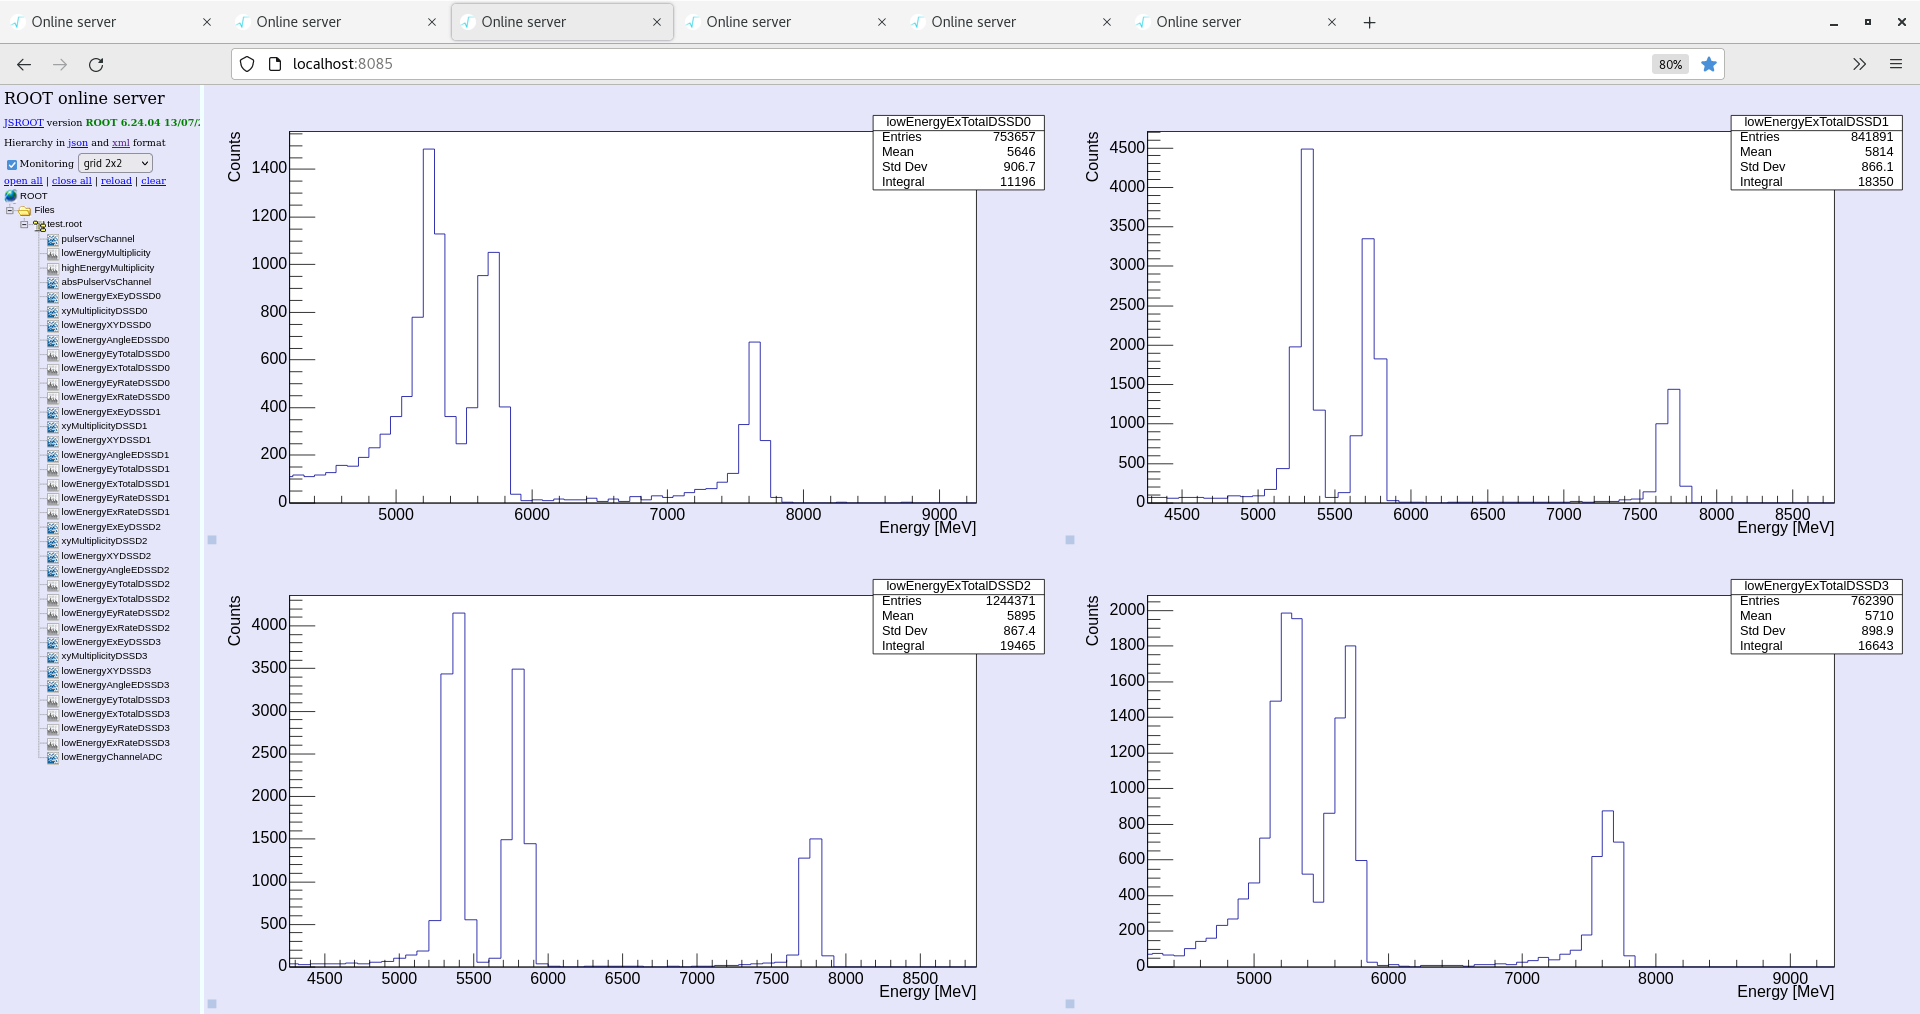
Checks OK
08:00
We can now change to 1.5 MeV/u no storage mode enabled. |
| Attachment 1: Screenshot_from_2025-05-31_00-56-32.png
|
|
| Attachment 2: Screenshot_from_2025-05-31_00-58-40.png
|
|
| Attachment 3: Screenshot_from_2025-05-31_06-16-50.png
|
|
|
591
|
Wed Jun 5 13:21:45 2024 |
JM, CB | Run 36 - pulser walkthrough |
14:00
Access to the cave as Nikos and Andreas have begun work on the target.
Run 36 started - pulser walkthrough.
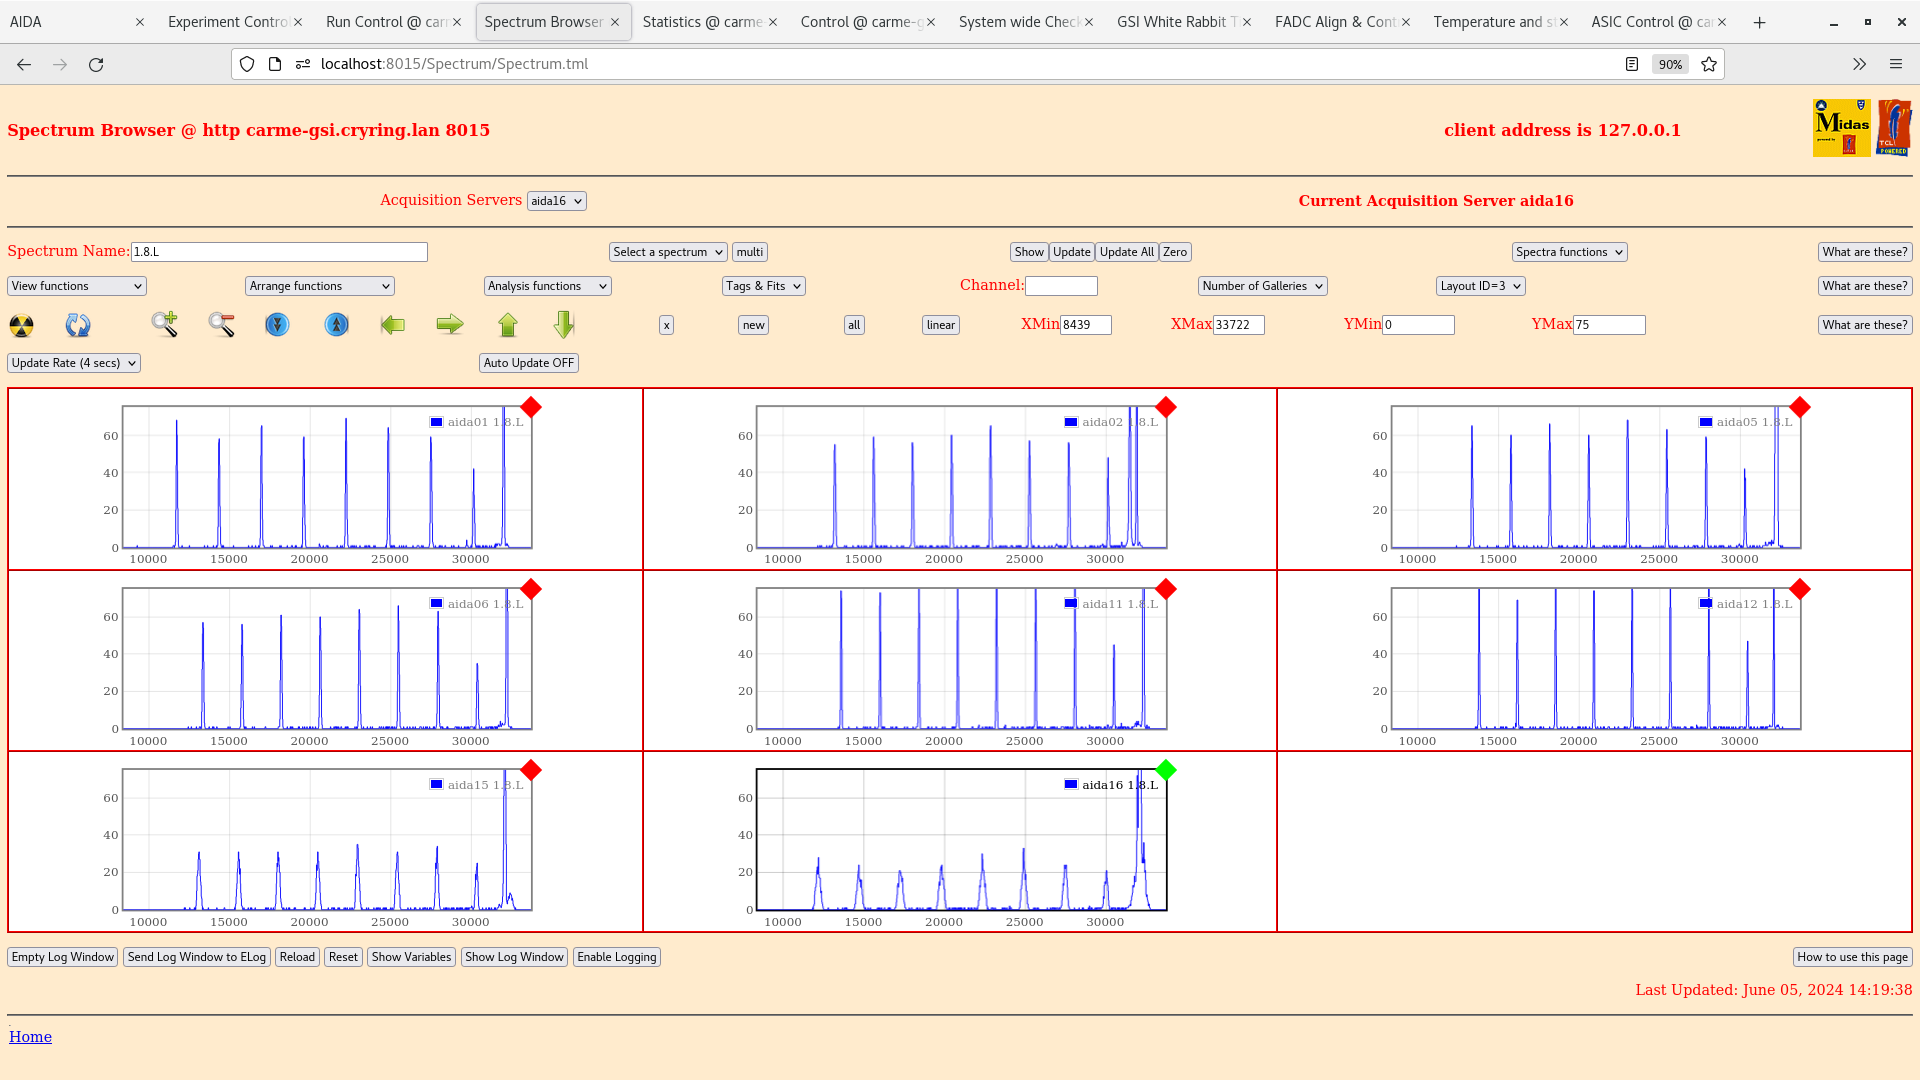
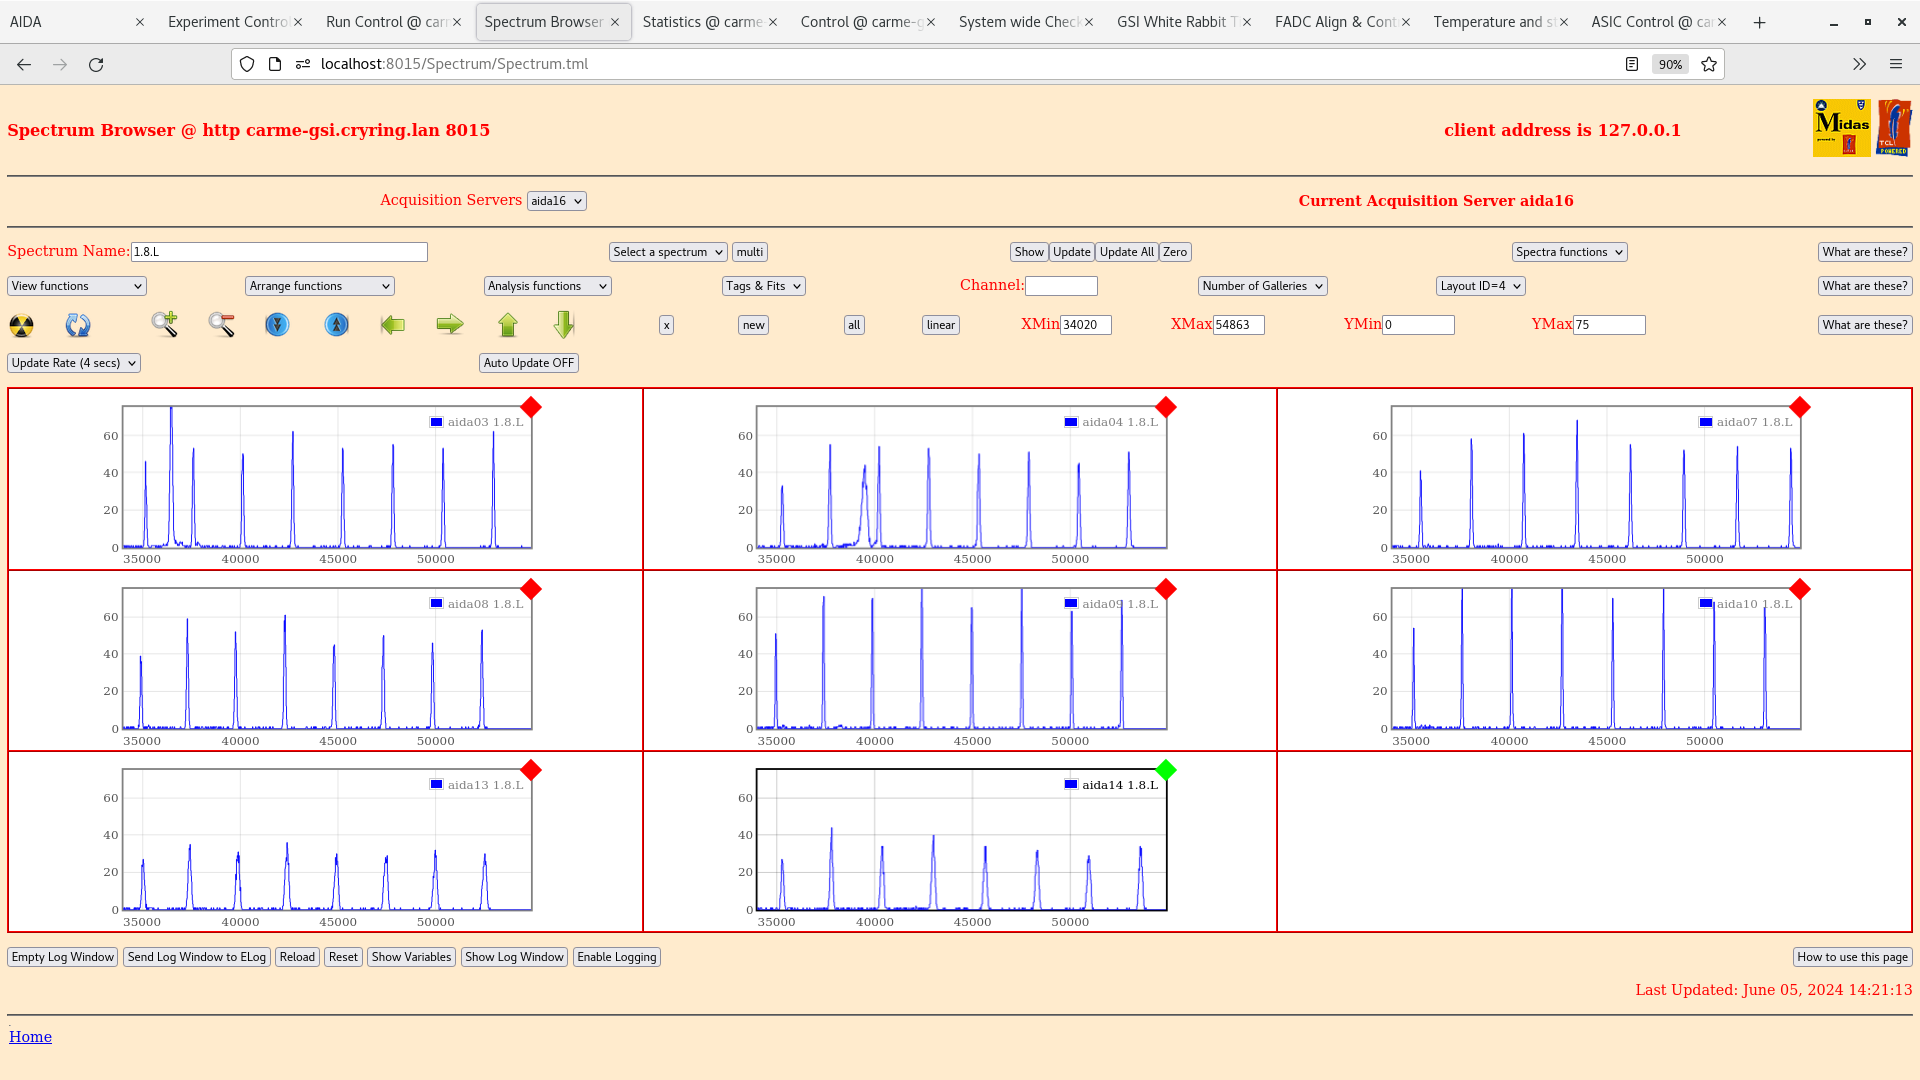
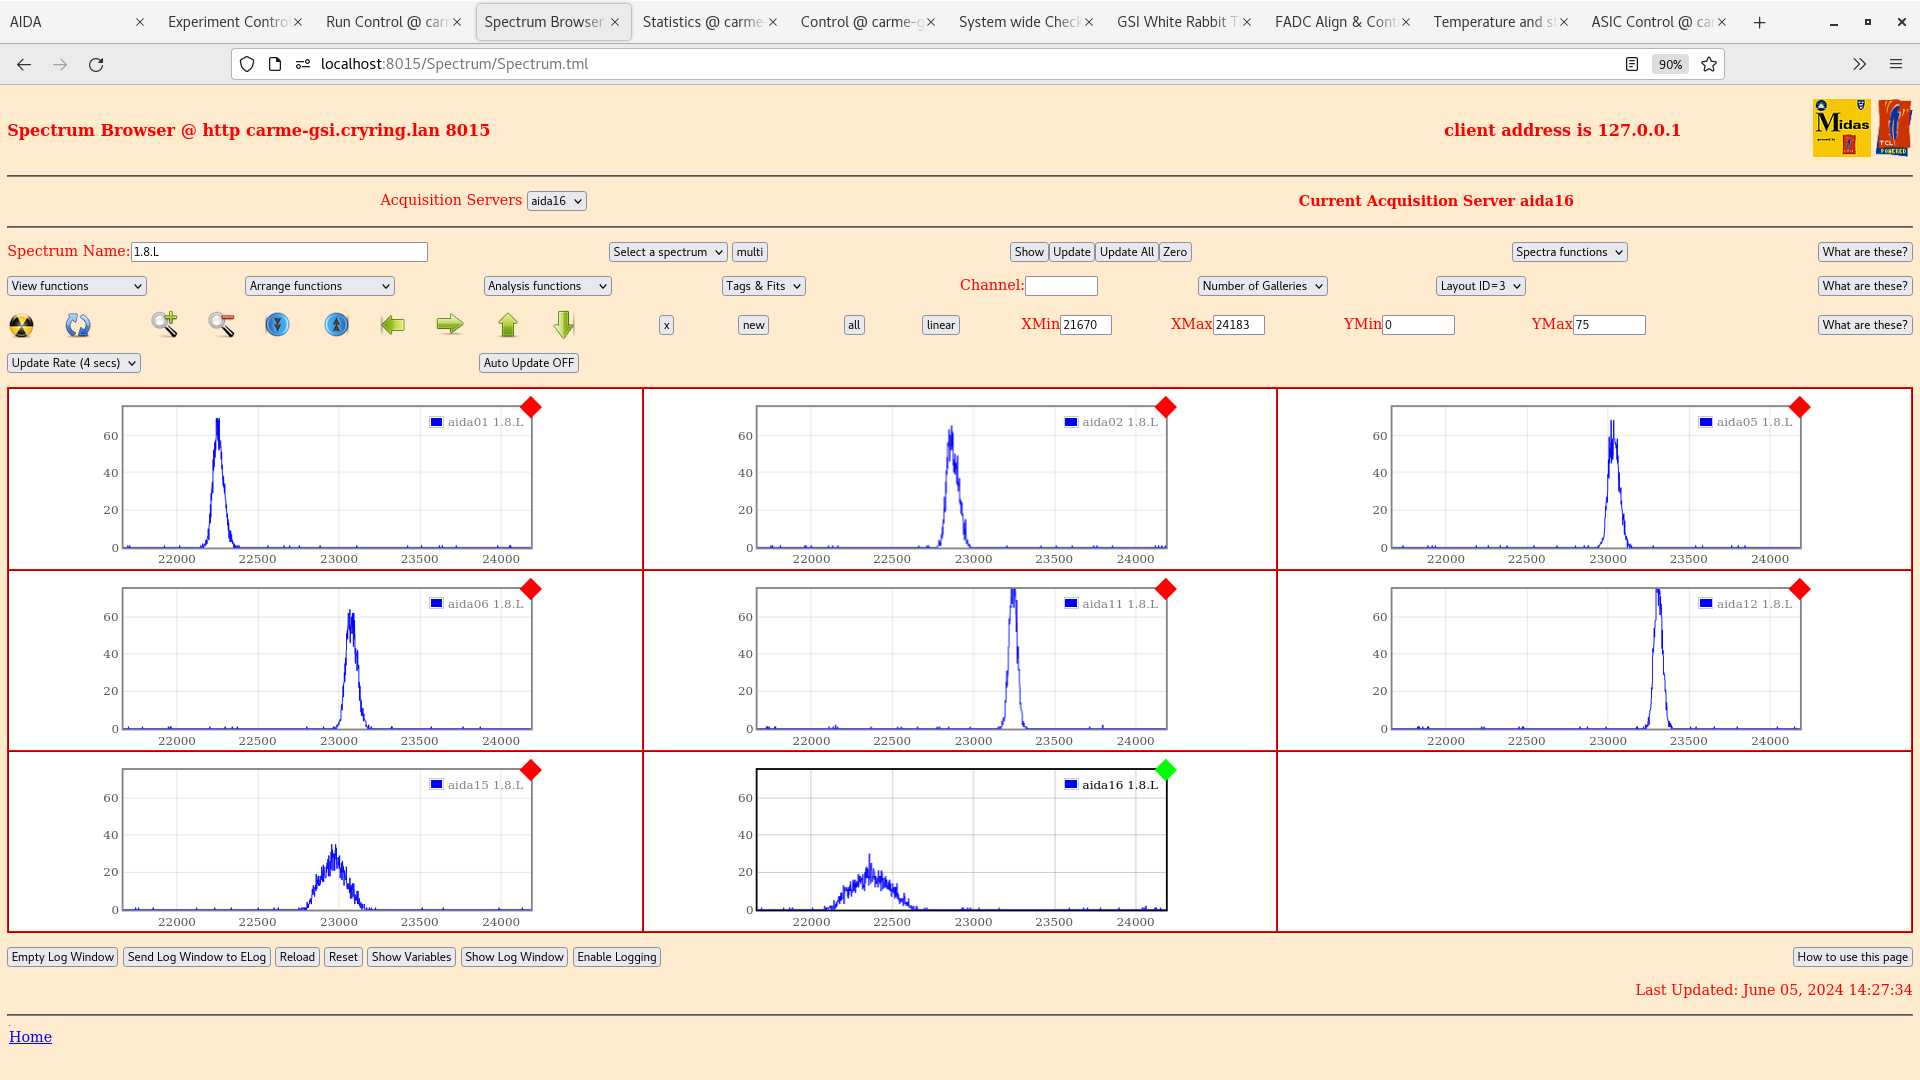
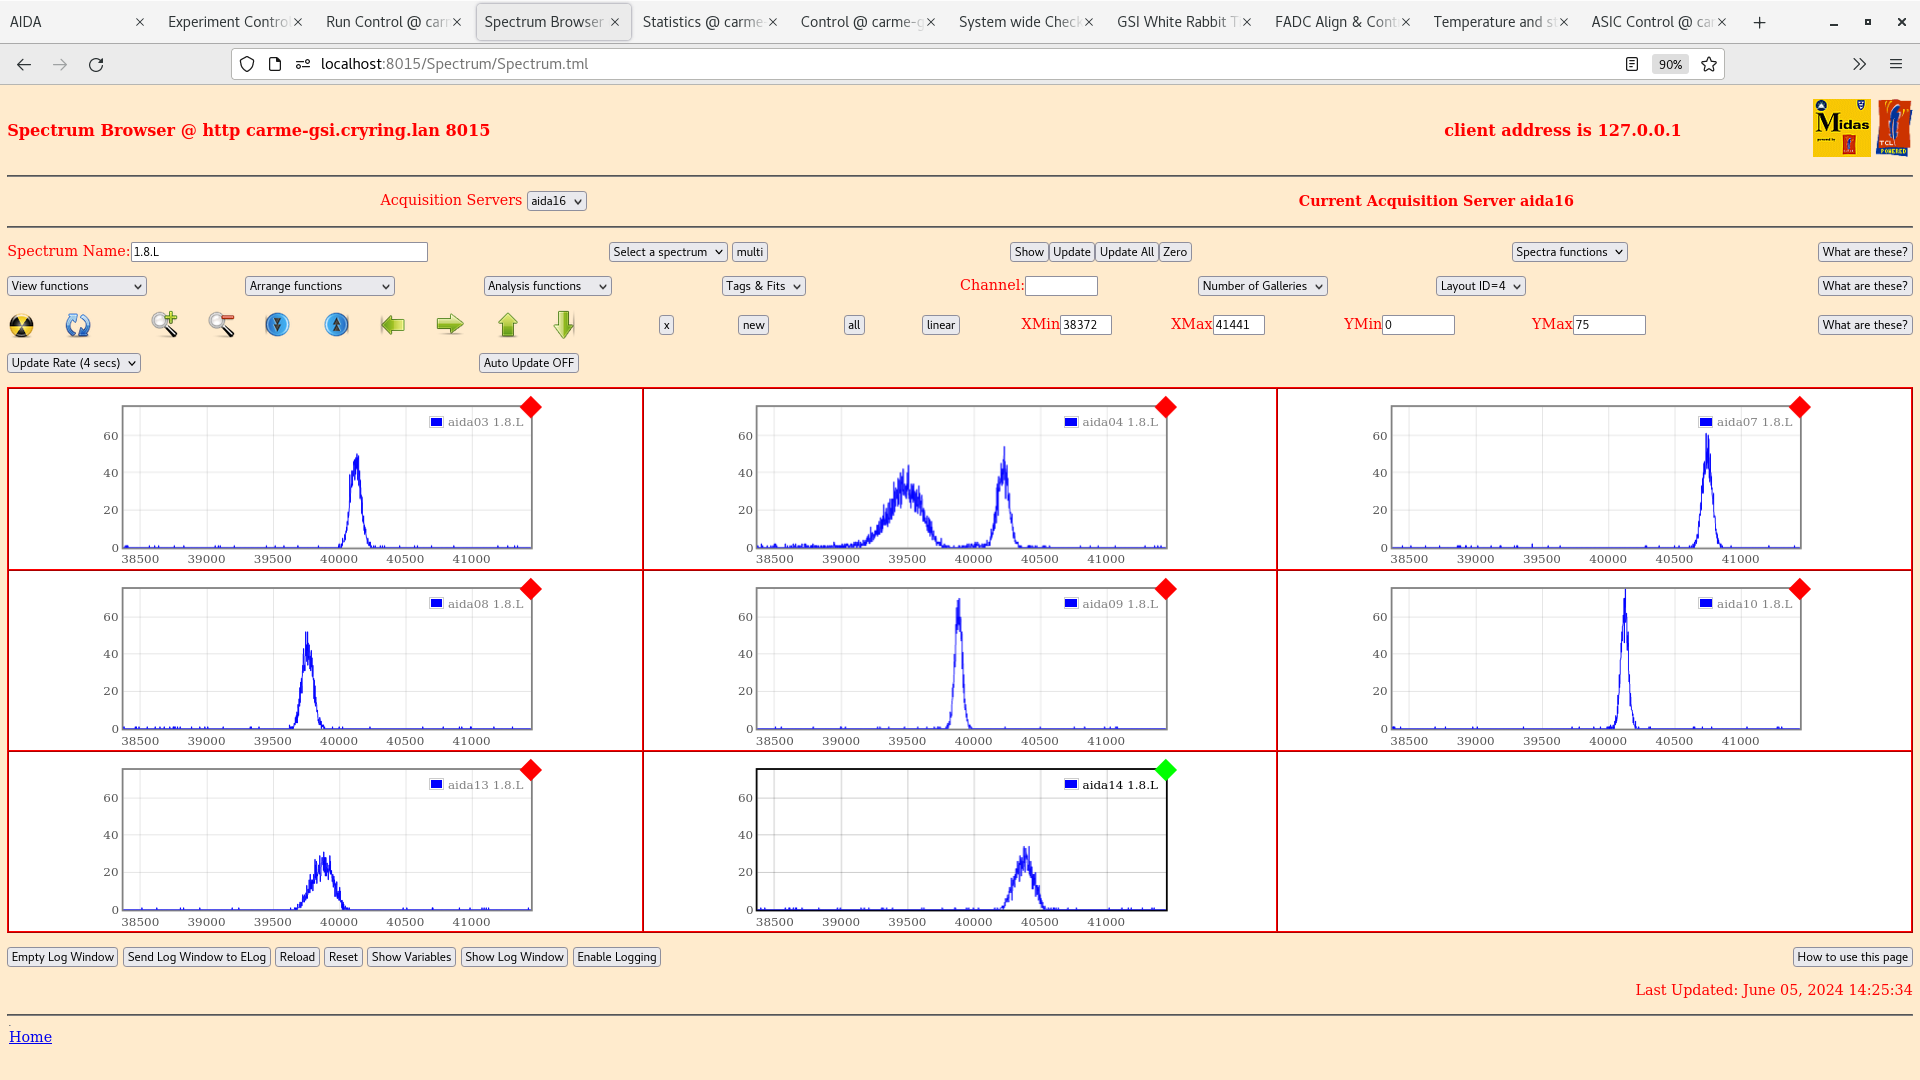
Pulser amplitudes of 8, 7, 6, 5, 4, 3, 2, 1
Attachment 1 - pn channels
Attachment 2 - nn channels
Attachment 3 - pn channels (zoom)
Attachment 4 - nn channels (zoom)
Best pn channel looks like AIDA09 - pulser width 63
Worst pn channel looks like AIDA14 - pulser width 148
Best nn channel looks like AIDA12 - pulser width 58
Worst nn channel looks like AIDA16 - pulser width 246
This is approximately the same as pulser widths before the beam time. |
| Attachment 1: Screenshot_from_2024-06-05_14-20-18.png
|
|
| Attachment 2: Screenshot_from_2024-06-05_14-21-26.png
|
|
| Attachment 3: Screenshot_from_2024-06-05_14-27-43.png
|
|
| Attachment 4: Screenshot_from_2024-06-05_14-25-44.png
|
|
|
705
|
Fri May 30 20:47:47 2025 |
JM, CB, NP | Run 36 |
21:47
Run 36 started.
D+ beam deuterium target. D+ beam energy is 2 MeV/u.
Target density is about 1.6e12 at/cm2. FLuctuations between 1e12 and 1e13 at/cm2.
Detectors are now IN with the servo motors only. Detectors are stationary.
Left potentiometer = 36.54 mm
Right potentiometer = 37.96 mm
Ring cycle time is 1 minute. Note we see some hydrogen in in the spectrum, this disapears after a few seconds.
Target T1=30K, T2=31.9K.
Nozzle position x=-3.12, z=1.72 mm
YR09-Etarget pressure = 2.29e-10 mbar.
Cooler set value = 1126V, 15 mA. Read value = 1068V, 13.22 mA
Detector 4 is still a bit unstable in its leakage current but the data coming through looks good. Some crap is periodically written to disk when leakage current spikes.
We will run like this for an hour then move detectors back out for overnight run.
after 1 hour of beamtime we stop.
Attachment 1 - xy plot
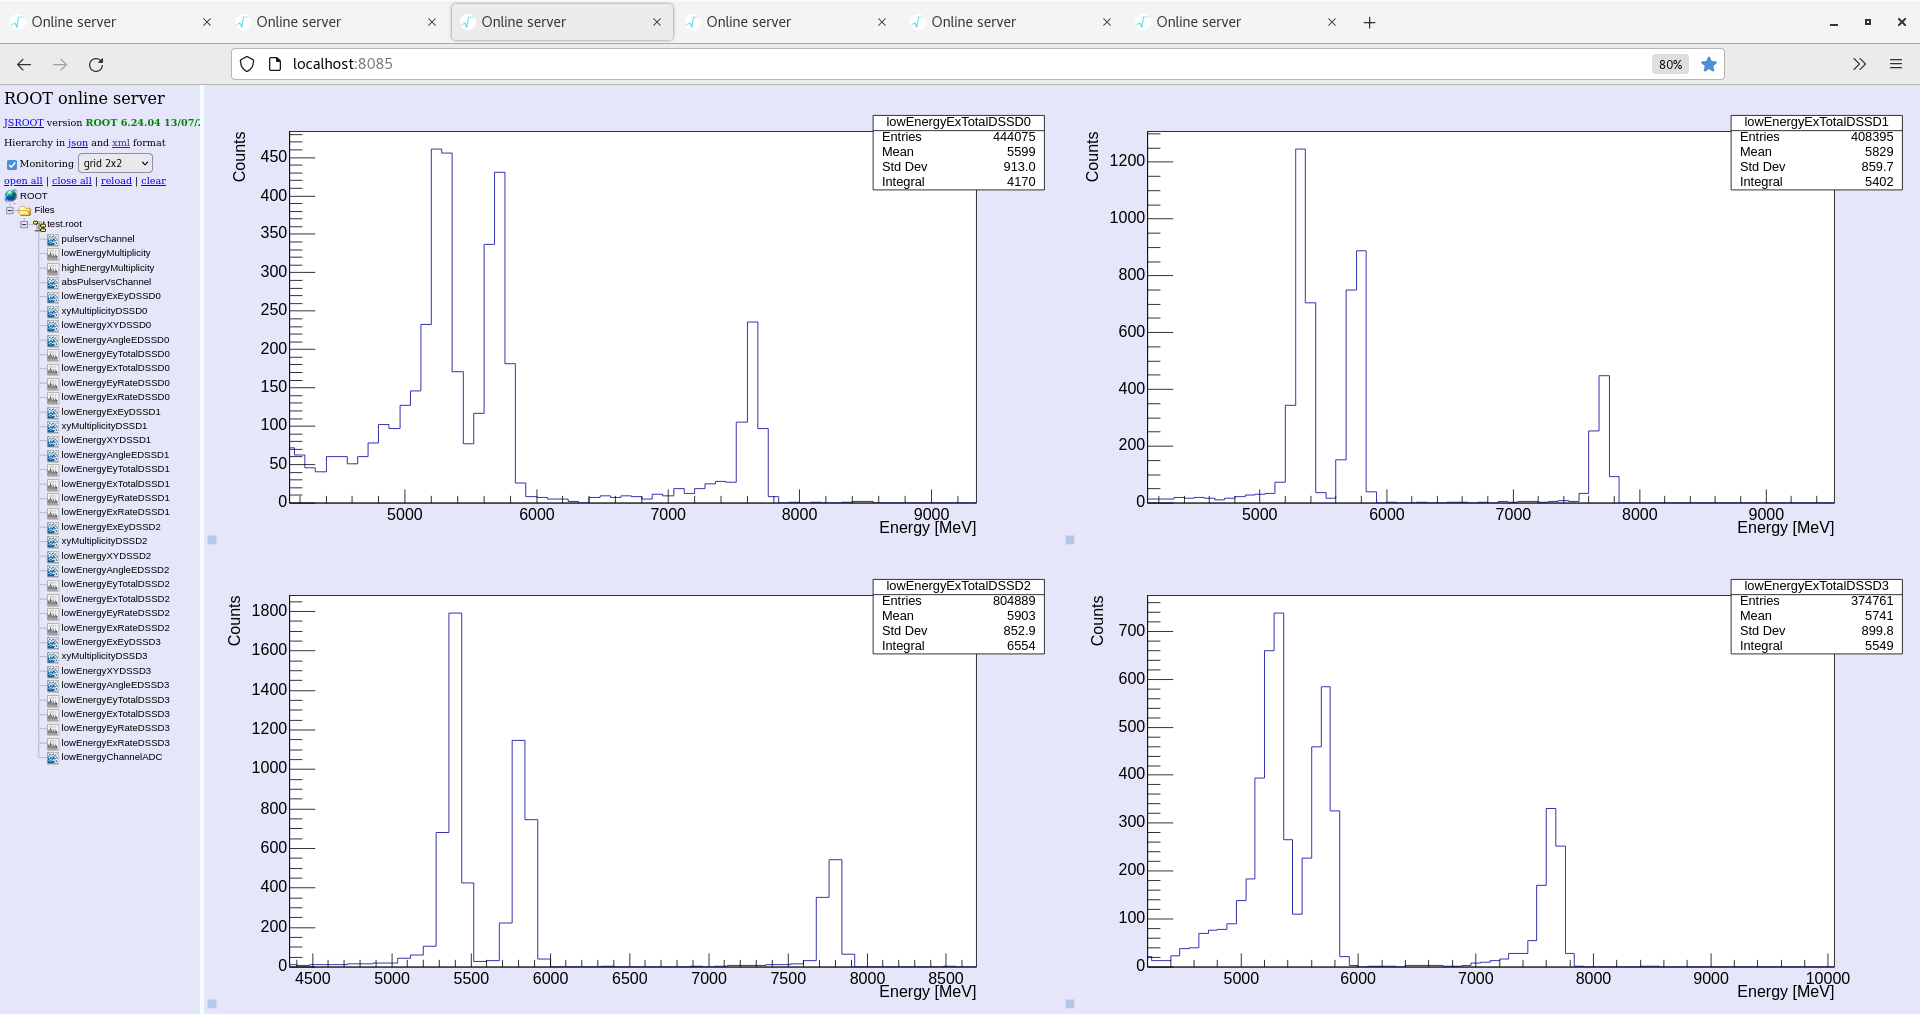
Attachment 2 - energy histogram NUCLEAR |
| Attachment 1: Screenshot_from_2025-05-30_22-45-48.png
|

|
| Attachment 2: Screenshot_from_2025-05-30_22-46-48.png
|
|
|
520
|
Fri Feb 16 22:03:27 2024 |
TD | Run 35 - night shift |
22.51 DAQ continues file G22-86/R35_36

      DSSSD bias OK - attachments 1-2

      FEE64 temperatures - attachments 3-4
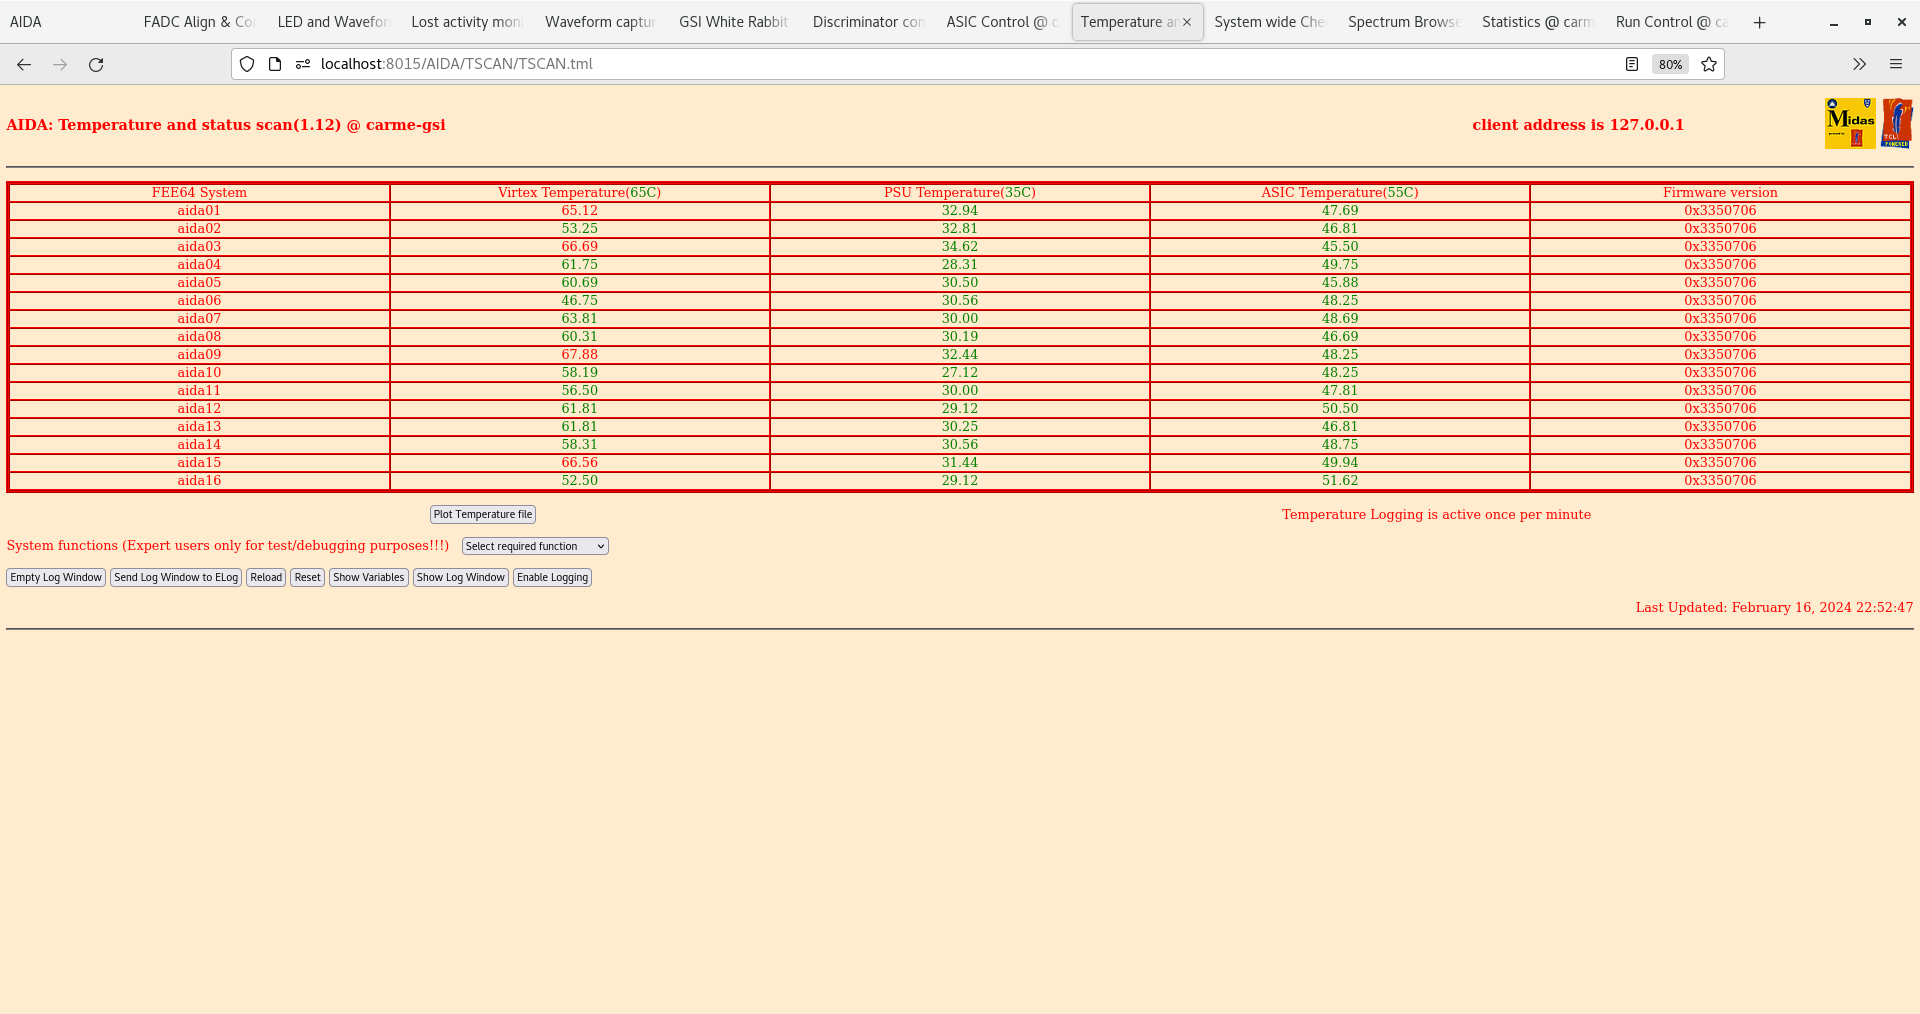
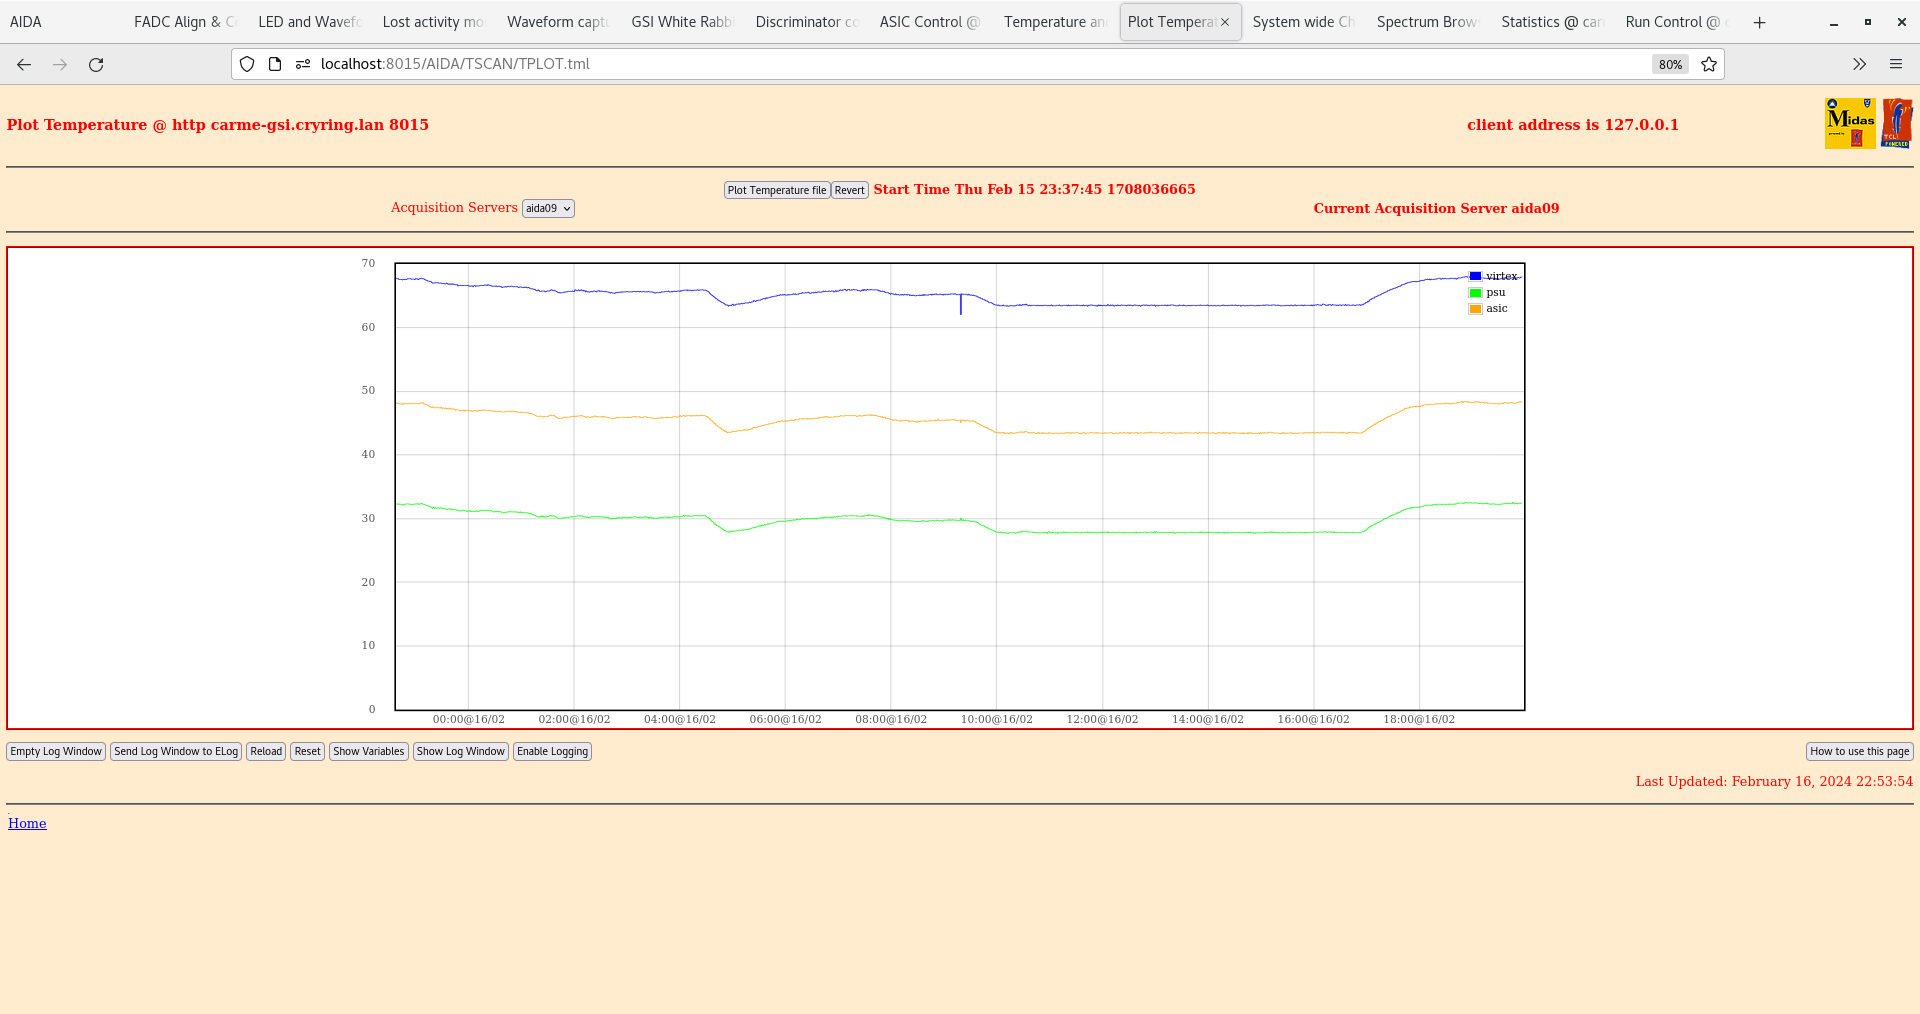
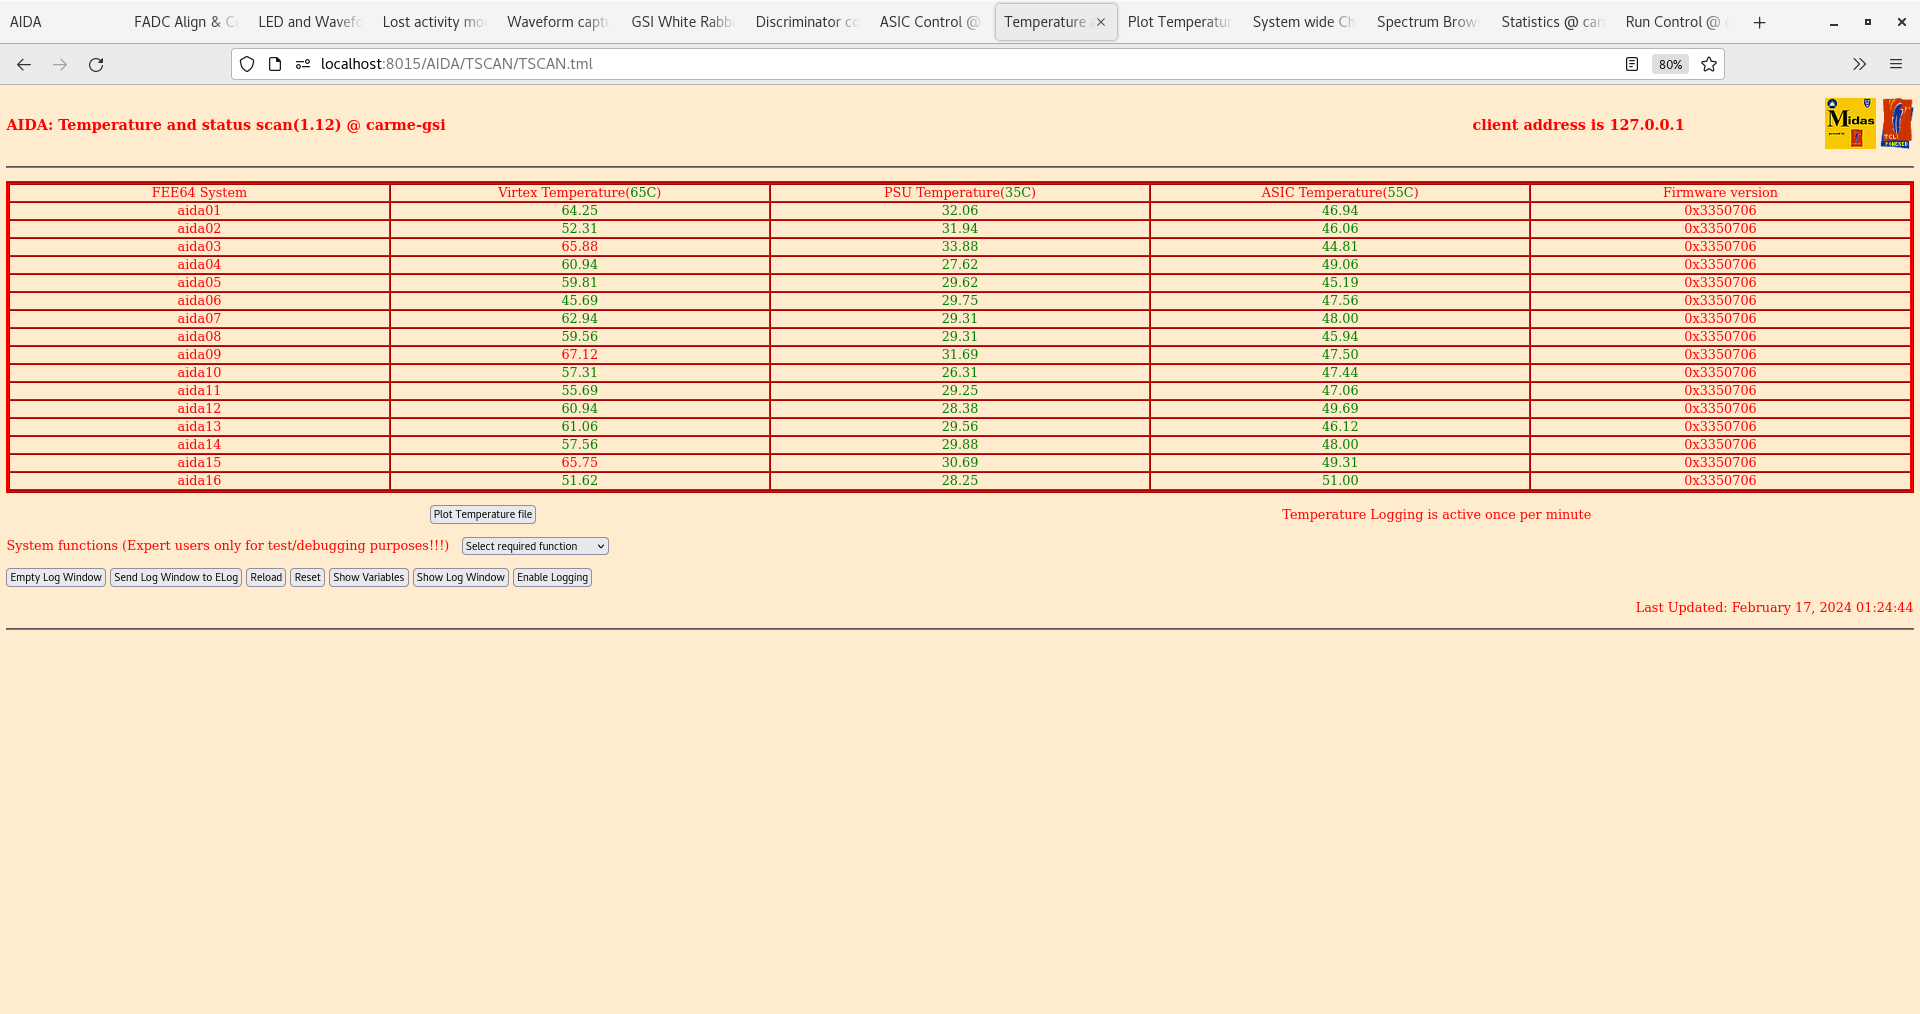
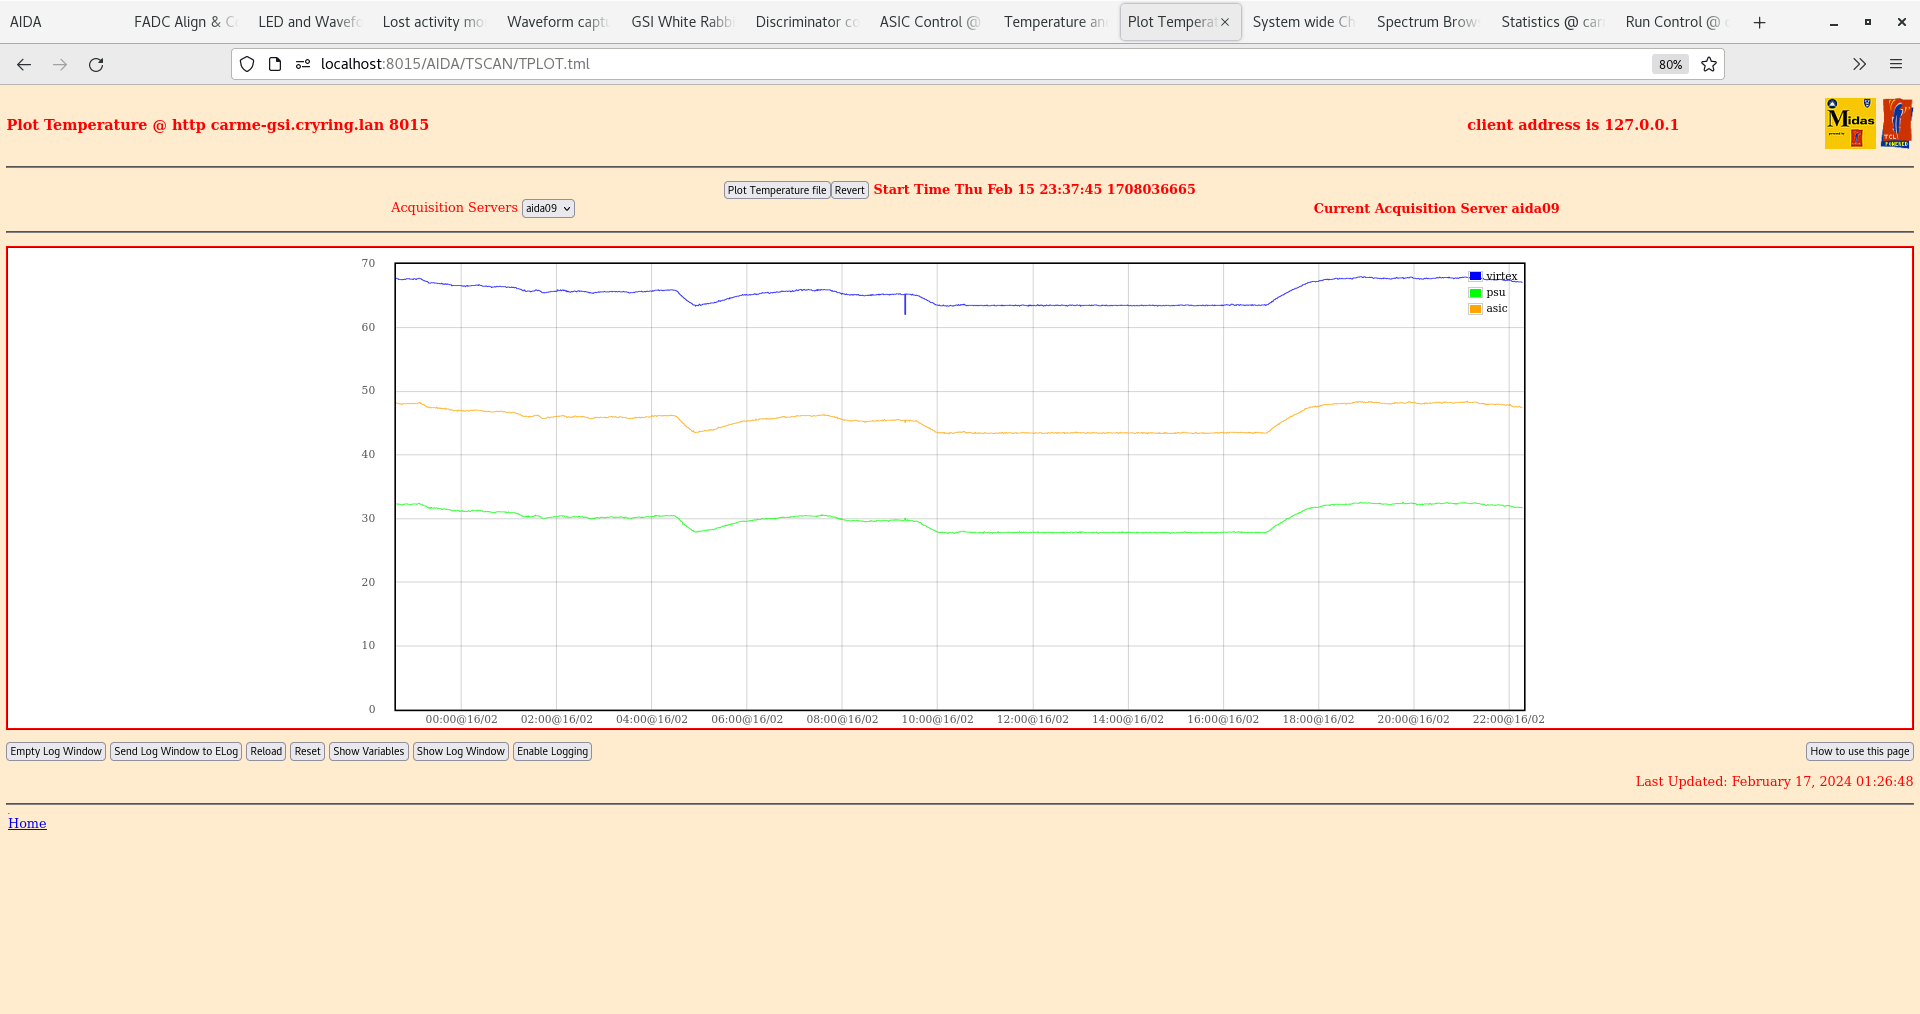
      CRYRING hall ambient temperature 20
      FEE64 temps tracking ambient temperature - aida01, aida03, aida09 and aida15 - all ( just ) over 65 deg C

      All system wide checks OK

      WR timestamps OK - attachment 5

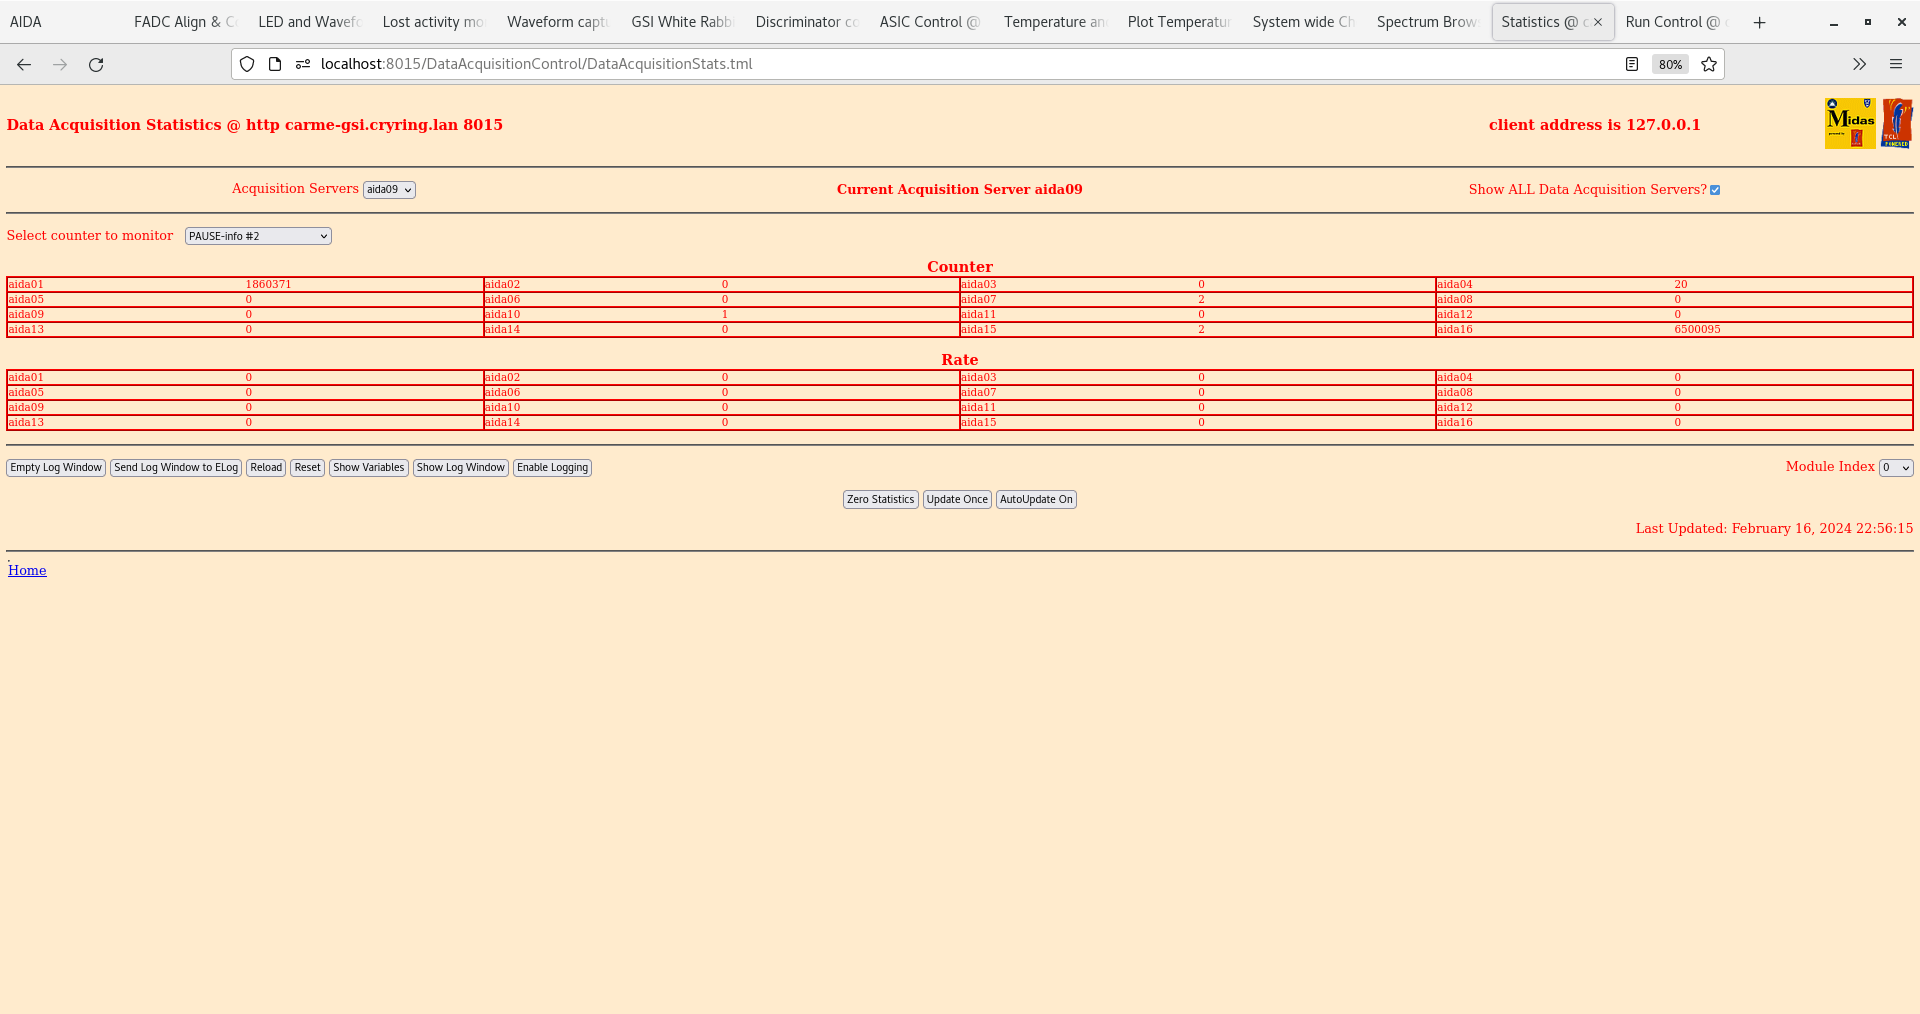
      ADC, DISC and PAUSE data item stats - attachments 6-8
       hot channels aida01 ( 91k ), aida04 ( 12k ), aida15 ( 11k )

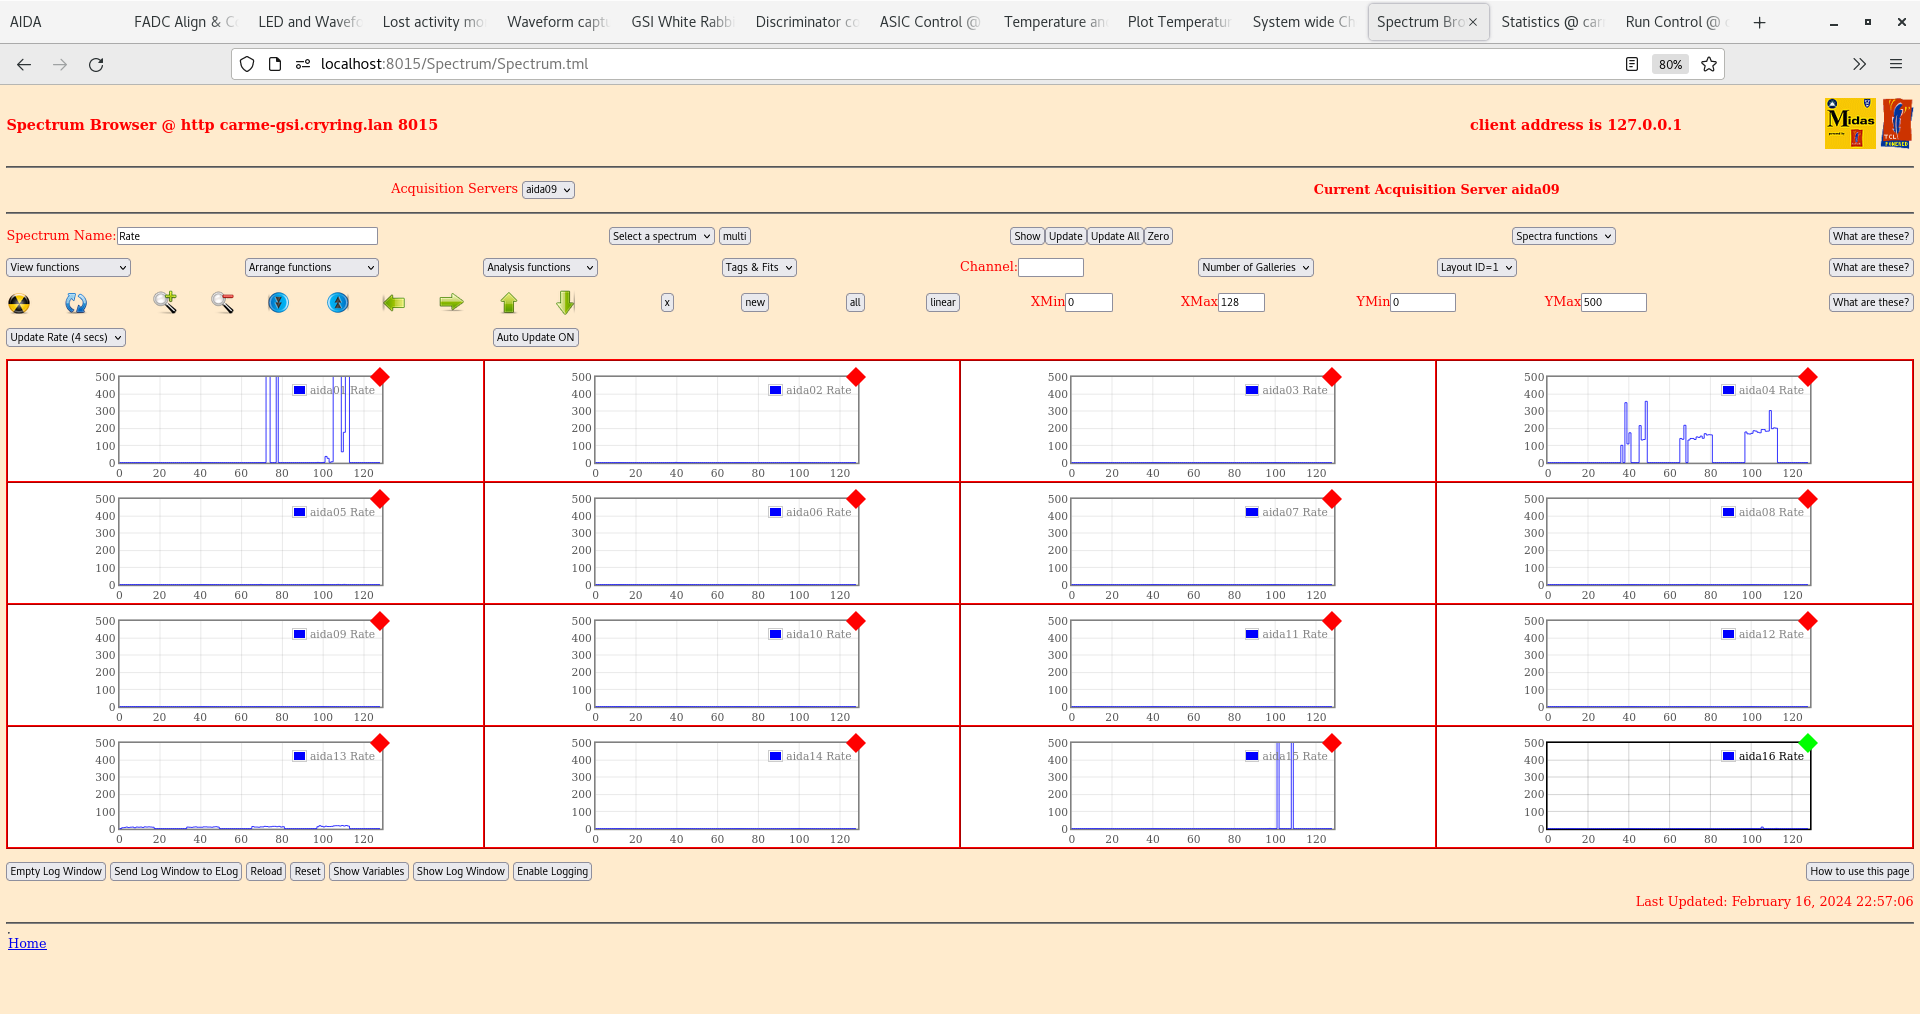
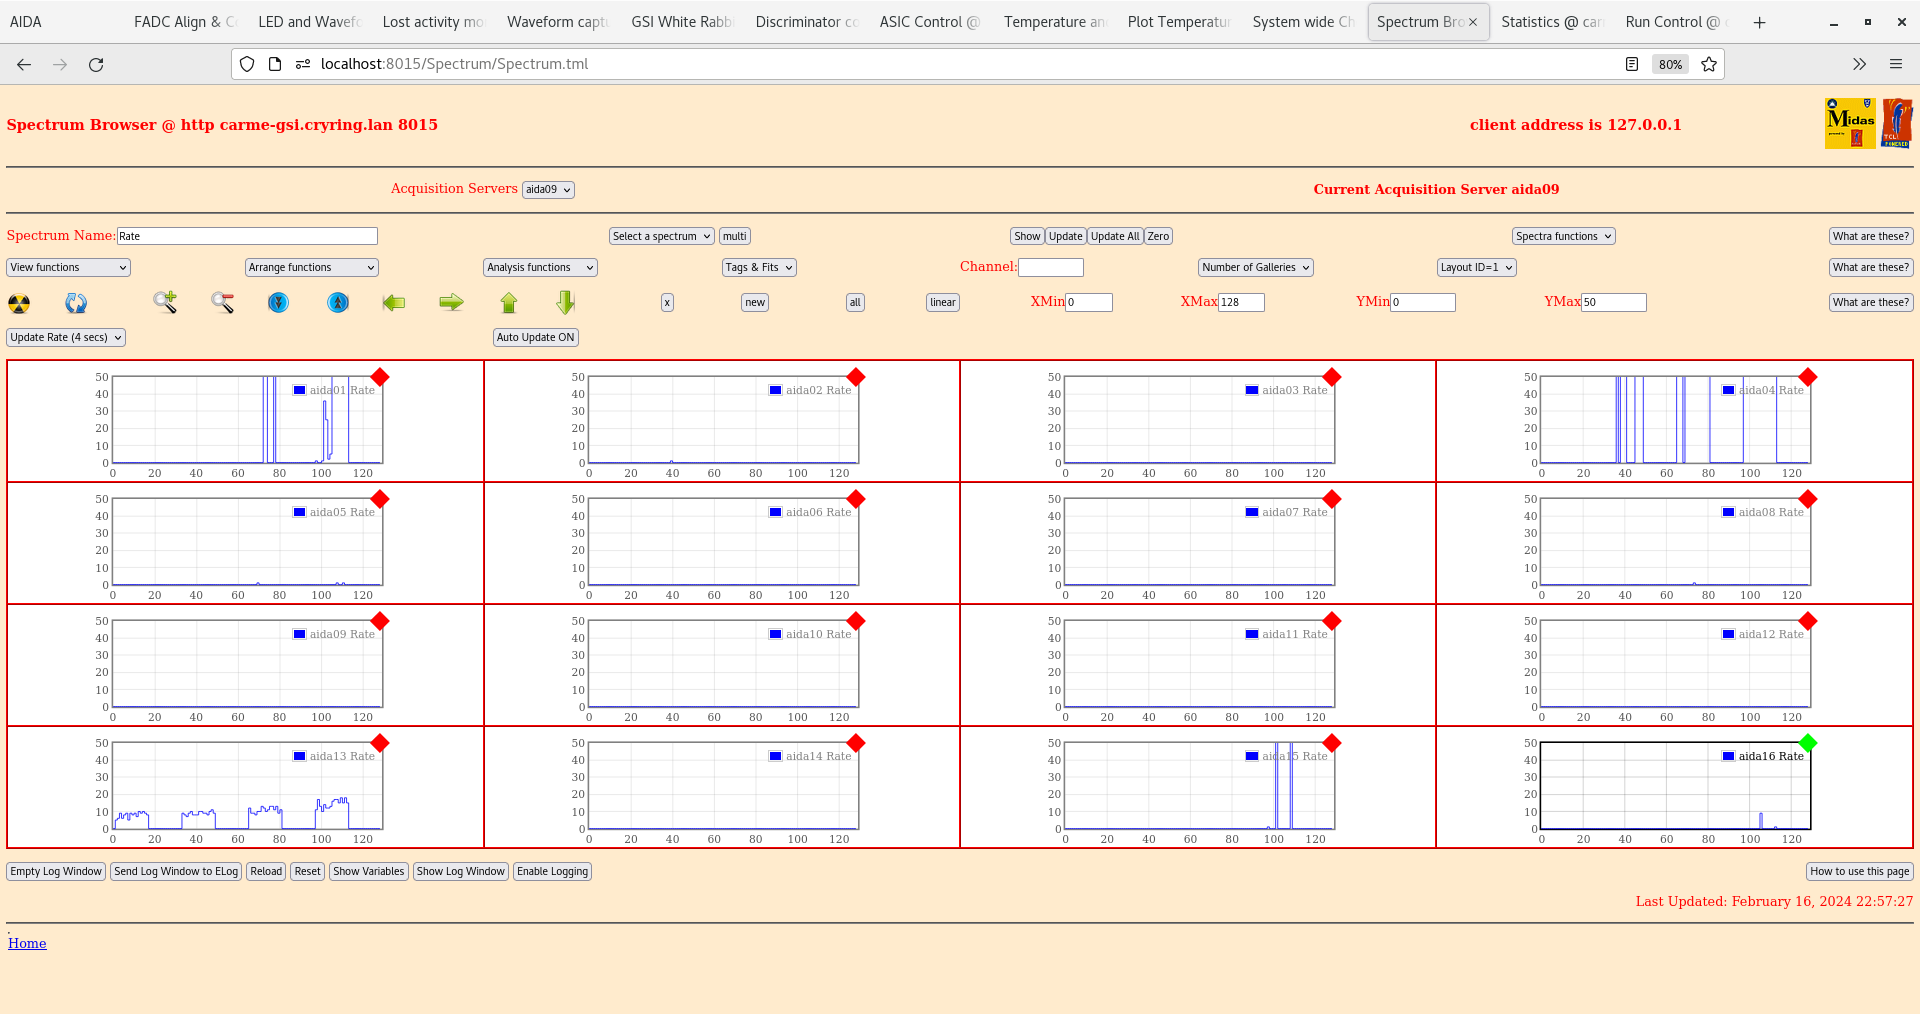
      per FEE64 Rate spectra - attachments 9-10
       aida04 & aida13 only FEE64s with significant rates and systematic rate variation with channel #

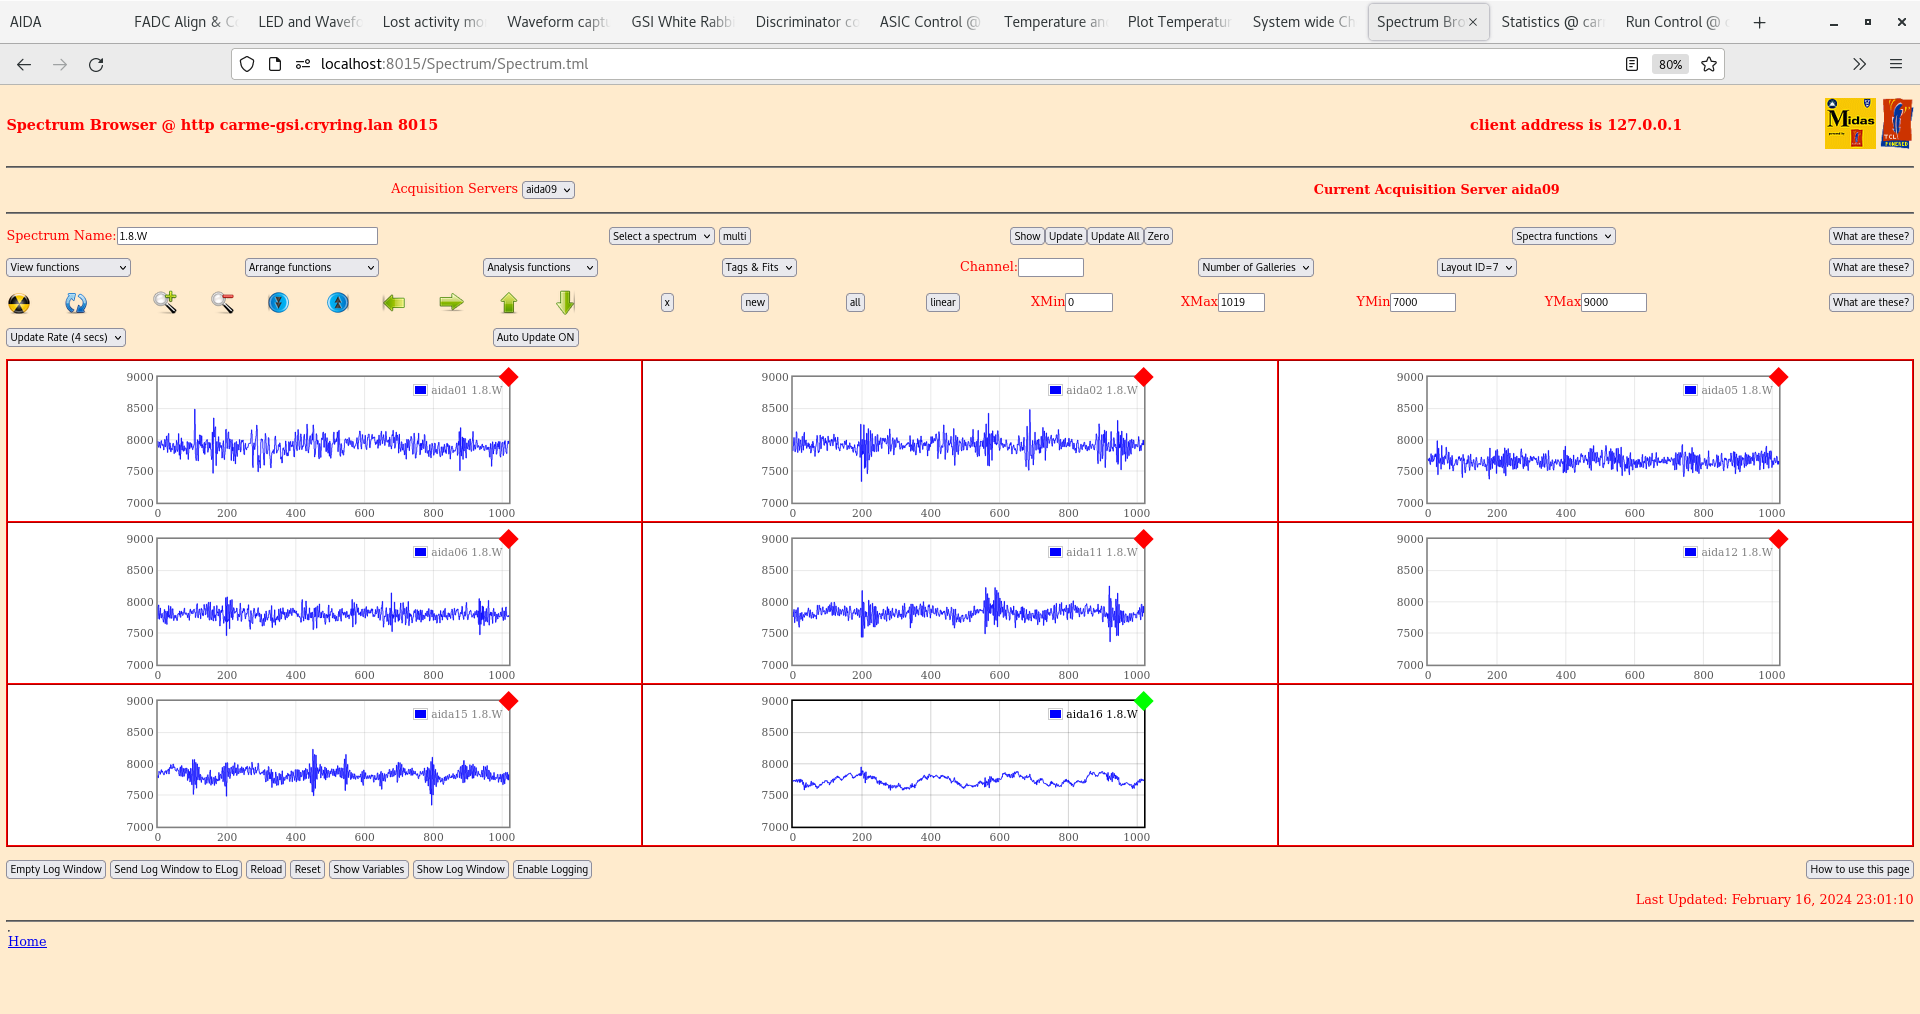
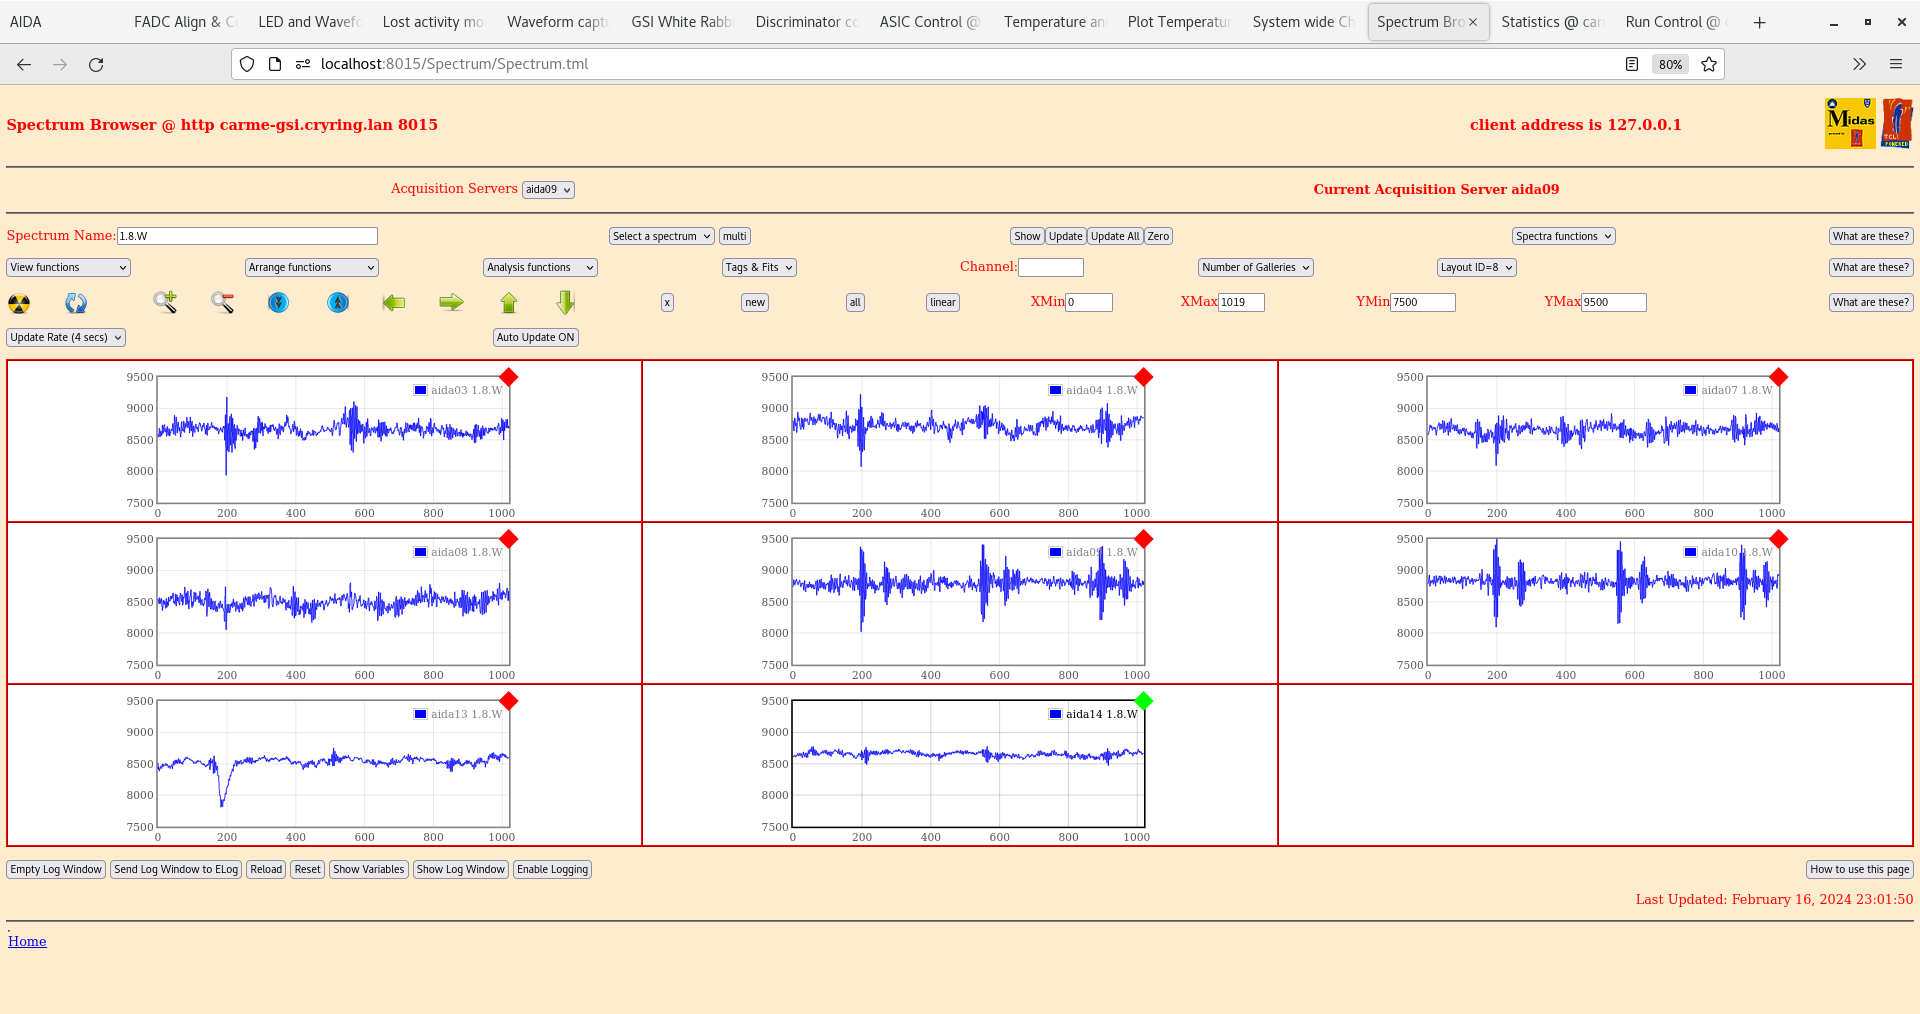
      per FEE64 1.8.L, 1.8.H and 1.8.W 20us FSR spectra - attachments 11-16

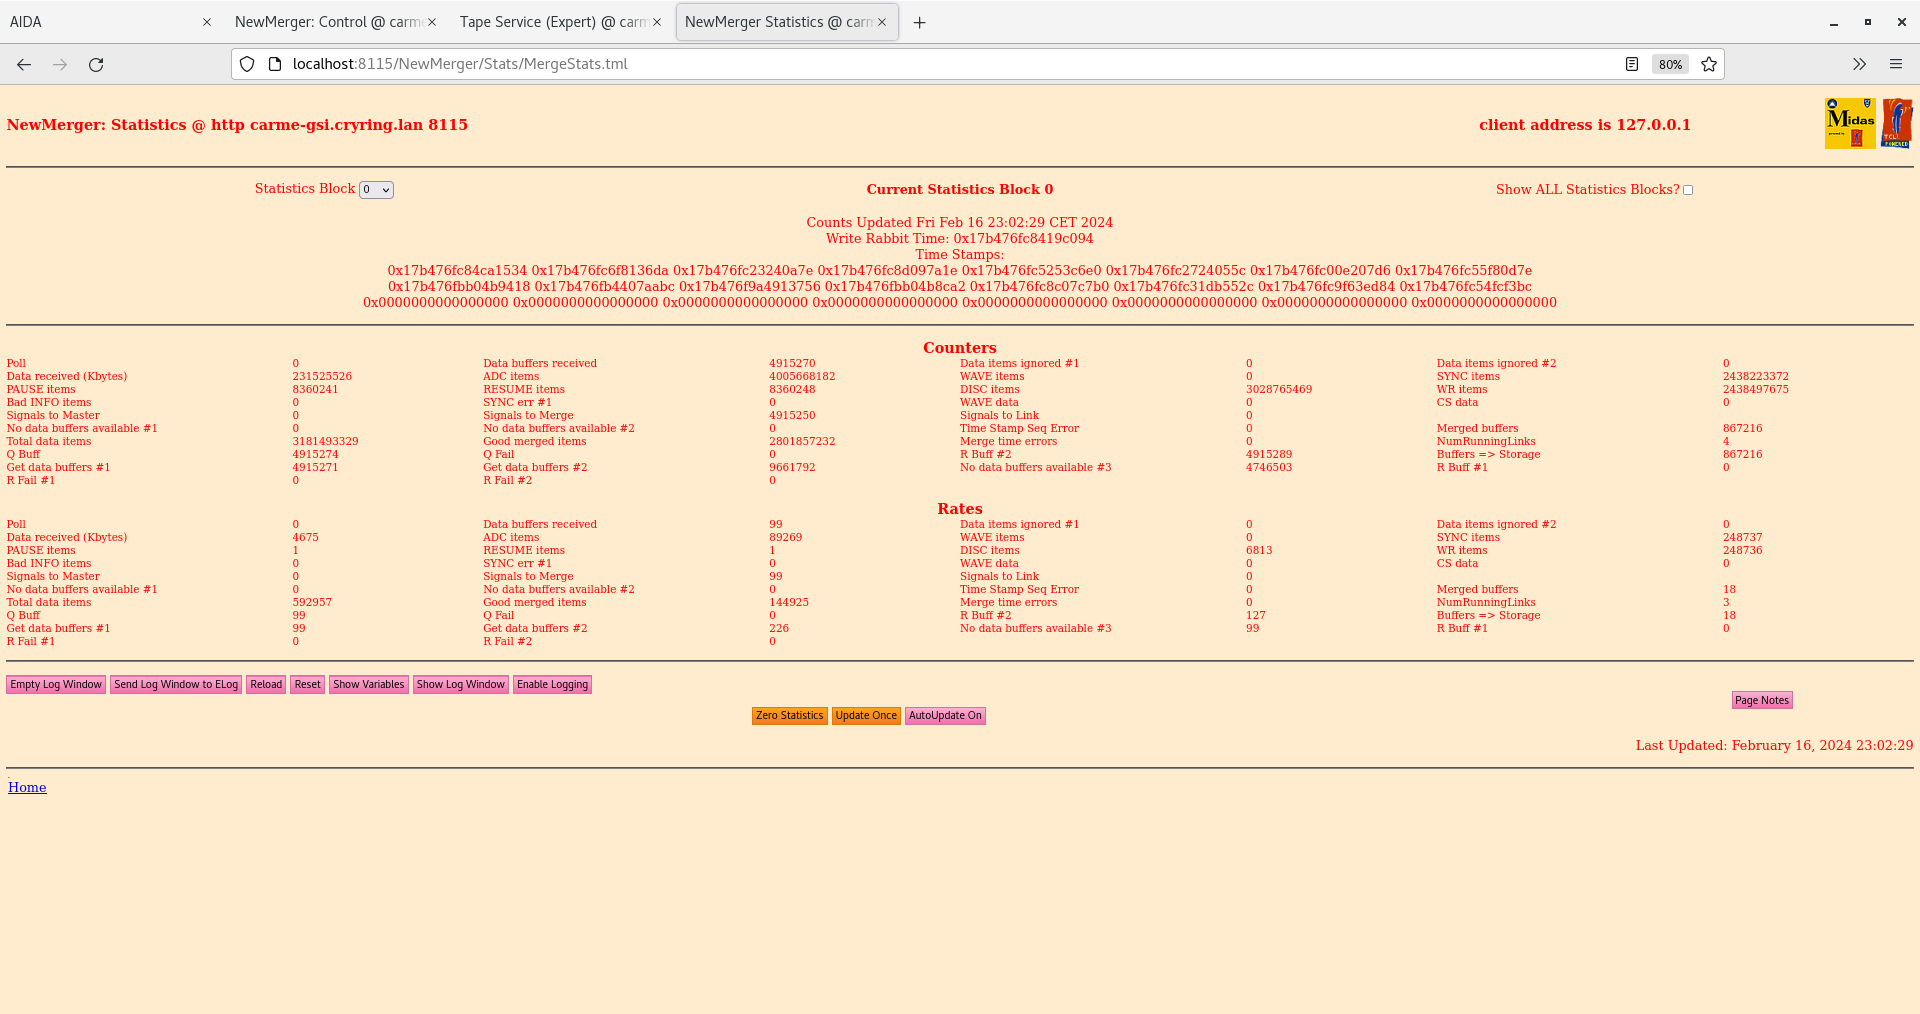
      Merger, Merger stats and TapeServer OK - attachments 17-19

23.16 All histograms, stats and merger stats zero'd

      Online analysis spectra - attachments 21-26
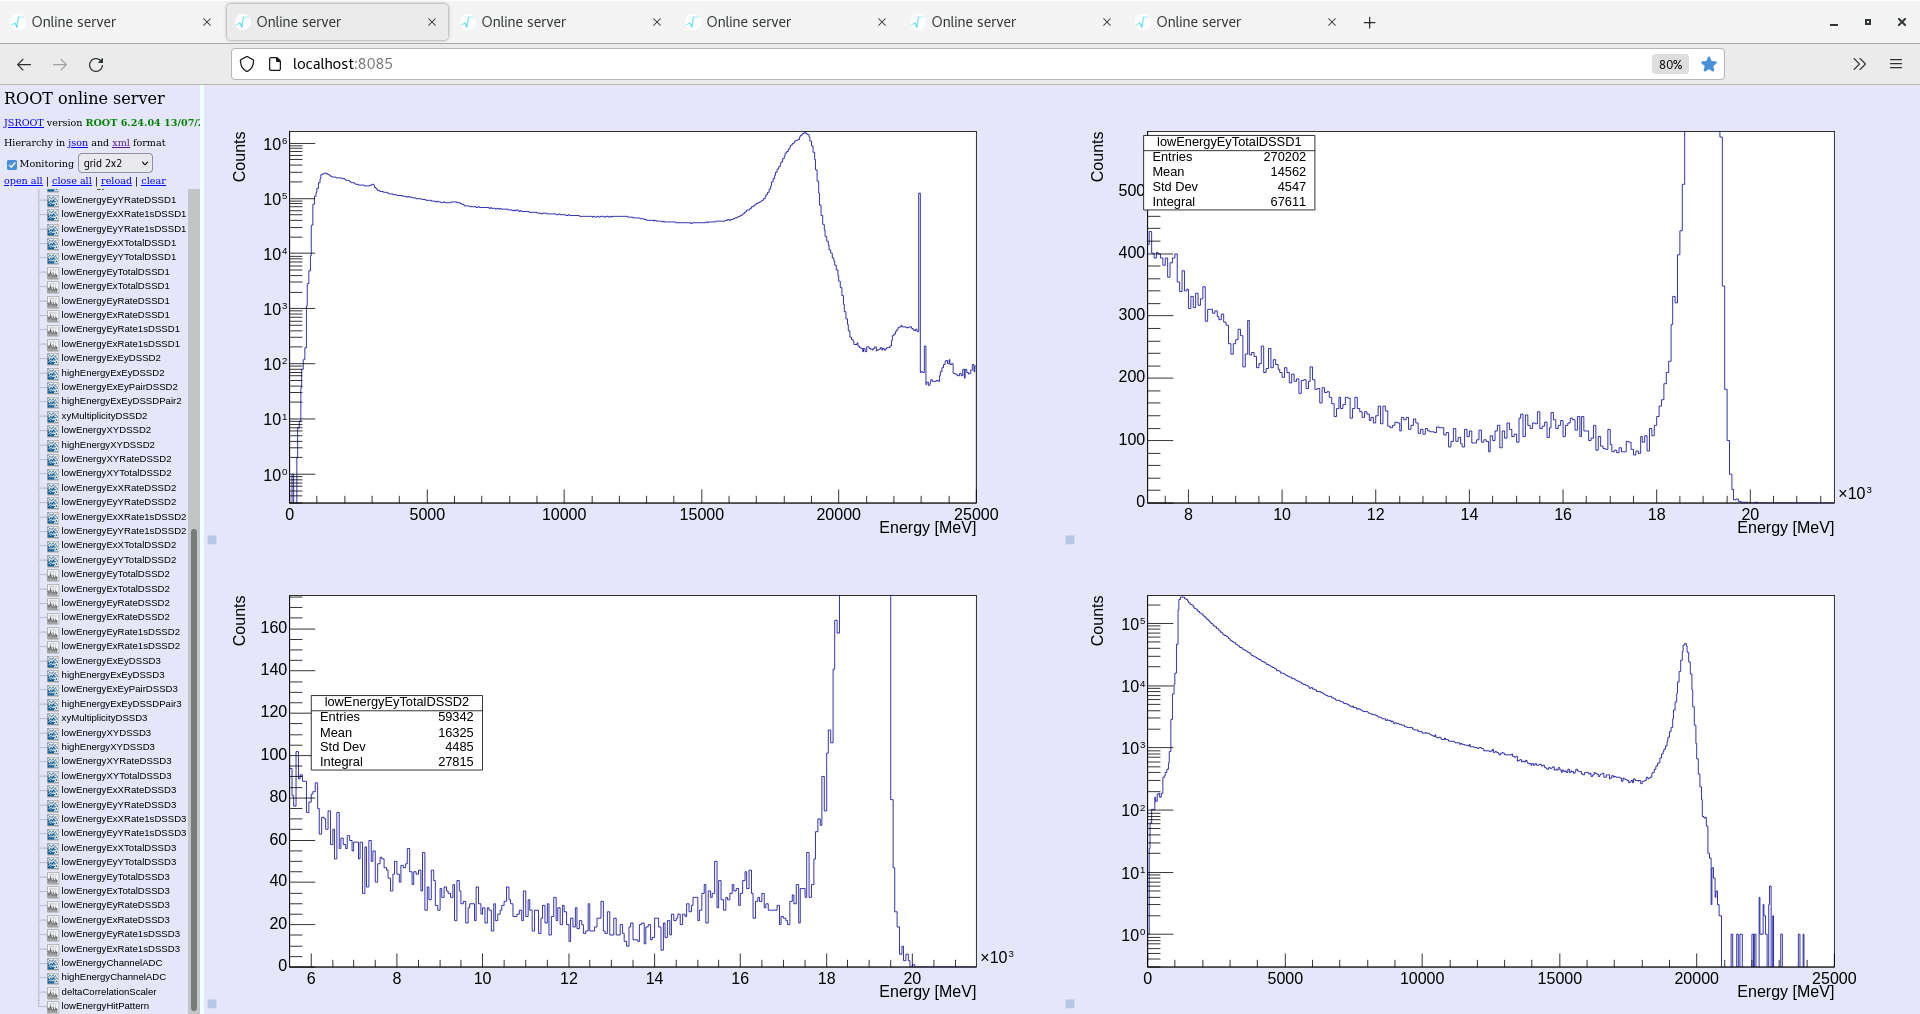
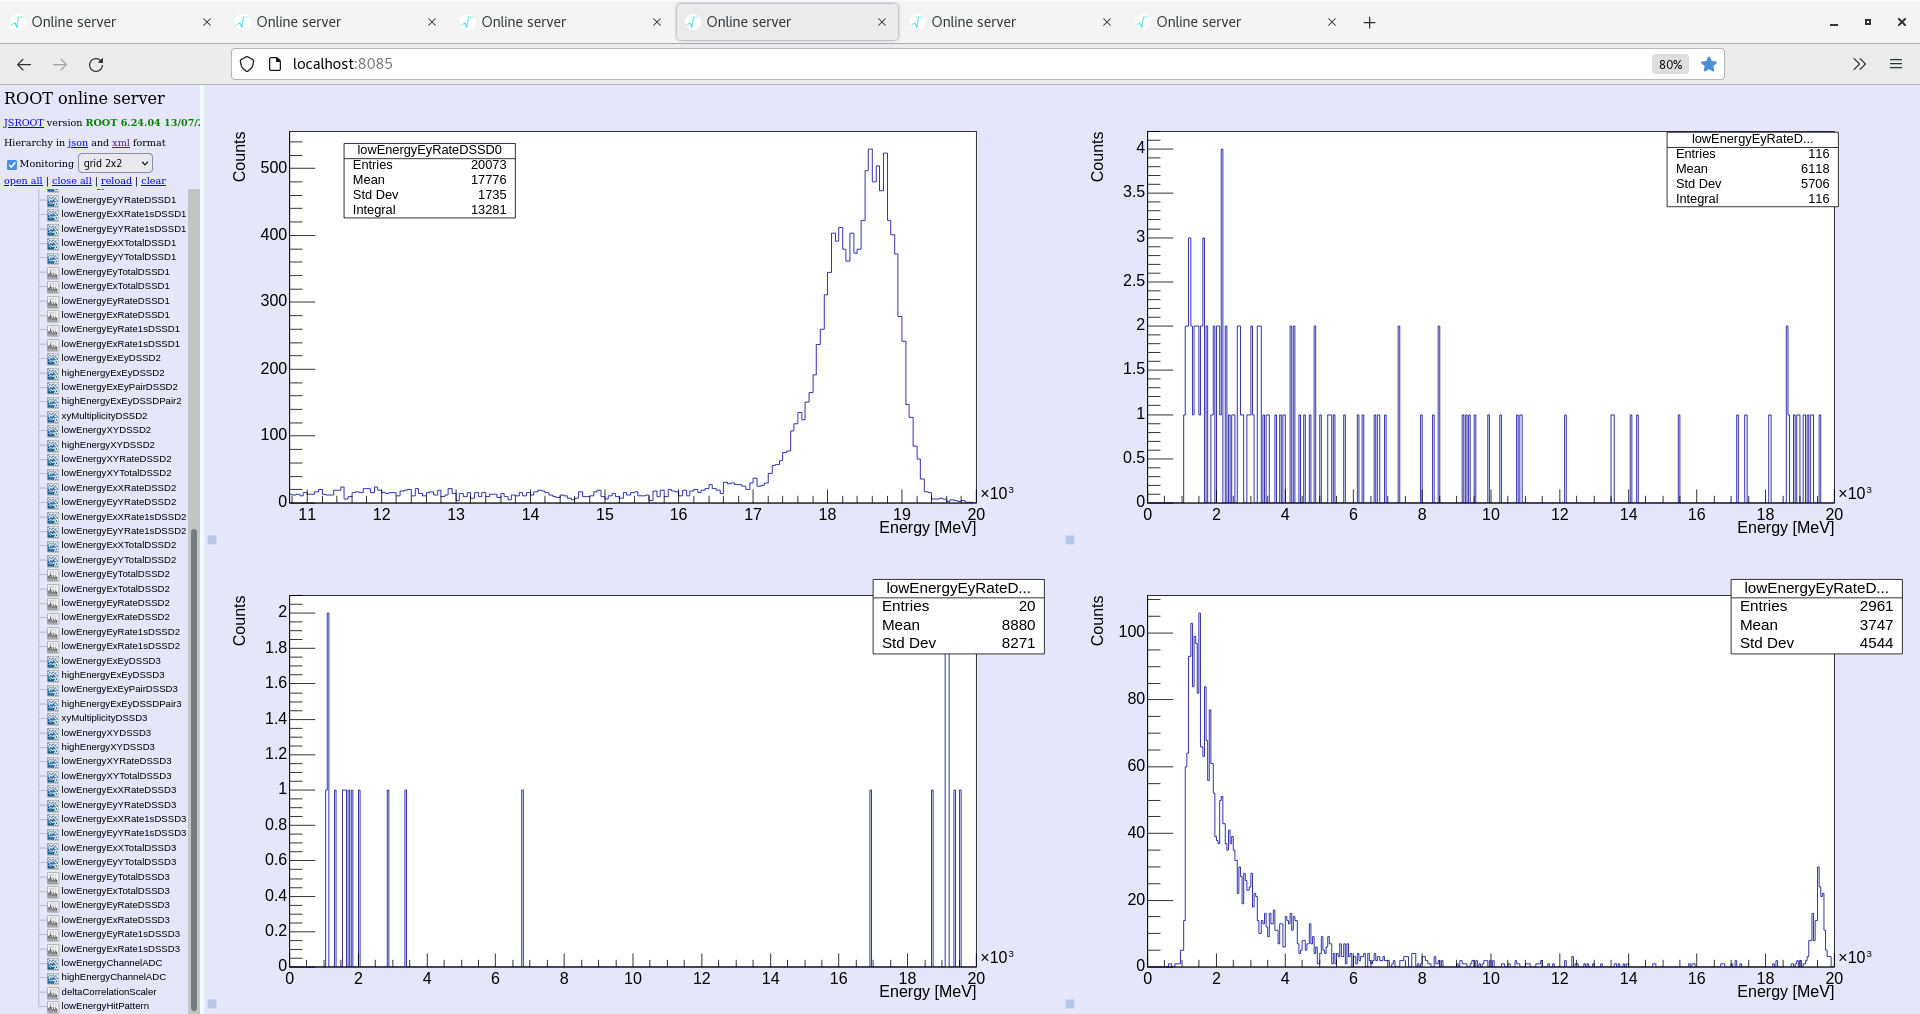
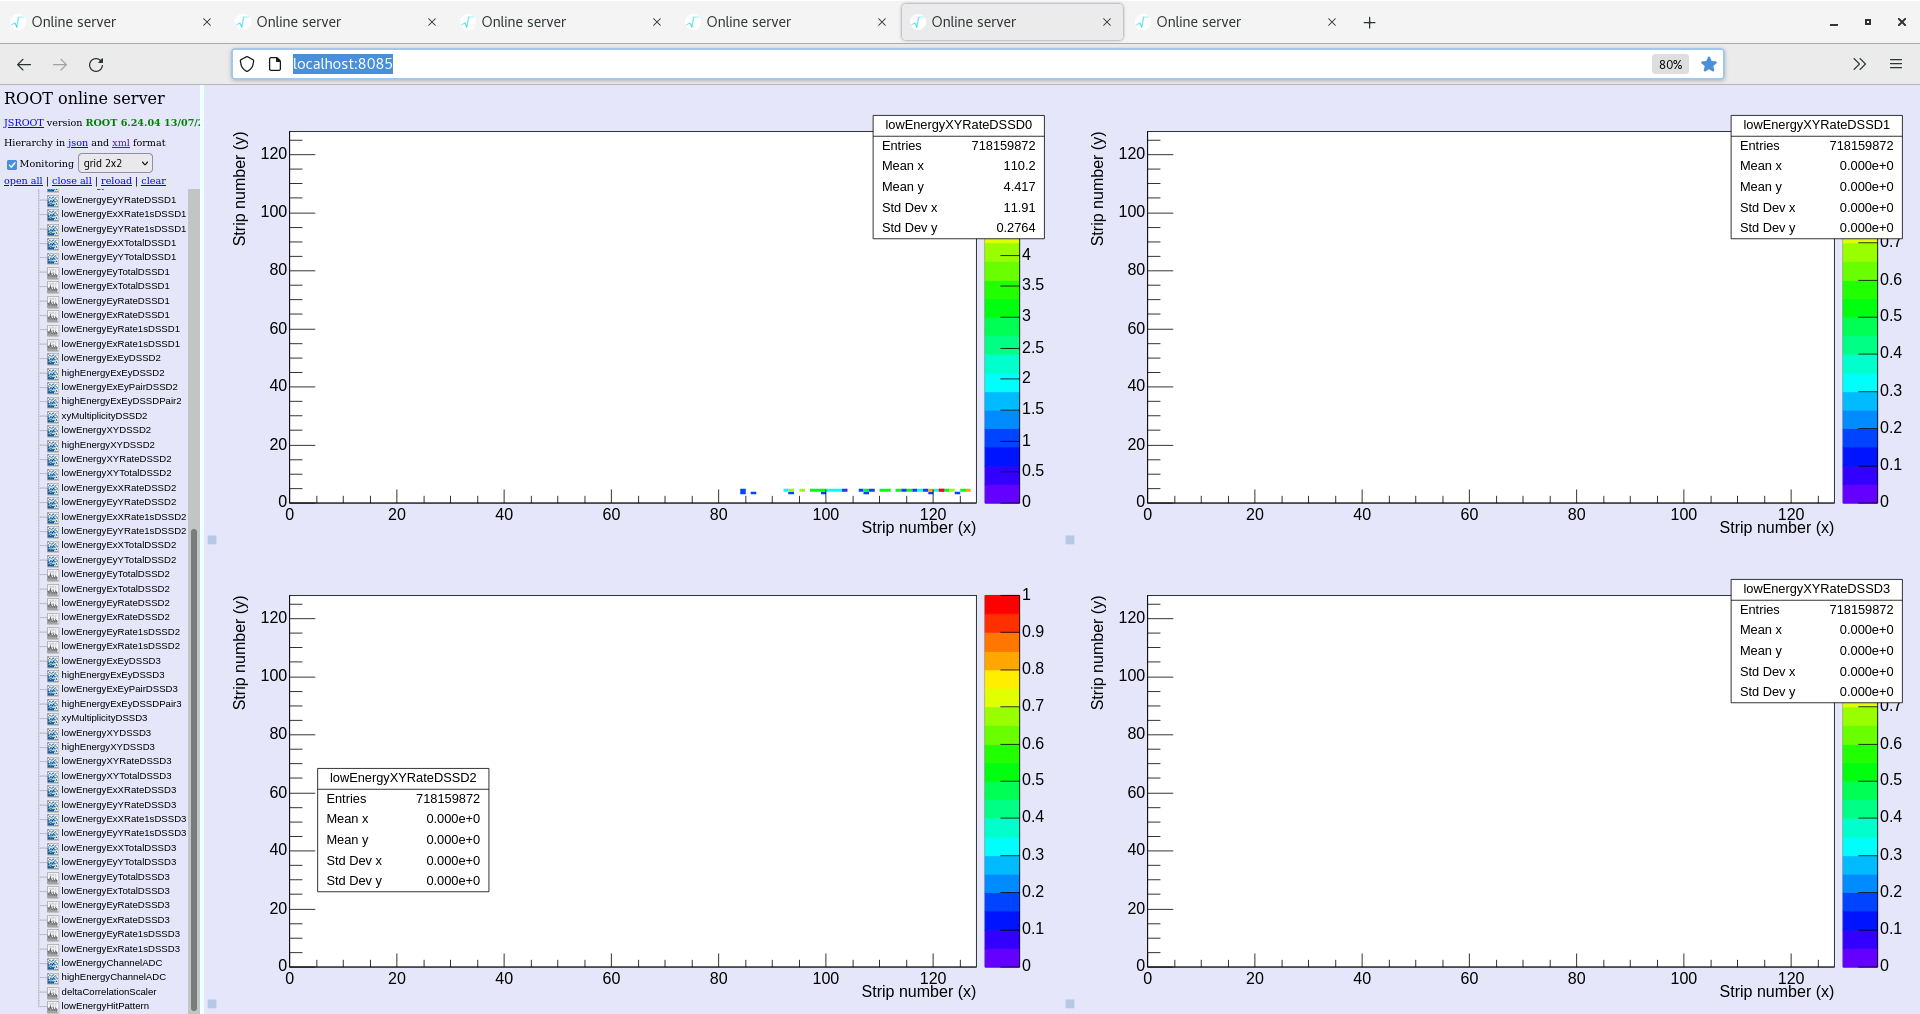
       only the inner quadrants of the 4x DSSSDs are correctly mapped - attachment 21
       observe double peak structure in DSSSD0 rate spectra - radiation damage most forward lab angle strips? - attachment 24

23.23 restart online analysis - zero spectra

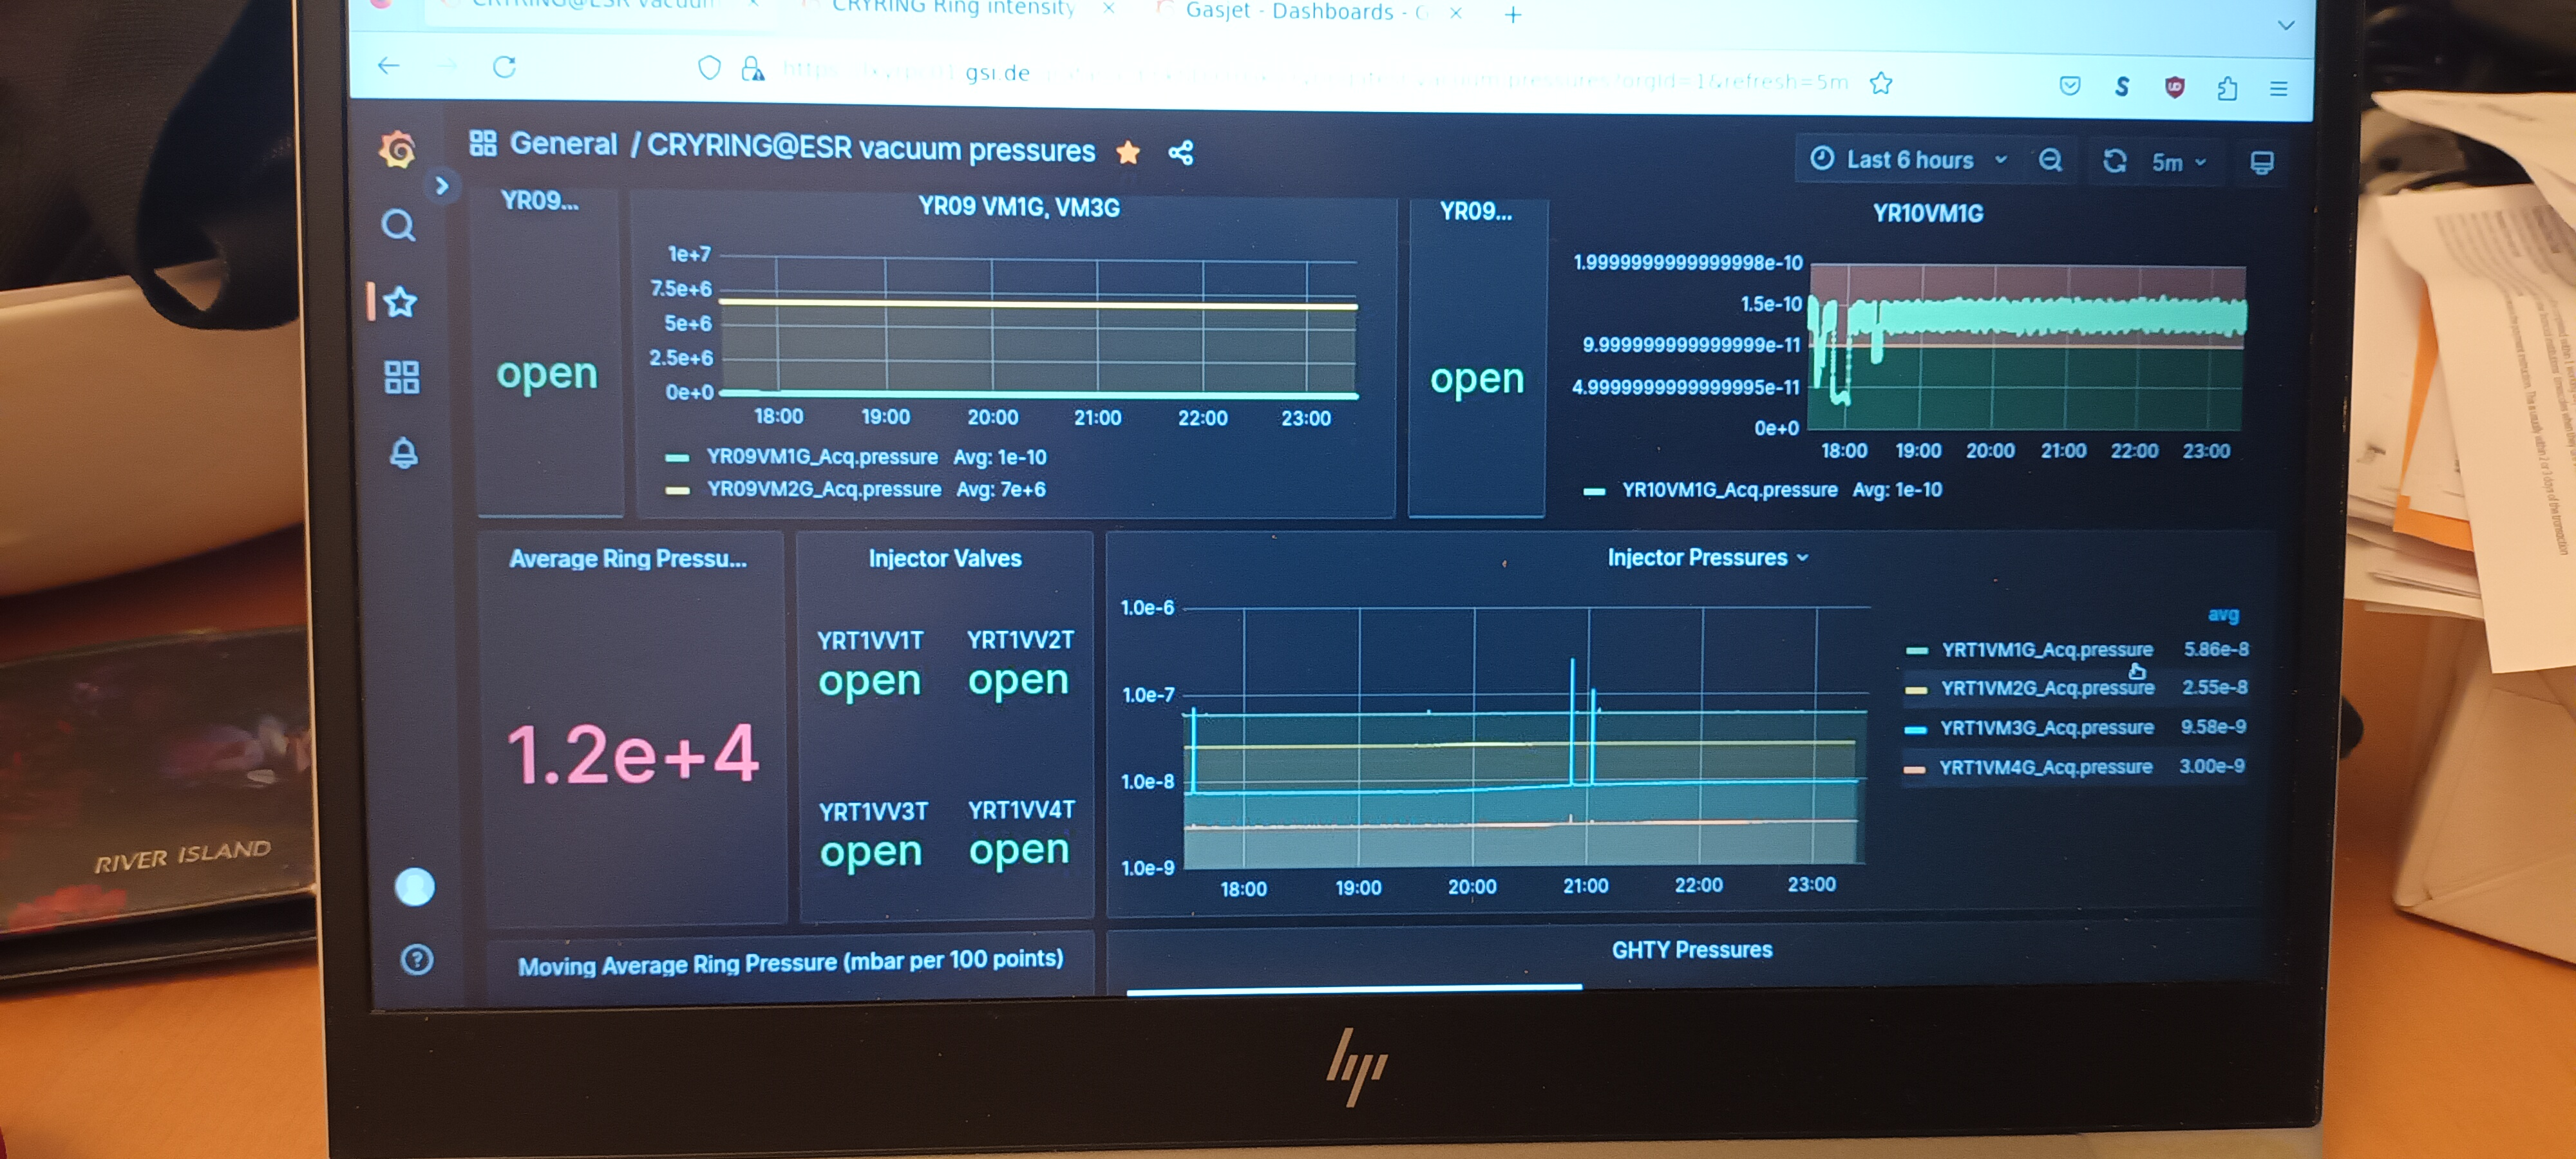
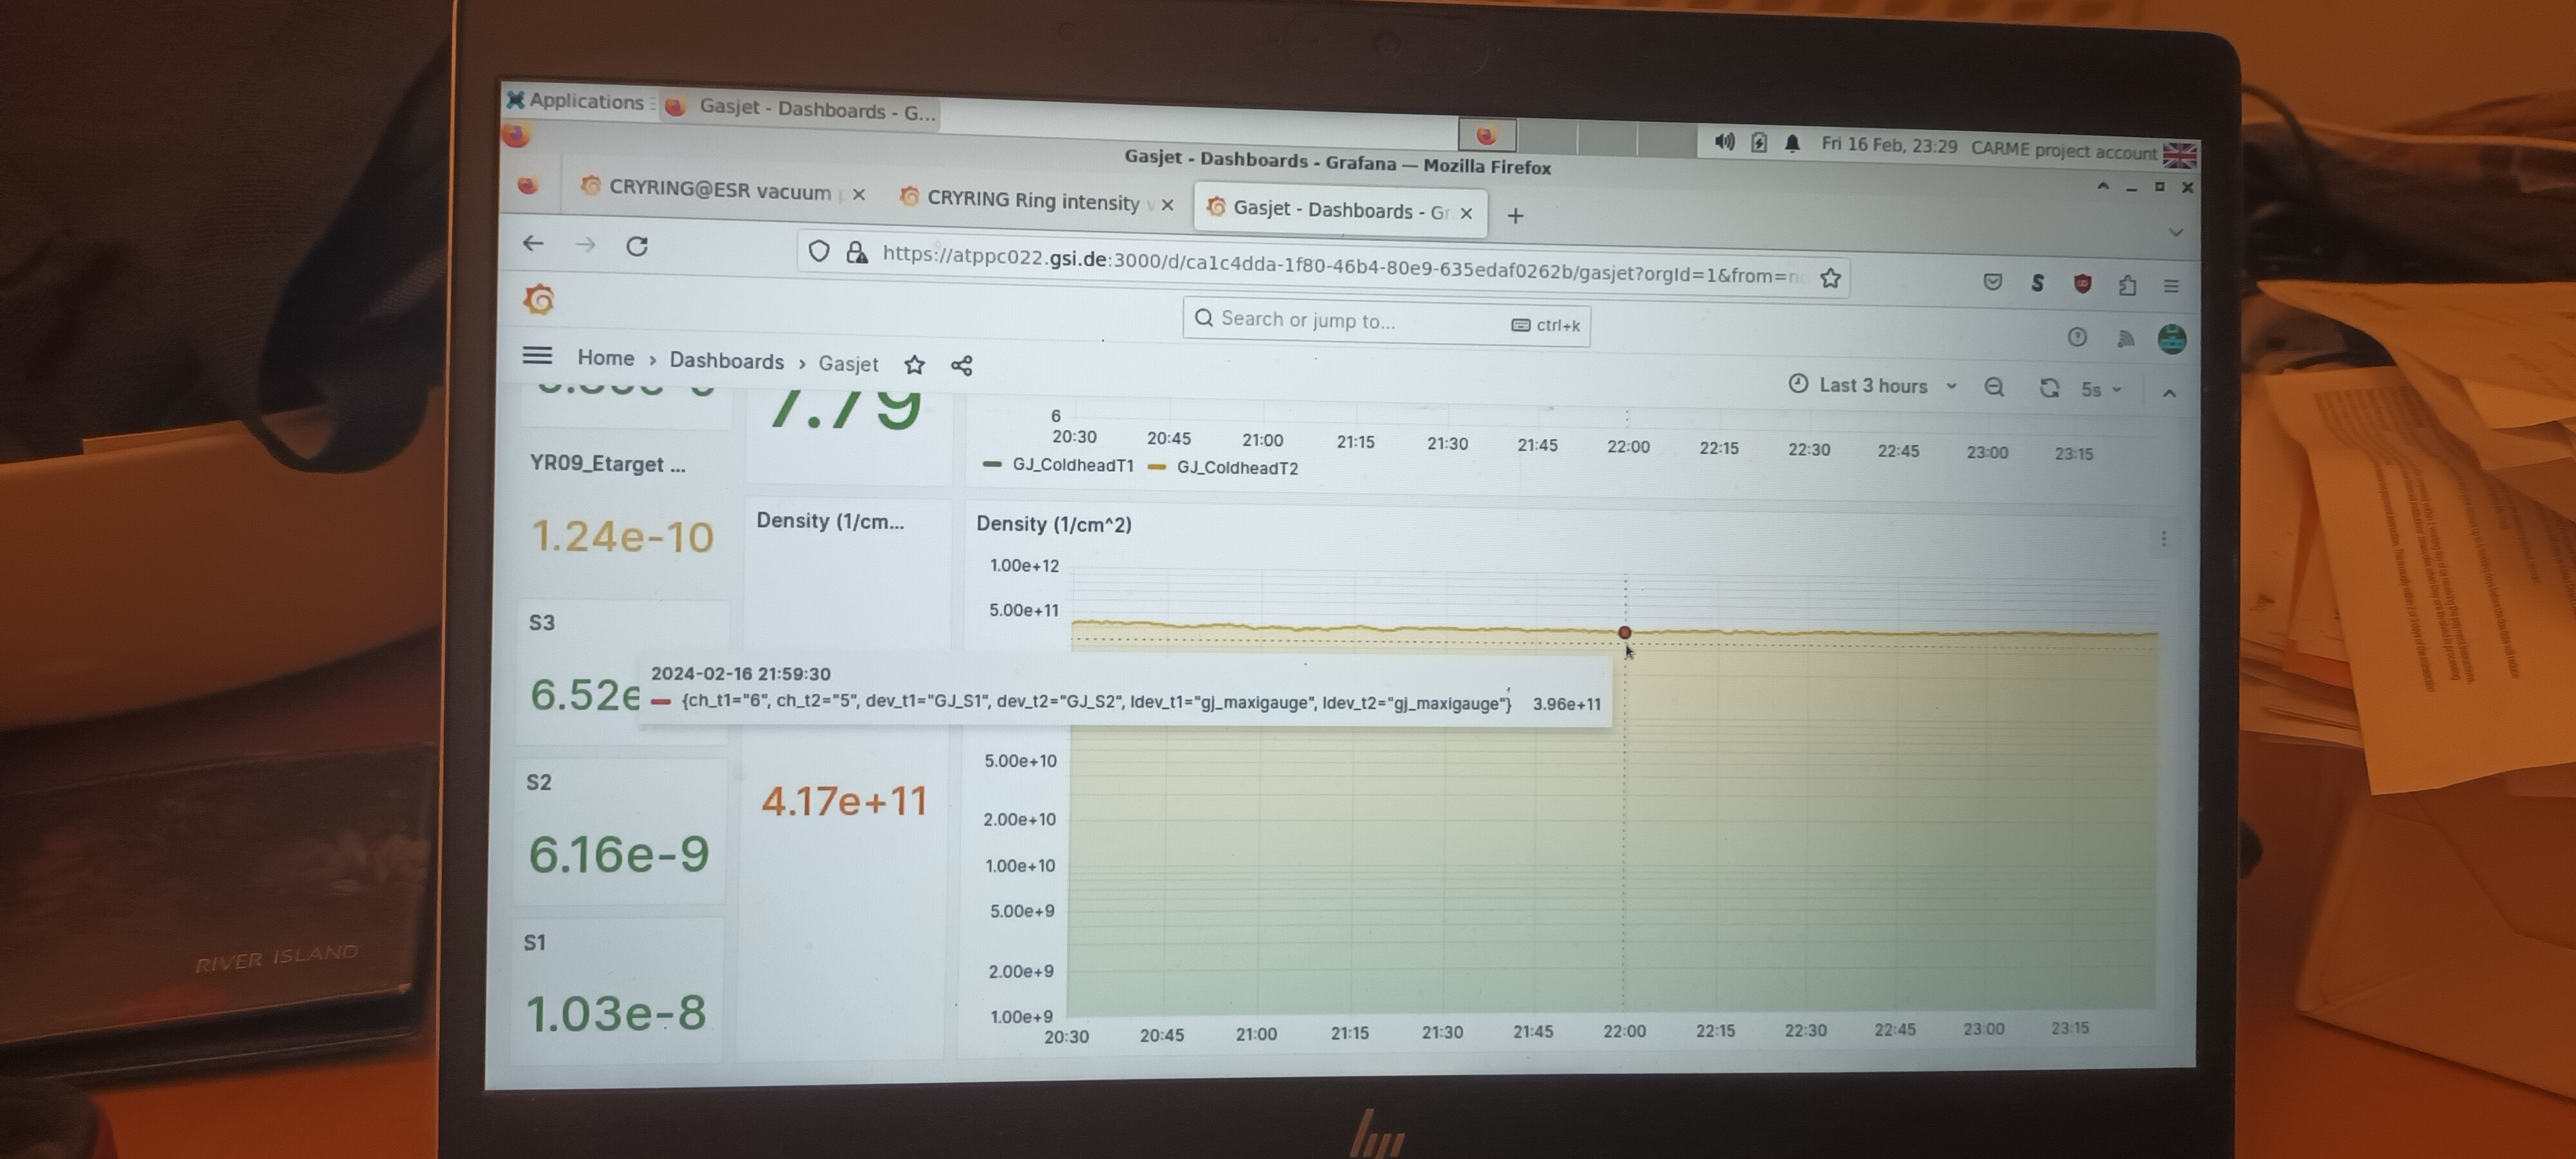
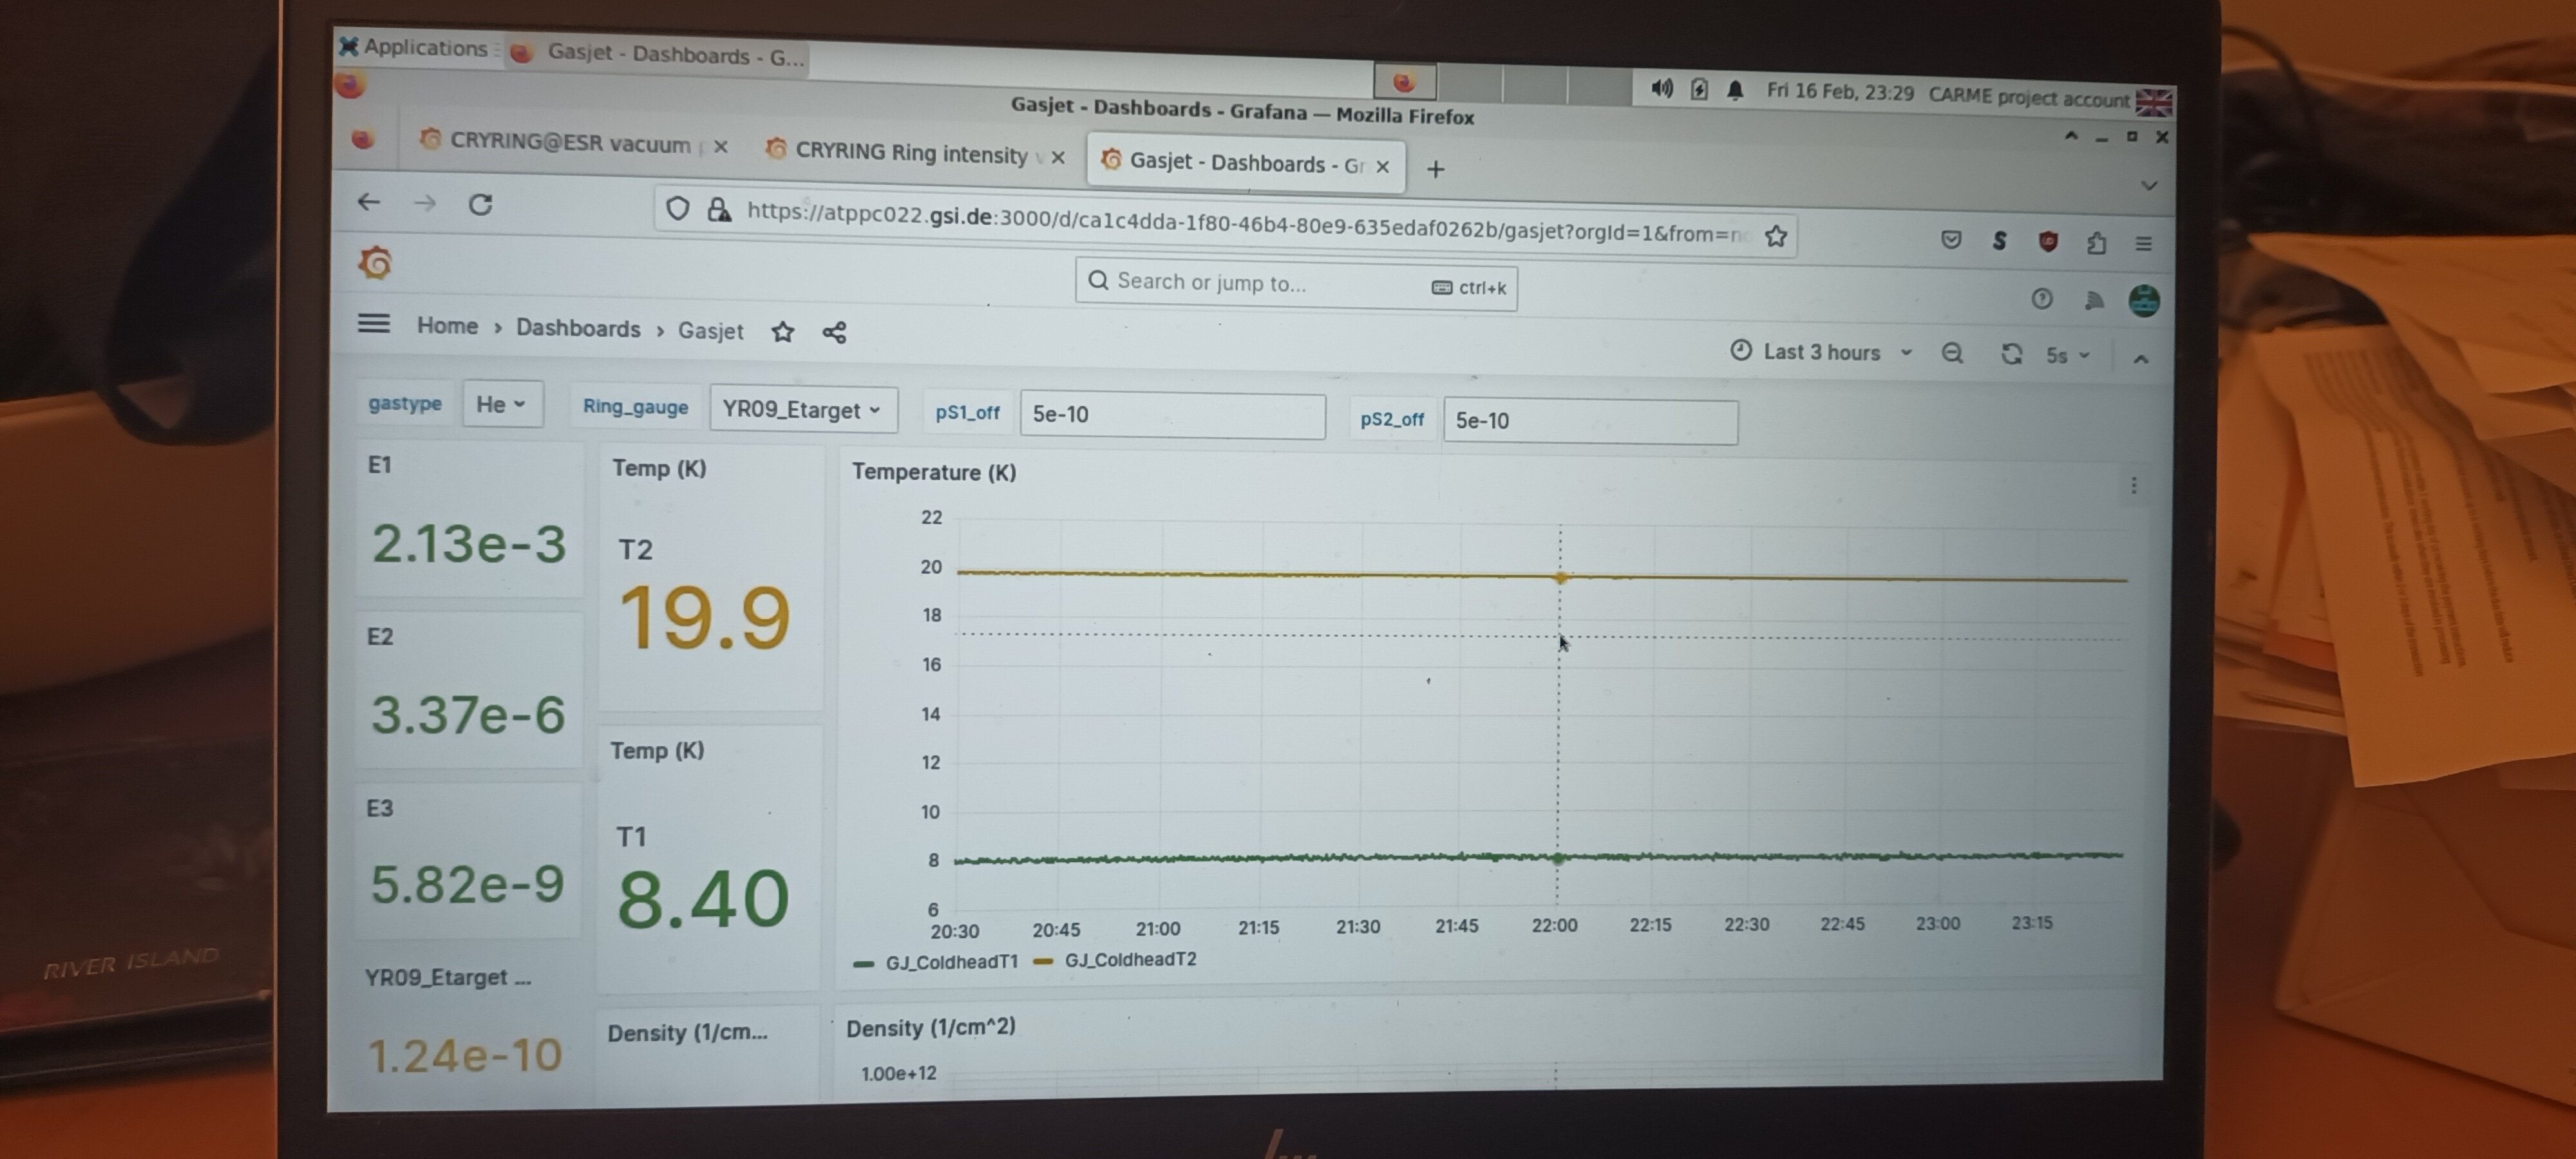
23.30 YR12DTIC 2.5e7/s
      YR09 vacuum 7e-11 - 1.2e-10 mbar
      density 4e11/cm2
      See attachments 27-34


01.30 DAQ continues file G22-86/R35_39

      FEE64 temperatures - attachments 35-36

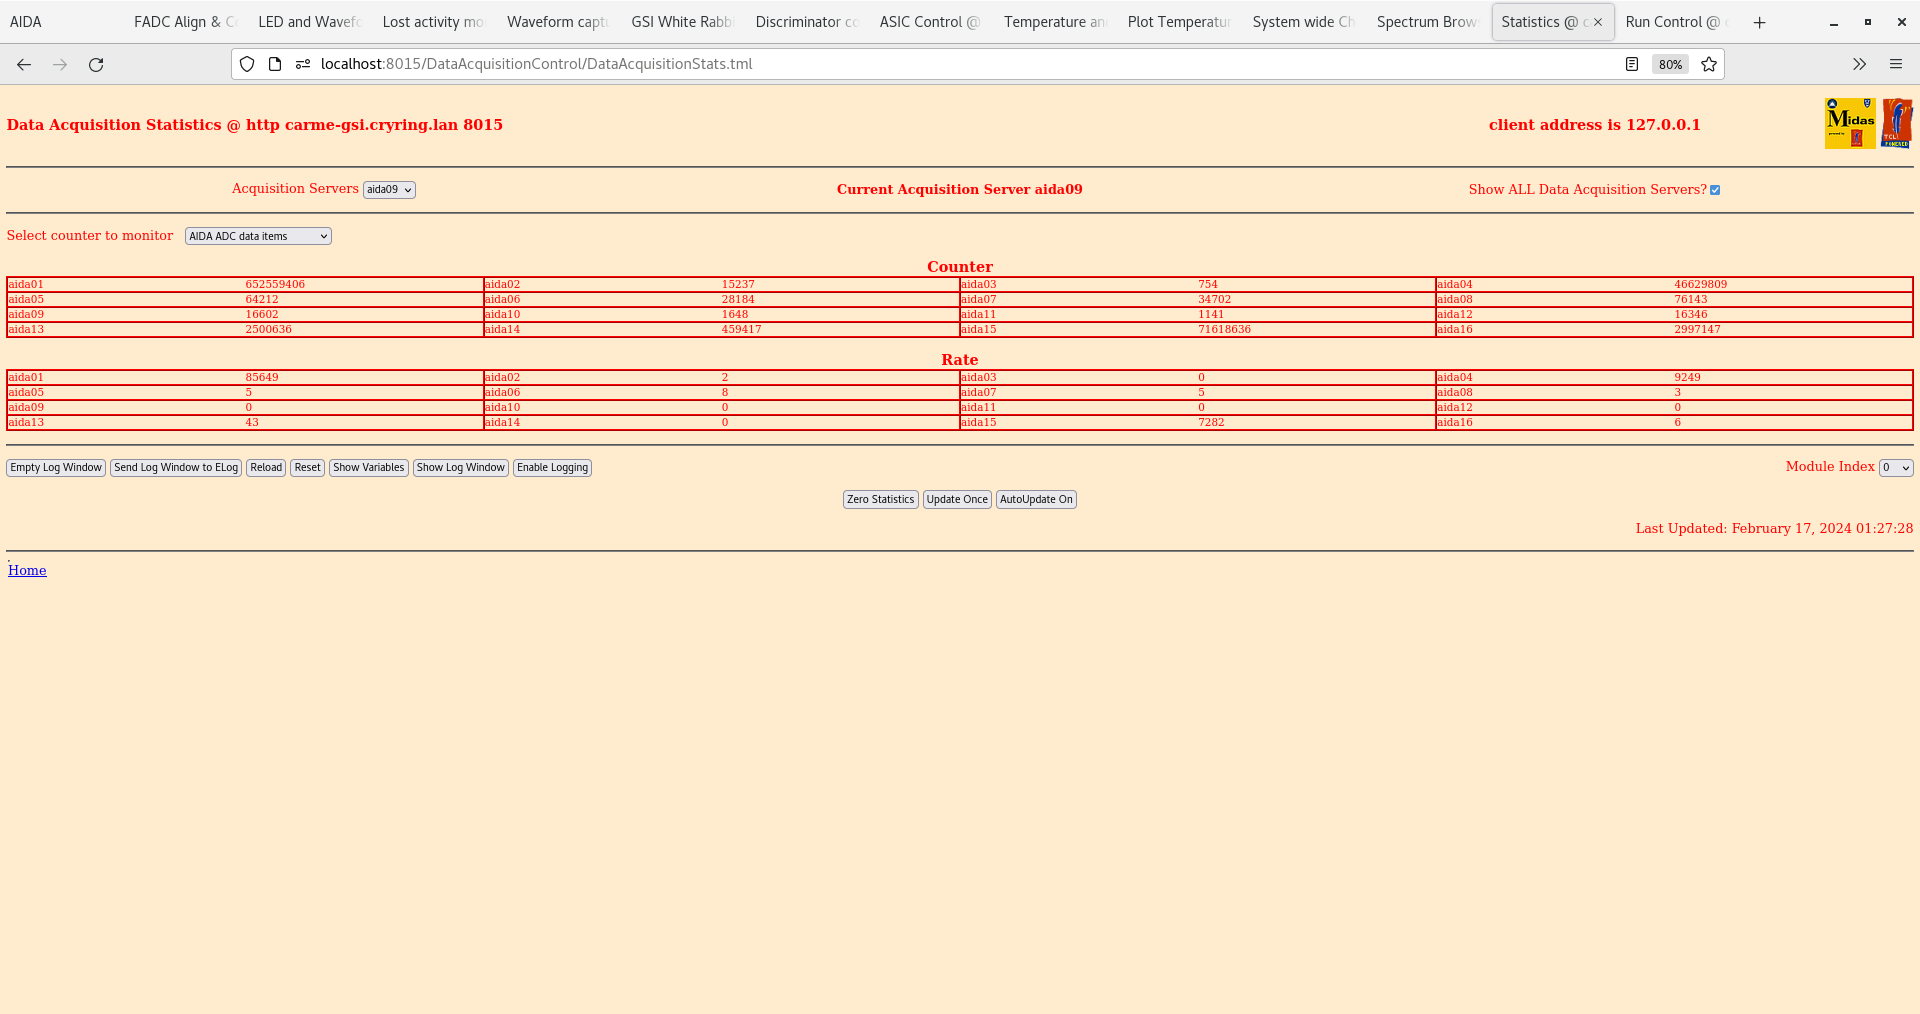
      ADC data item stats - attachment 37

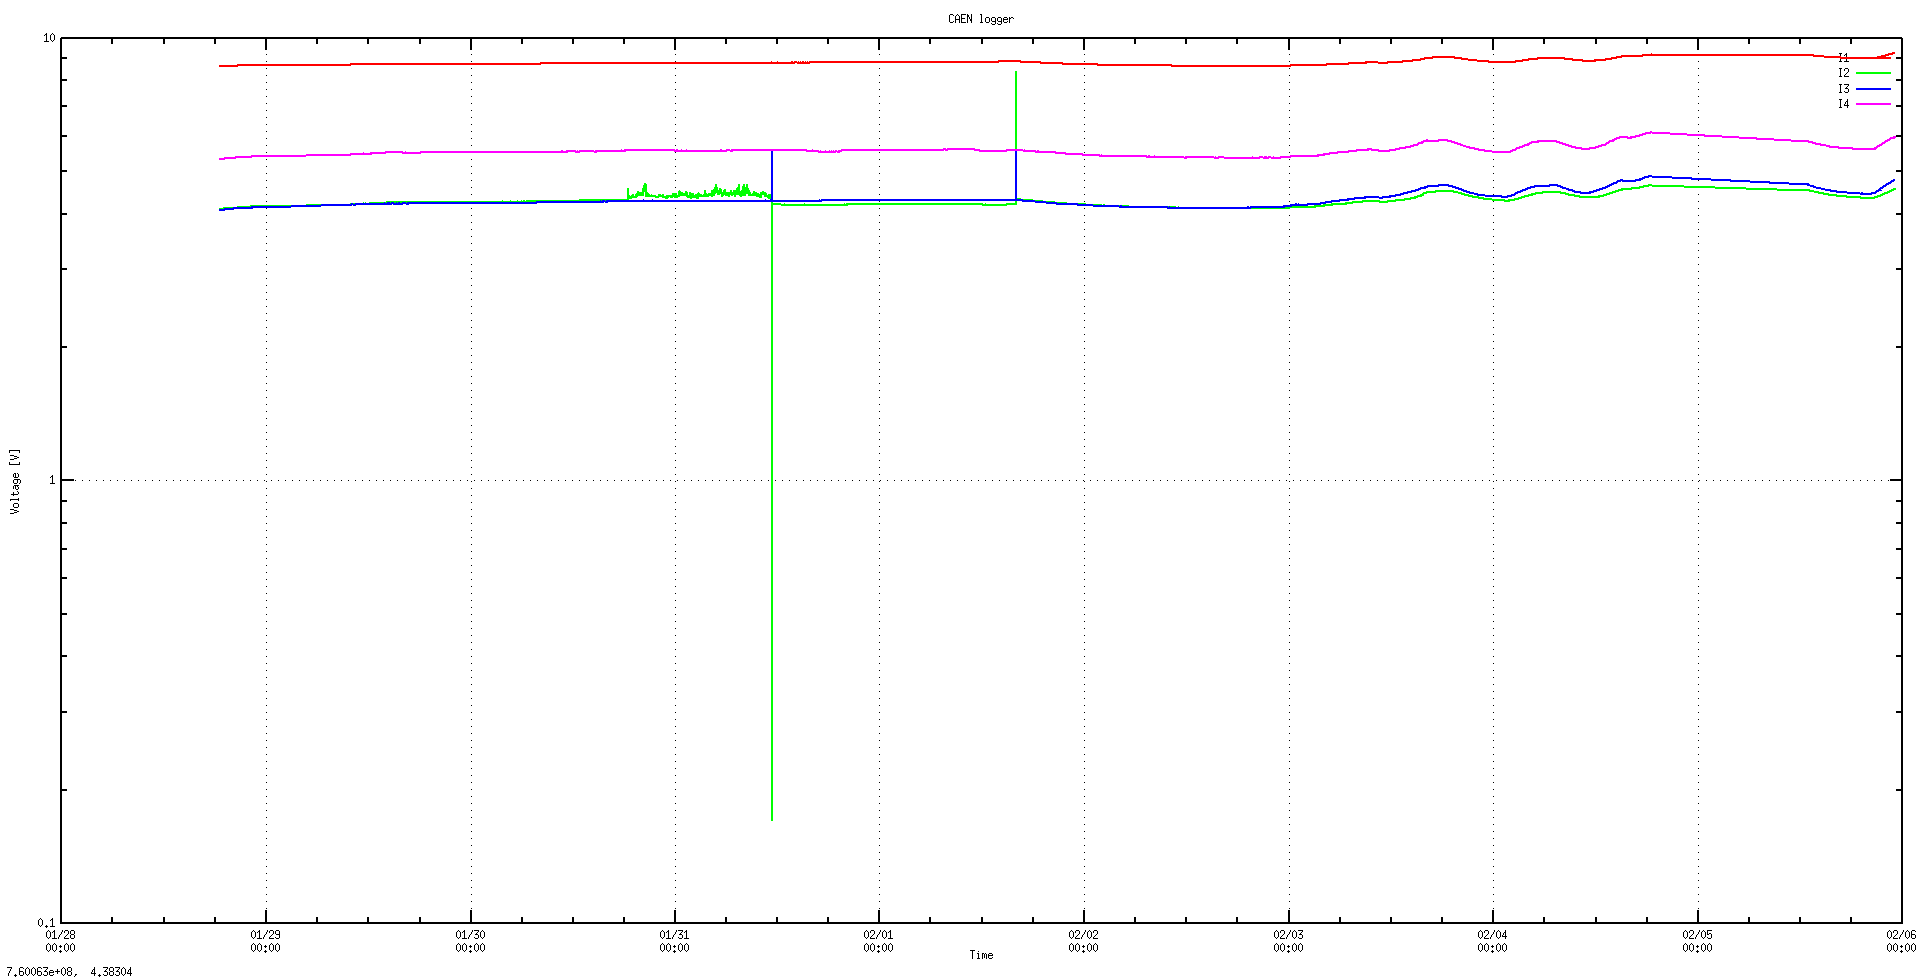
      DSSSD leakage currents - attachment 38

      YR12DTIC 2.5e7/s
      YR09 vacuum 7e-11 - 1.2e-10 mbar
      density 4.1e11/cm2


03.05 YR12DTIC 2.2e7/s
      YR09 vacuum 7e-11 - 1.2e-10 mbar
      density 3.5e11/cm2

      DAQ continues file G22-86/R35_42

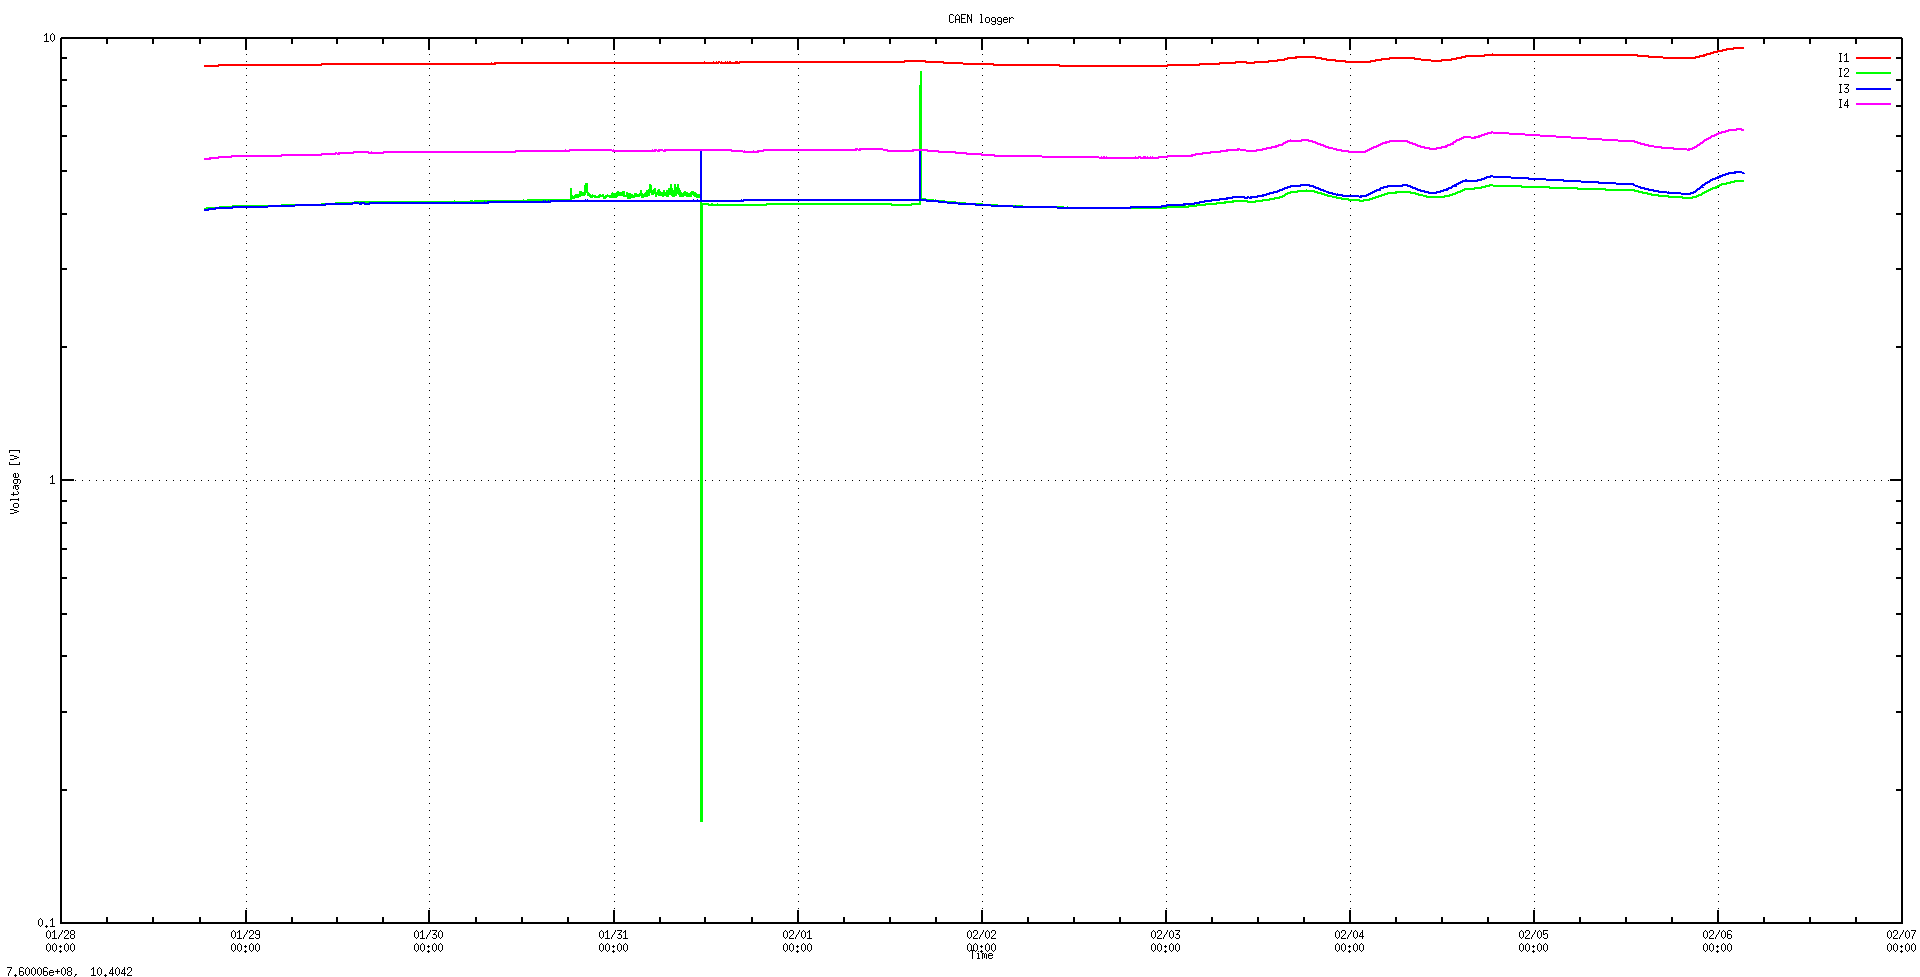
      DSSSD leakage currents - attachment 39

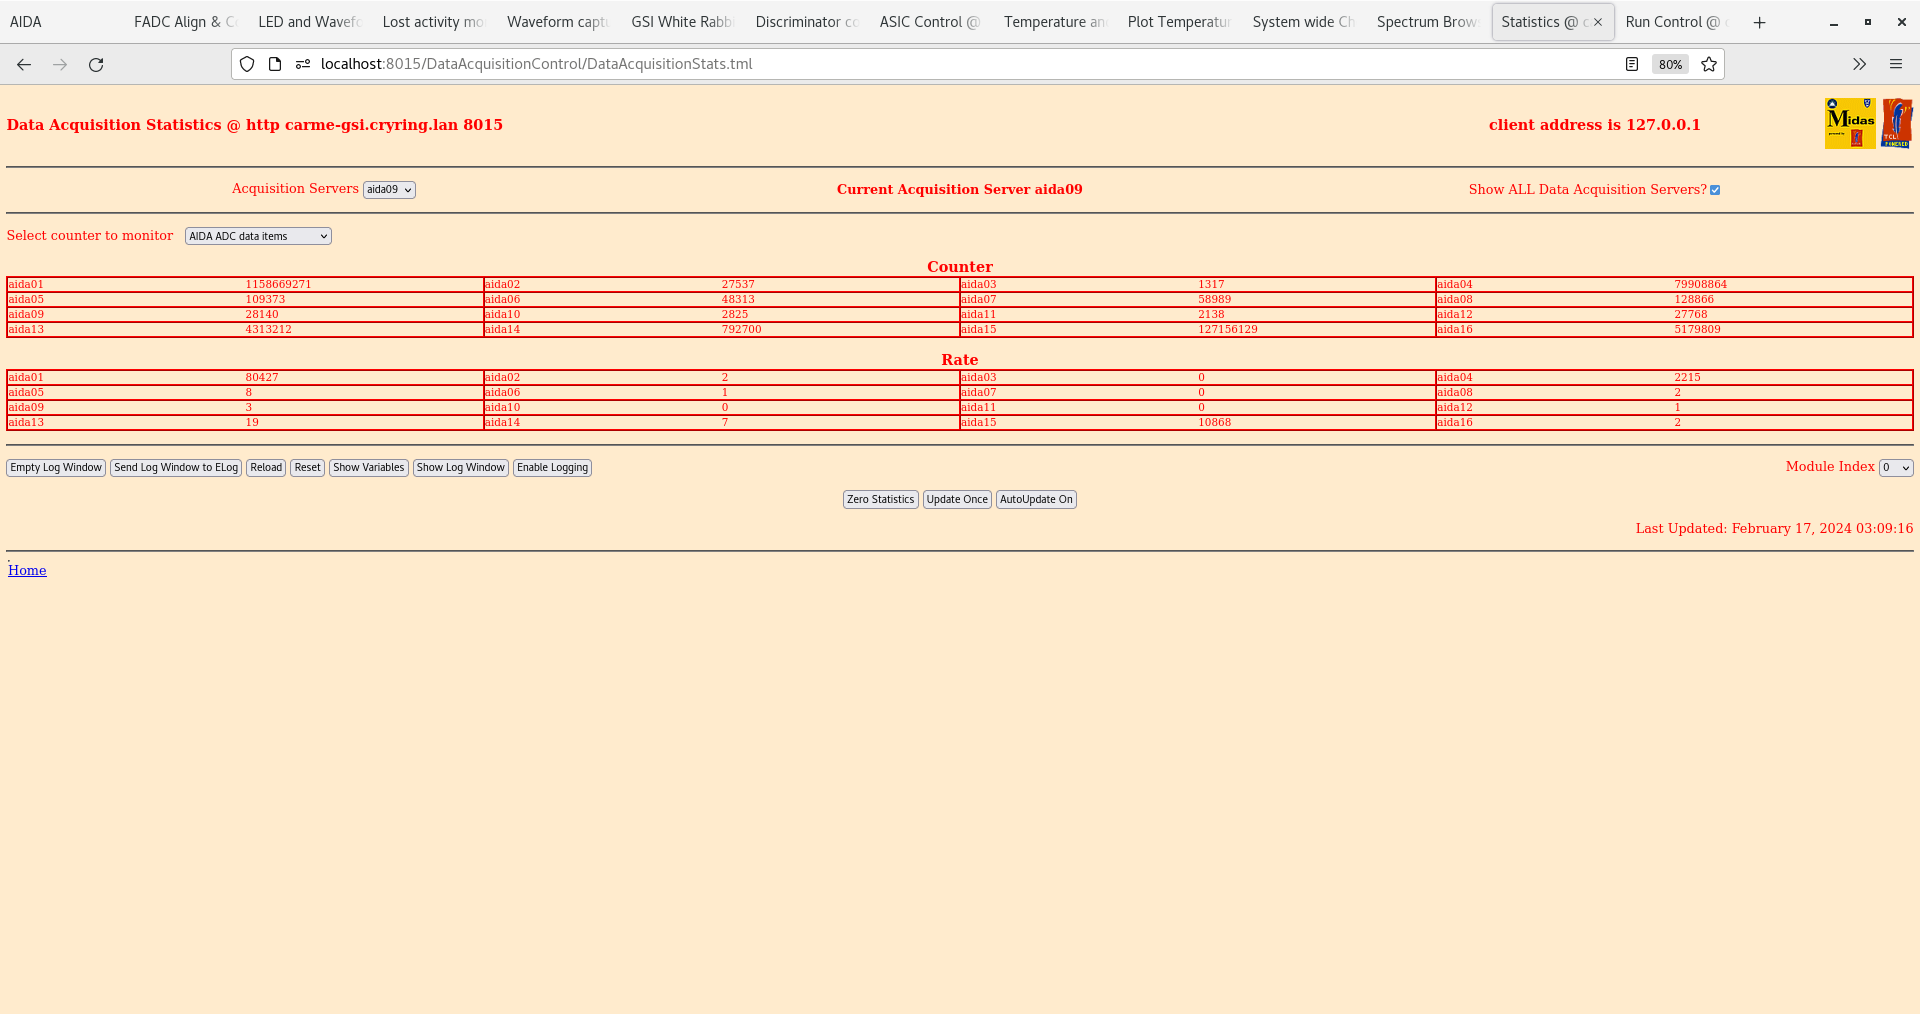
      FEE64 temperatures - attachments 40-41

      ADC data item stats - attachment 42

05.05 DAQ continues file G22-86/R35_47

      YR12DTIC 2.5e7/s
      density 3.8e11/cm2

      DAQ continues file G22-86/R35_42

      DSSSD leakage currents - attachment 43

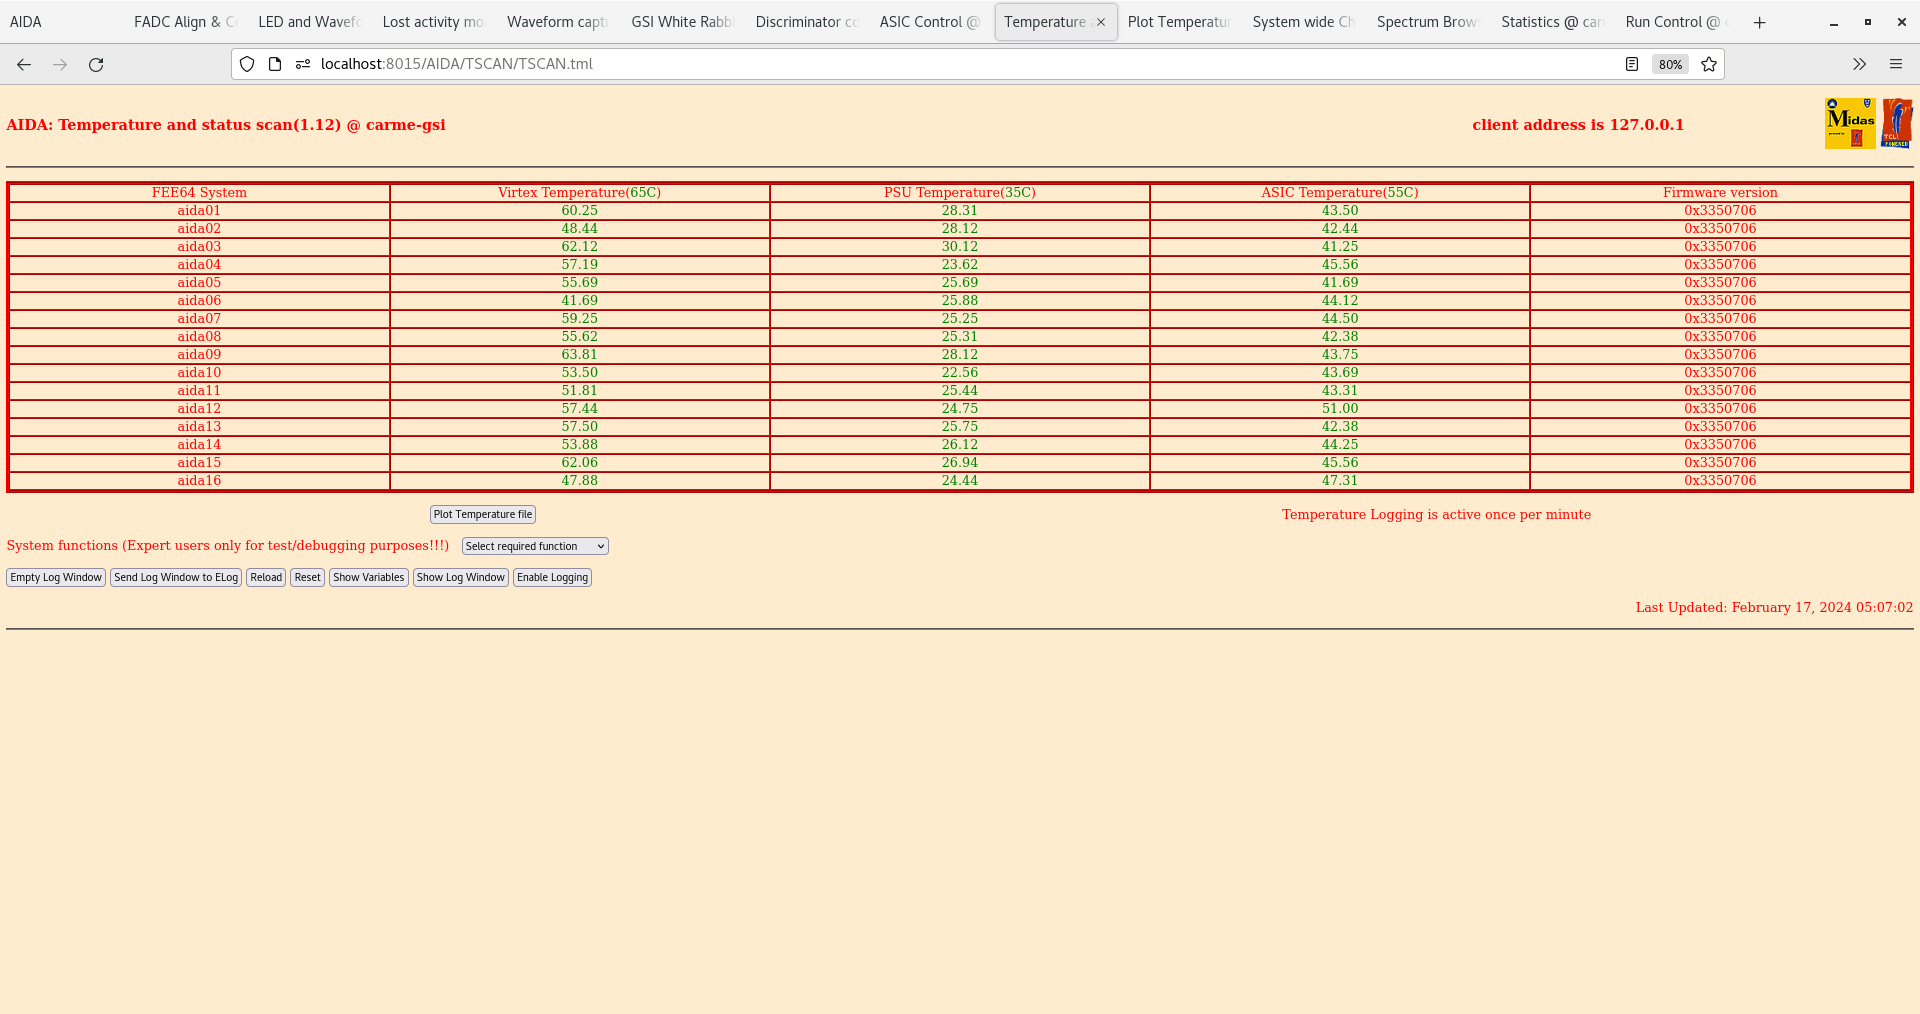
      FEE64 temperatures - attachments 44-45

      ADC data item stats - attachment 46

      per FEE64 Rate spectra - attachments 47-48
       aida12 asic #1 and # 2 HEC activity
       and following Check ASIC load aida12

      ADC data item stats - attachment 49


Shift Summary

Beam, target density and vacuum appear to have been stable overnight

FEE64 temperatures continue to cycle

Evidence of some radiation damage DSSSDD 0 presumably for most forward lab angle strips?

aida12 asic #1 and #2 high rate HEC activity - fixed by ASIC check load |
| Attachment 1: Screenshot_from_2024-02-16_22-51-27.png
|

|
| Attachment 2: Screenshot_from_2024-02-16_22-52-15.png
|
|
| Attachment 3: Screenshot_from_2024-02-16_22-53-02.png
|
|
| Attachment 4: Screenshot_from_2024-02-16_22-54-10.png
|
|
| Attachment 5: Screenshot_from_2024-02-16_22-55-11.png
|

|
| Attachment 6: Screenshot_from_2024-02-16_22-55-38.png
|

|
| Attachment 7: Screenshot_from_2024-02-16_22-55-55.png
|

|
| Attachment 8: Screenshot_from_2024-02-16_22-56-24.png
|
|
| Attachment 9: Screenshot_from_2024-02-16_22-57-14.png
|
|
| Attachment 10: Screenshot_from_2024-02-16_22-57-37.png
|
|
| Attachment 11: Screenshot_from_2024-02-16_22-58-23.png
|

|
| Attachment 12: Screenshot_from_2024-02-16_22-59-08.png
|

|
| Attachment 13: Screenshot_from_2024-02-16_22-59-46.png
|

|
| Attachment 14: Screenshot_from_2024-02-16_23-00-33.png
|

|
| Attachment 15: Screenshot_from_2024-02-16_23-01-18.png
|
|
| Attachment 16: Screenshot_from_2024-02-16_23-01-59.png
|
|
| Attachment 17: Screenshot_from_2024-02-16_23-02-21.png
|

|
| Attachment 18: Screenshot_from_2024-02-16_23-02-36.png
|
|
| Attachment 19: Screenshot_from_2024-02-16_23-02-48.png
|

|
| Attachment 20: Capture.PNG
|

|
| Attachment 21: Screenshot_from_2024-02-16_23-18-08.png
|

|
| Attachment 22: Screenshot_from_2024-02-16_23-18-22.png
|
|
| Attachment 23: Screenshot_from_2024-02-16_23-18-34.png
|

|
| Attachment 24: Screenshot_from_2024-02-16_23-19-00.png
|
|
| Attachment 25: Screenshot_from_2024-02-16_23-19-13.png
|
|
| Attachment 26: Screenshot_from_2024-02-16_23-19-26.png
|

|
| Attachment 27: Capture.PNG
|

|
| Attachment 28: 20240216_222850.jpg
|

|
| Attachment 29: 20240216_222907.jpg
|
|
| Attachment 30: 20240216_222736.jpg
|

|
| Attachment 31: 20240216_222950.jpg
|
|
| Attachment 32: 20240216_222747.jpg
|

|
| Attachment 33: 20240216_222928.jpg
|

|
| Attachment 34: 20240216_222941.jpg
|
|
| Attachment 35: Screenshot_from_2024-02-17_01-24-57.png
|
|
| Attachment 36: Screenshot_from_2024-02-17_01-26-57.png
|
|
| Attachment 37: Screenshot_from_2024-02-17_01-27-34.png
|
|
| Attachment 38: Screenshot_from_2024-02-17_01-29-05.png
|

|
| Attachment 39: Screenshot_from_2024-02-17_03-07-38.png
|
|
| Attachment 40: Screenshot_from_2024-02-17_03-08-05.png
|

|
| Attachment 41: Screenshot_from_2024-02-17_03-08-57.png
|

|
| Attachment 42: Screenshot_from_2024-02-17_03-09-26.png
|
|
| Attachment 43: Screenshot_from_2024-02-17_05-06-46.png
|

|
| Attachment 44: Screenshot_from_2024-02-17_05-07-11.png
|
|
| Attachment 45: Screenshot_from_2024-02-17_05-08-19.png
|

|
| Attachment 46: Screenshot_from_2024-02-17_05-09-42.png
|

|
| Attachment 47: Screenshot_from_2024-02-17_05-11-03.png
|

|
| Attachment 48: Screenshot_from_2024-02-17_05-11-27.png
|

|
| Attachment 49: Capture.PNG
|

|
|
519
|
Fri Feb 16 10:02:41 2024 |
JM, OF, CB, AR, EM | Run 35 - cooled beam on target |
11:01
Run 35 started cooled beam on target
Detectors IN (left arm pot =36.5 mm, right arm pot = 70.49 mm)
Electron cooler voltage 751.4 this corresponds to 1.3436 MeV/u. This should be on the peak of the resonance.
Target density is 3.75e11 at/cm2, ring pressure looks OK YR09 1.43e-10 mbar.
Horizontal beam position is -7.5 mm, vertical beam position is 0.0 mm. Same as run 33.
Beam is in the ring for 8 seconds and total cycle time between injections is 12 seconds. Same as run 33
Beam injection looks stable. ~2e7 injected and no missed injections so far.
Merger OK, Tape server OK
Merger statistics zero'd
All histograms and statistics zero'd, monitoring code reset.
ADC data item statistics looks as before, very few counts until injection into the ring. OK
FEE temperatures look OK
System checks OK
Leakage current trending upwards, same as previous elog.
13:33
FEE temperatures OK - all FEEs at least 1.5C below vertex warning
ADC data items statistics OK
Merger and Tape server OK
Target density 3.8e11 at/cm2, ring pressure stable.
Ring injections look very stable
Leakage current now decreasing (attachment 1)
Monitoring code xy and energy histograms (attachment 2+3)
15:03
System wide checks ok. Merger ok. Temperatures ok.
Attatchment 4: Stats
Attatchment 5: Temperatures
Attatchments 6-9: Waveforms.
Attatchment 10: Leakage current
Attatchment 11: lowenergyEytotal plots
17:09
System wide check ok. Merger ok. Temperature ok.
Attachment 12: Stats
Attachment 13: Temperatures
Attachment 14-18: Waveforms (Layout 7: strange behaviour in aida01, went to ASIC Control and did "Check ASIC control" three times, which resolved the problem)
Attachment 19: Leakage current
Attachment 20: lowenergyEytotal plots
Gas pressure was going up a little bit: changed Y position of the nozzle from 1000 to 950.
17:55
The gas jet target pressure started to fall sharply at 17:34 and went down to zero within 2 minutes.
It came back while it we were changing the nozzle position but at 17:49 fell to zero again.
Currently waiting for Nikos to came and have look at it.
18:10
Target back in place and has a density of 4.04e11. Beam transformer looks similar to pre plummeting target density.
18.55 Check ASIC load FEE64 aida16 asic#3 HEC channels active
Following check load merger rate decreased significantly.
19:14
Gas density remains stable around 4e11 after the incident at 17:34 and the beam transformer singal looks ok too. Gas pressure ok.
Merger: All aidas turn green but the merger has decreased significantly (too about 306 000 items/sec) as mentioned above.
System wide check ok. Temperature ok.
Attachment 21: Stats
Attachment 22: Temperatures
Attachment 23-26: Waveforms
Attachment 27: Leakage current
|
| Attachment 1: Screenshot_from_2024-02-16_13-44-25.png
|

|
| Attachment 2: Screenshot_from_2024-02-16_13-46-26.png
|

|
| Attachment 3: Screenshot_from_2024-02-16_13-46-52.png
|

|
| Attachment 4: Screenshot_from_2024-02-16_14-56-20.png
|

|
| Attachment 5: Screenshot_from_2024-02-16_14-56-38.png
|

|
| Attachment 6: Screenshot_from_2024-02-16_14-58-01.png
|

|
| Attachment 7: Screenshot_from_2024-02-16_14-58-31.png
|

|
| Attachment 8: Screenshot_from_2024-02-16_14-59-59.png
|

|
| Attachment 9: Screenshot_from_2024-02-16_15-00-11.png
|

|
| Attachment 10: Screenshot_from_2024-02-16_15-00-54.png
|

|
| Attachment 11: Screenshot_from_2024-02-16_15-02-24.png
|

|
| Attachment 12: Screenshot_from_2024-02-16_16-54-55.png
|

|
| Attachment 13: Screenshot_from_2024-02-16_16-55-17.png
|

|
| Attachment 14: Screenshot_from_2024-02-16_16-56-23.png
|

|
| Attachment 15: Screenshot_from_2024-02-16_16-57-08.png
|

|
| Attachment 16: Screenshot_from_2024-02-16_16-58-01.png
|

|
| Attachment 17: Screenshot_from_2024-02-16_17-04-41.png
|

|
| Attachment 18: Screenshot_from_2024-02-16_17-06-07.png
|

|
| Attachment 19: Screenshot_from_2024-02-16_17-08-45.png
|

|
| Attachment 20: Screenshot_from_2024-02-16_17-20-51.png
|

|
| Attachment 21: Screenshot_from_2024-02-16_19-10-26.png
|

|
| Attachment 22: Screenshot_from_2024-02-16_19-10-39.png
|

|
| Attachment 23: Screenshot_from_2024-02-16_19-11-56.png
|

|
| Attachment 24: Screenshot_from_2024-02-16_19-12-21.png
|

|
| Attachment 25: Screenshot_from_2024-02-16_19-12-50.png
|

|
| Attachment 26: Screenshot_from_2024-02-16_19-13-32.png
|

|
| Attachment 27: Screenshot_from_2024-02-16_19-14-12.png
|

|
|
521
|
Sat Feb 17 06:19:27 2024 |
JM, CB | Run 35 - contd |
07:10
FEE temperatures OK
System checks OK
Merger and tape server OK
Statistics look OK,
Rates in the detectors from the mointoring code indicate we have beam on target.
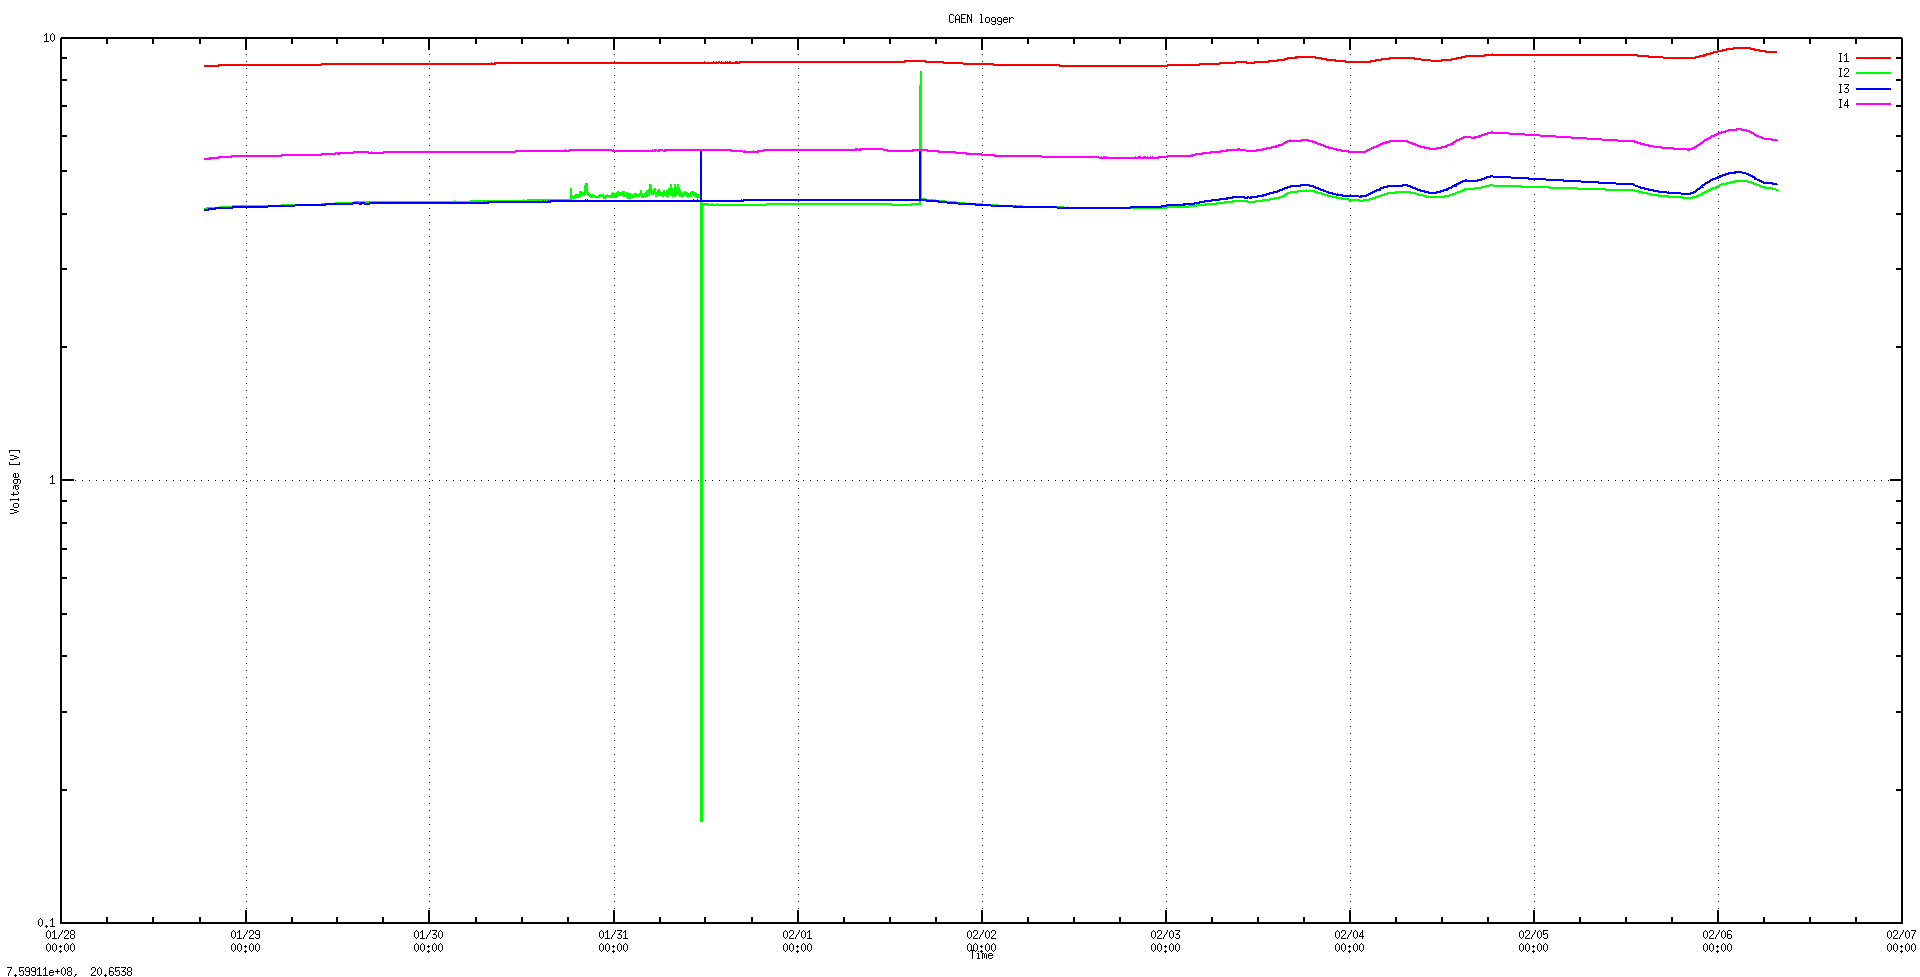
Detector leakge current appears to be following same pattern as yesterday -> temperature (attachment 1)
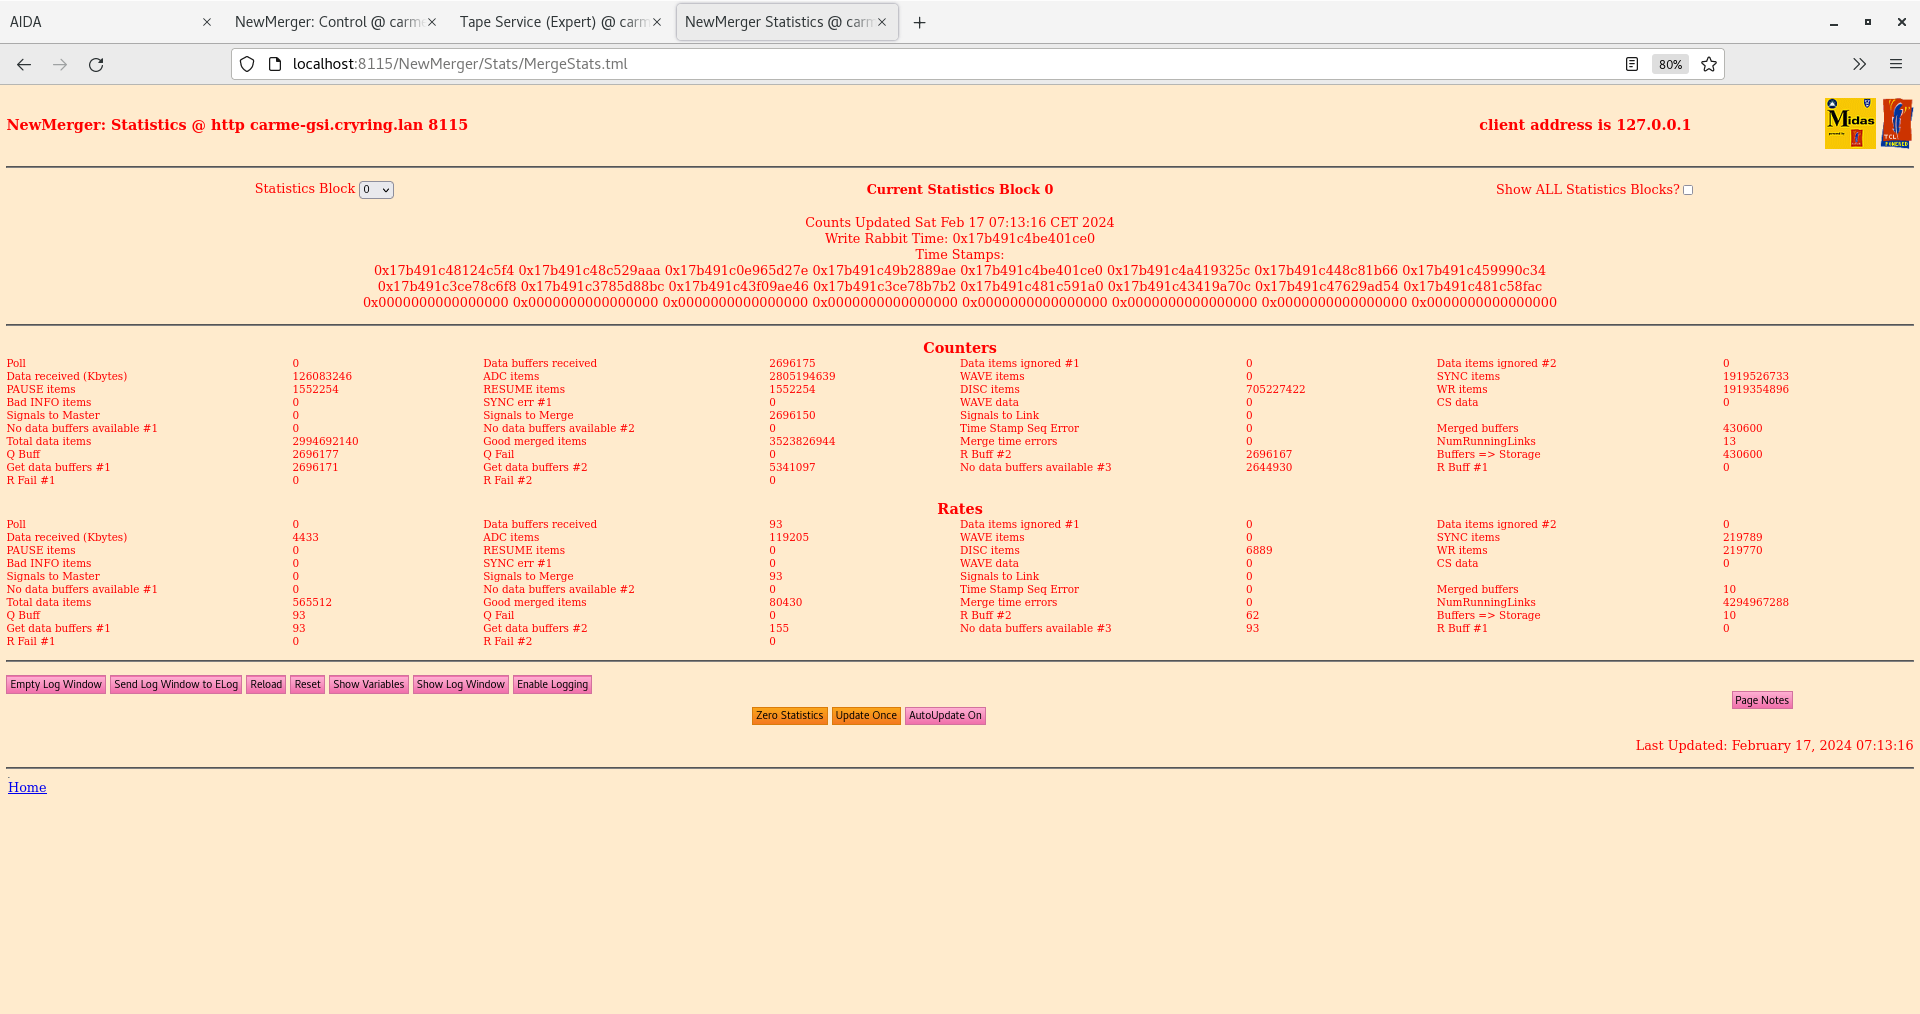
Merger stats (attachment 2) - quite a few more pause / resume statements than normal - noise last night?
Target density appears stable over the last 3 hours ~3.8e11 at/cm2, ring pressure stable YR09 ~1.5e-10 mbar
Beam injection looks stable over the last few hours.
09:08
FEE temperatures OK -aida03 and aida09 0.5 C over 65C warning.
system checks OK
ADC data item stats OK
Spectrum browser rate (attachment 3)
Merger and Tape server OK
Monitoring xy and energy histograms since zero'd last night (attachments 4+5)
Target density slight drop to ~3.5e11 at/cm2. Pressure in the ring stable. CB attempting to optimise target density and ring pressure.
Beam injection into the ring still good
11:04
FEE temperatures OK
System checks OK
ADC data items and spectrum browser rates OK
Target density ~4.6e11 at/cm2, ring pressure looks OK ~1e-10 mbar
Beam injection still good.
Merger and tape server OK
12:45
Beam injection over last 2 hours has been stable
Target density 4.75e11 and stable. ring pressures are stable.
FEE temperatures OK
System checks OK
ADC data items stats and spectrum browser rates look OK
Merger and tape server OK
14:01
We wish to test the beam ahlo on injection so are ending run
Run stopped. |
| Attachment 1: Screenshot_from_2024-02-17_07-20-01.png
|
|
| Attachment 2: Screenshot_from_2024-02-17_07-21-27.png
|
|
| Attachment 3: Screenshot_from_2024-02-17_09-09-35.png
|

|
| Attachment 4: Screenshot_from_2024-02-17_09-13-44.png
|

|
| Attachment 5: Screenshot_from_2024-02-17_09-14-35.png
|

|
|
588
|
Tue Jun 4 18:08:04 2024 |
Boudefla Dounia - CB - LB - SD | Run 34 |
19:08
Beam energy = 3 MeV.
Horizontal beam position = 4.0 mm, vertical beam position = 0.0 mm.
Target density ~ fluctuating
Beam intensity at inj ~ 1.7e7
Detectors are positioned IN. Left arm = 36.54, right arm = 64.60 mm
MBS signals saved from motors code
Histograms and stats zero'd, monitoring code restarted.
Beam in the ring ~ 6 minutes.
Pressure in YR09 E target ~ 4.36e-11 mbar.
Merger error recovered
White rabbit time stamps
Merger OK, Tape server OK
ADC data item statistics looks as before. OK
FEE temperatures look OK
System checks OK
Leakage current stable
21:27
Merger OK, Tape server OK
ADC data item statistics looks as before. OK
FEE temperatures look OK
System checks OK
Leakage current stable
23:00
Merger OK, Tape server OK
ADC data item statistics looks as before. OK
FEE temperatures look OK
System checks OK
Leakage current stable
Statistics attachment 5
Merger attachment 6
00:42
Merger OK, Tape server OK
ADC data item statistics looks as before. OK
FEE temperatures look OK
System checks OK
Leakage current stable
Density is oscillating between E10 and low E11.
attachment 7 is statistics, attachment 8 is temperature, attachment 9 is merger, attachment 10 is spectrum browser.
02:20
Merger OK, Tape server OK
ADC data item statistics looks as before. OK
FEE temperatures look OK
System checks OK
Leakage current stable
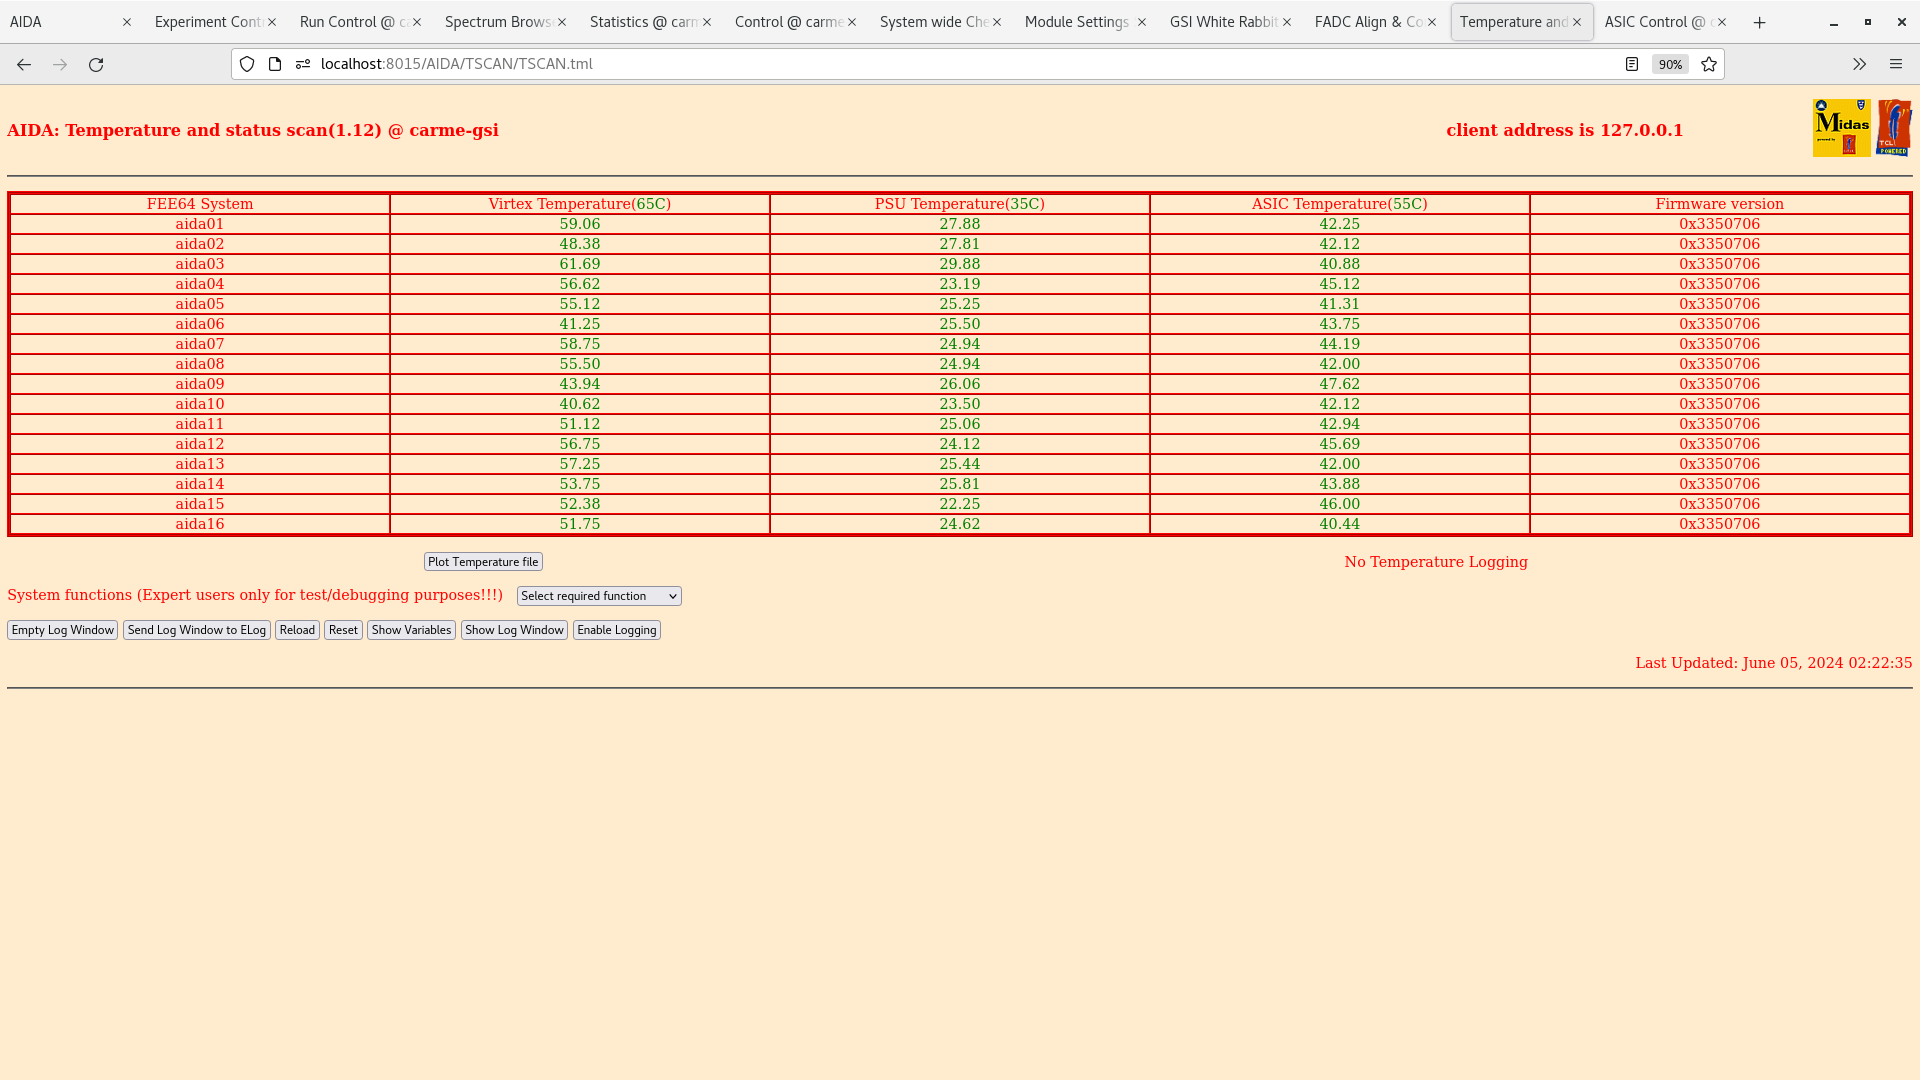
Density is oscillating between E10 and low E11. ( last 15 minutes below 2E10)
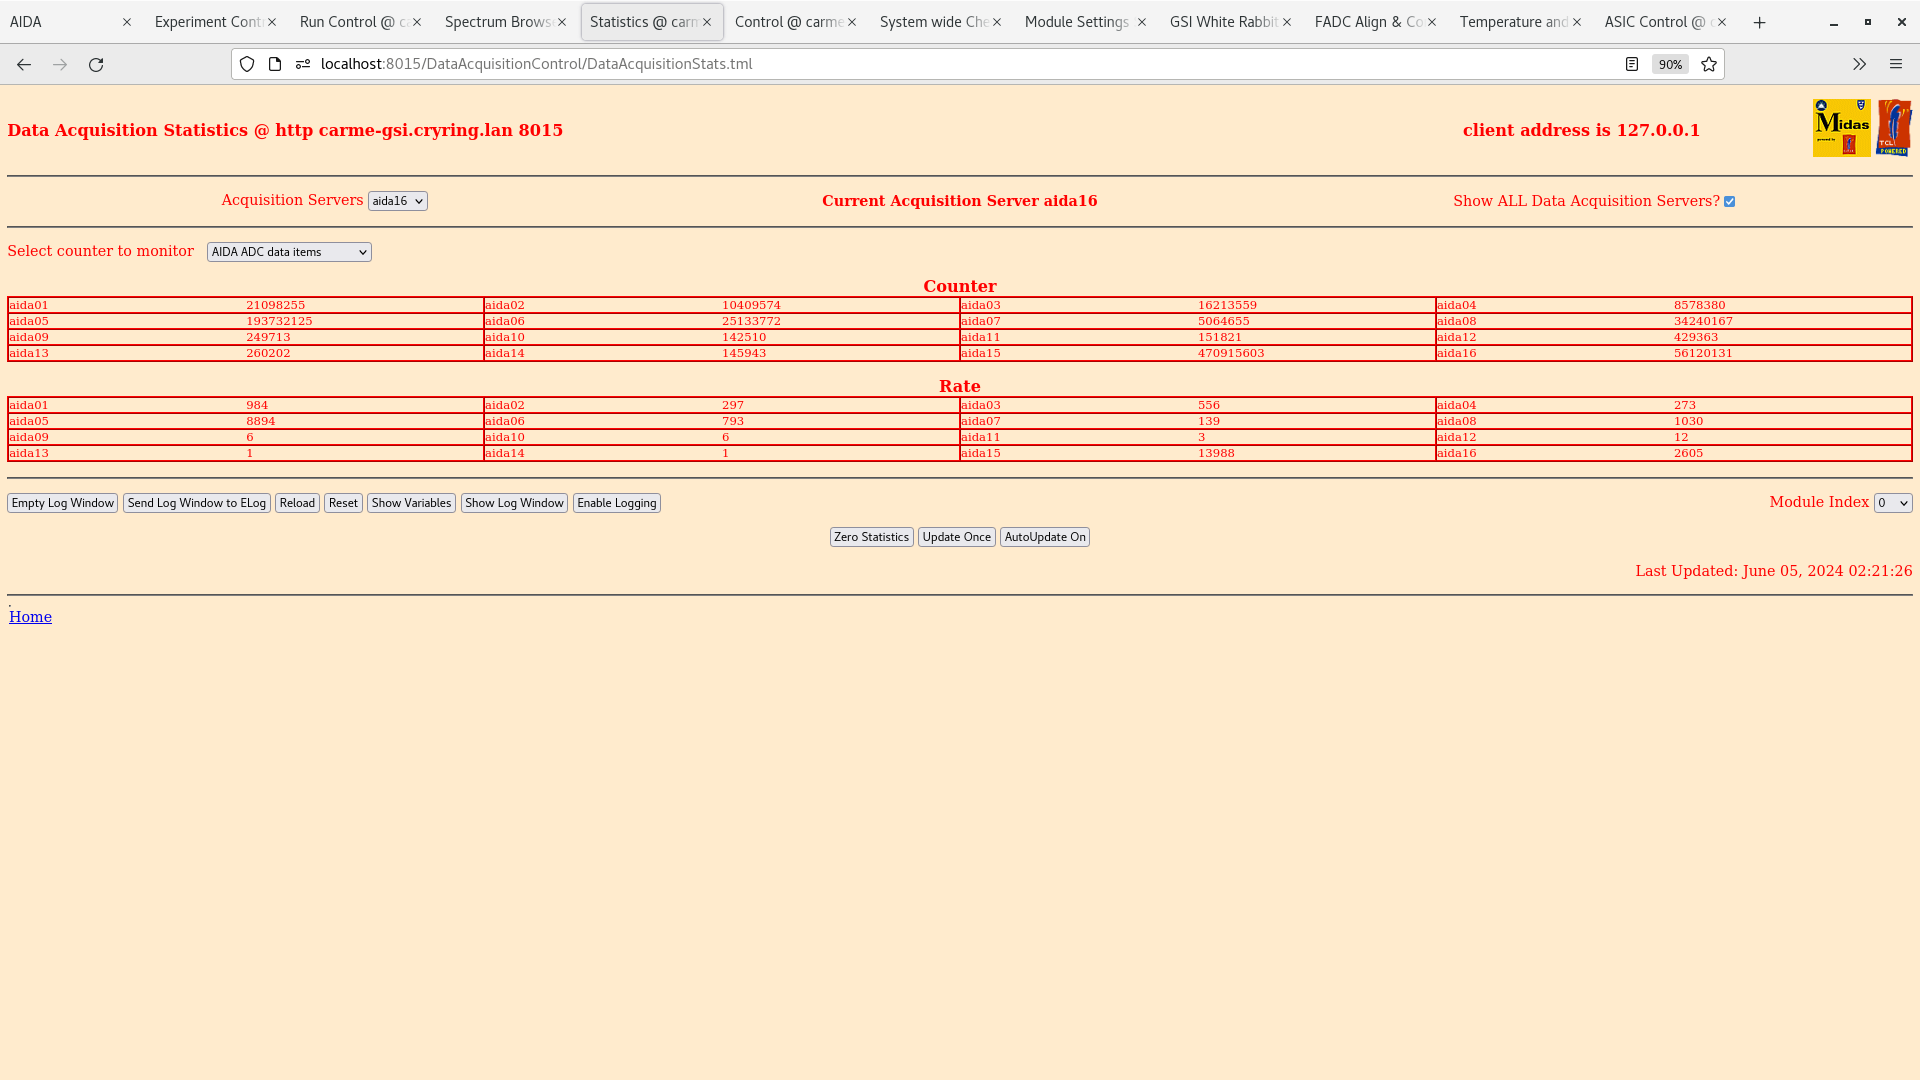
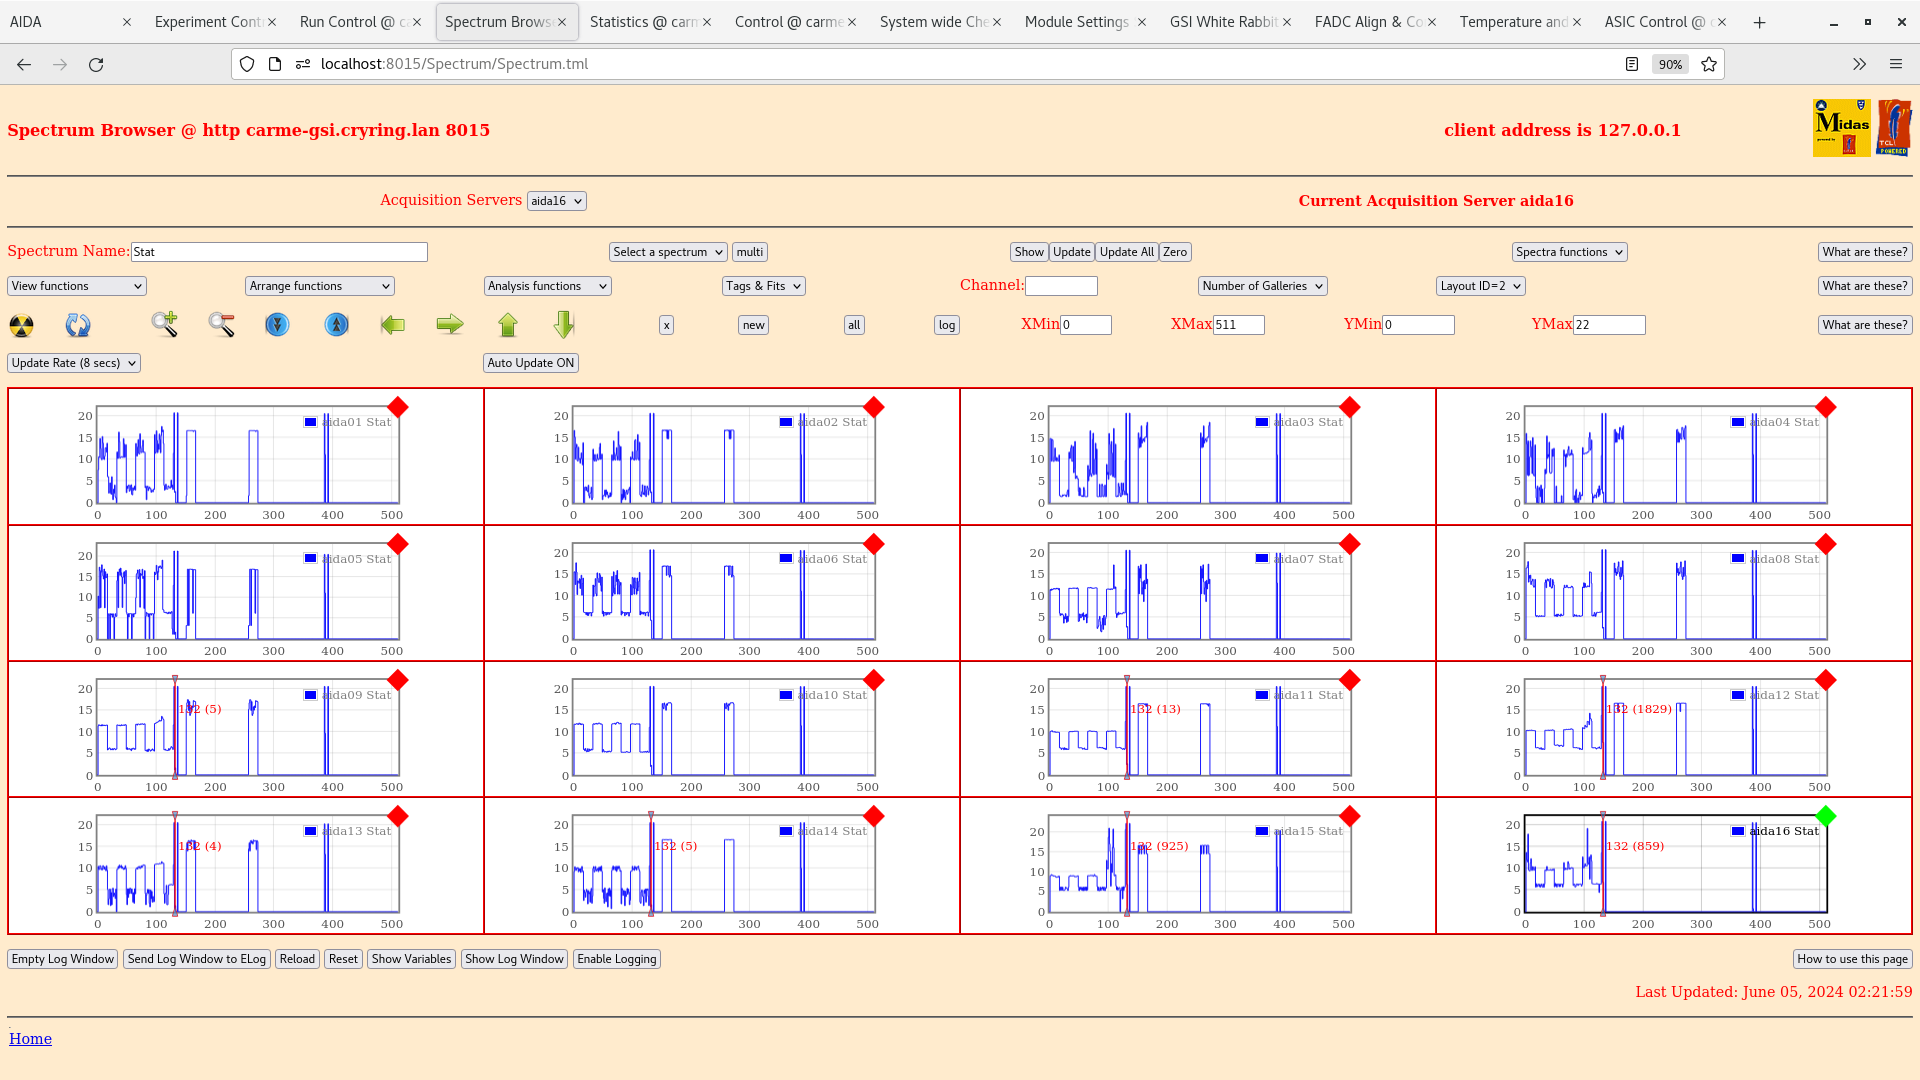
attachment 11 -13
From 2:00 target density falls below 2E10 and started decreasing to the E9 range. At 2:40 we started playing with x-y to get to higher density. At 3:30 we are at 5/6E10 and waiting to see if it stabilizesto that or if it needs more playing.
04:06
Target density being 1-2E11 since 5 minutes
Merger OK, Tape server OK
ADC data item statistics looks as before. OK
FEE temperatures look OK
System checks OK
Leakage current stable
Attachment 14 statistics, attachment 15 merger
05;53
Target density 1E10, sometimes e11, before going down to low E10 and we need to play a bit with x-y to recover it
Merger OK, Tape server OK
ADC data item statistics looks as before. OK
FEE temperatures look OK
System checks OK
Leakage current stable
Attachment 16-18
07:35
Target density 2.5E11, after changiny y position to 1000
Merger OK, Tape server OK
ADC data item statistics looks as before. OK
FEE temperatures look OK
System checks OK
Leakage current stable
09:00
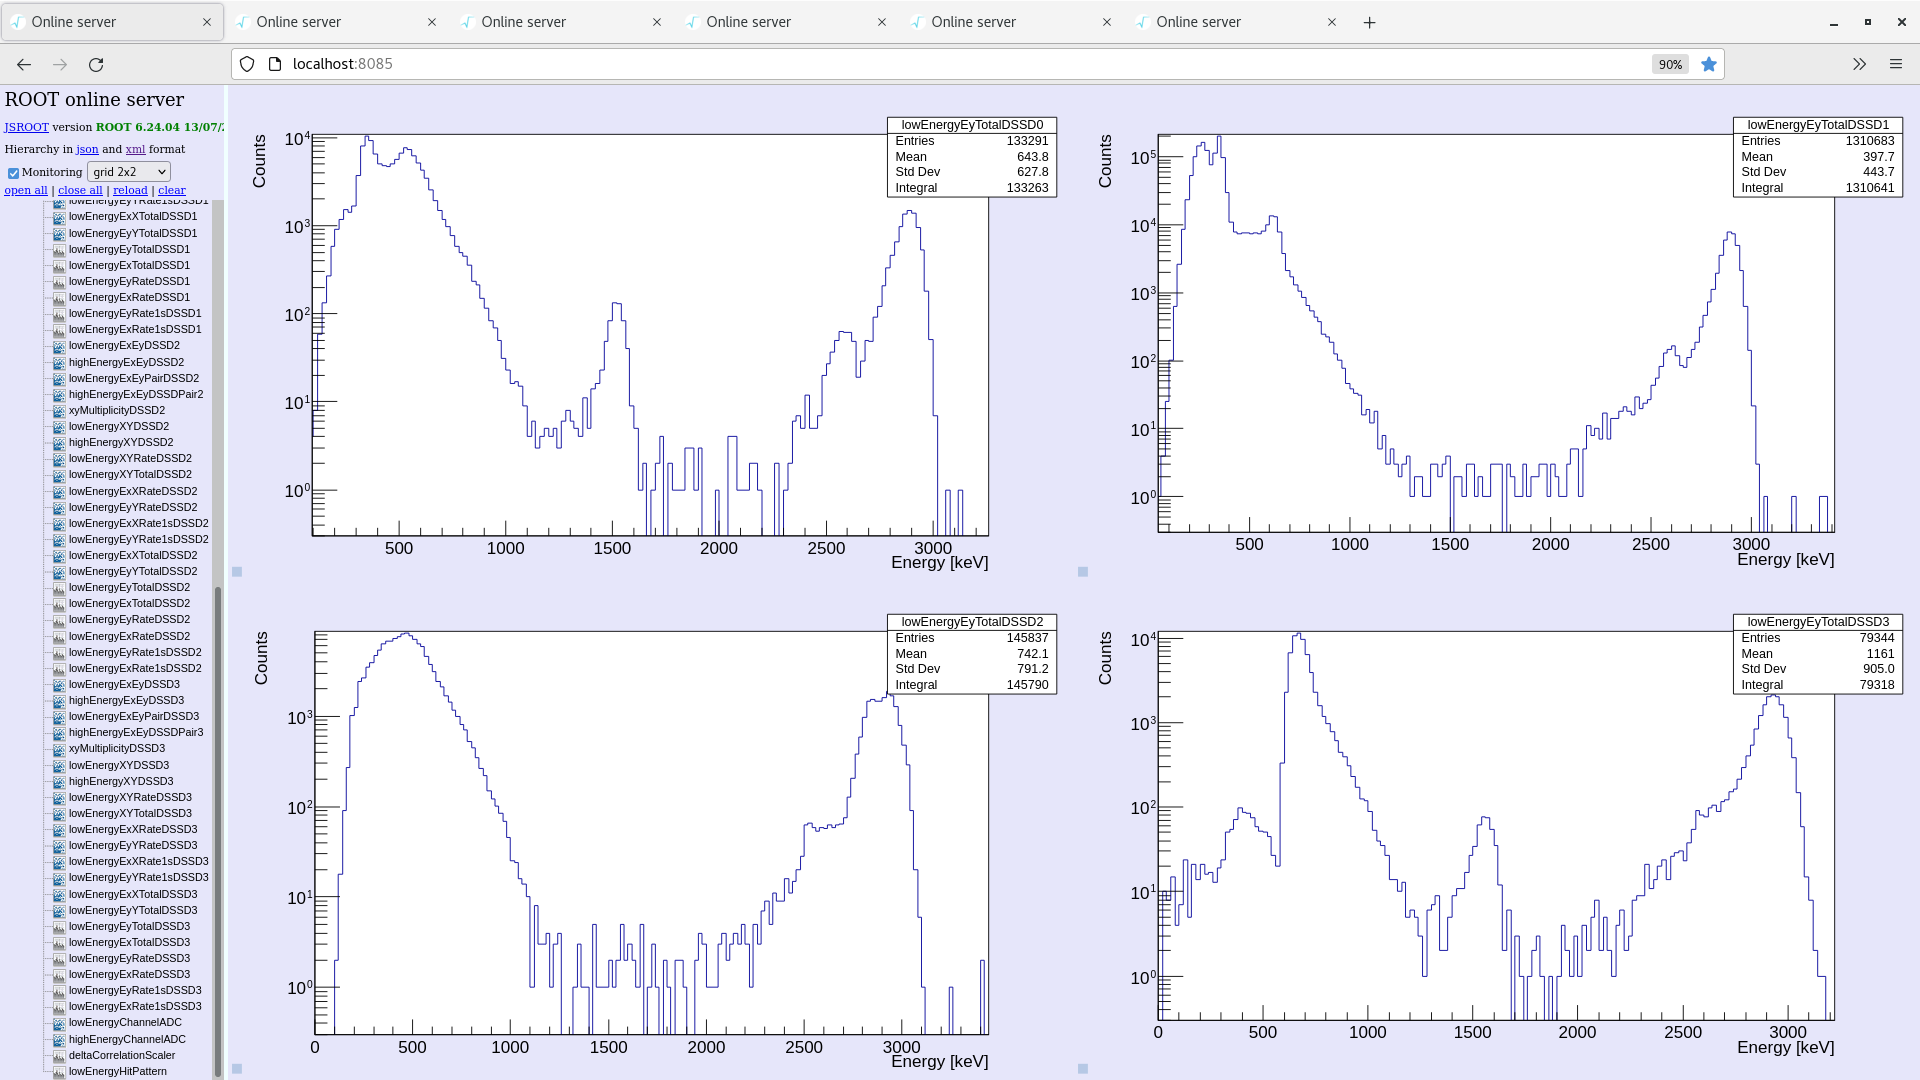
Target density has not improved despite efforts last night. Mid 10 - low 11 density range. We have asked HKR to remove beam from the ring and allow access so Nikos can change the nozzle.
Beam off now, access granted. Will begin warming nozzle. Internal cave work on changing nozzle expected to start at 11
Run stopped.
Final monitoring code histogram attached
|
| Attachment 1: Screenshot_from_2024-06-04_19-07-40.png
|

|
| Attachment 2: Screenshot_from_2024-06-04_19-11-14.png
|

|
| Attachment 3: Screenshot_from_2024-06-04_21-26-45.png
|

|
| Attachment 4: Screenshot_from_2024-06-04_21-26-50.png
|

|
| Attachment 5: Screenshot_from_2024-06-04_22-40-39.png
|

|
| Attachment 6: Screenshot_from_2024-06-04_22-43-21.png
|

|
| Attachment 7: Screenshot_from_2024-06-05_00-44-49.png
|

|
| Attachment 8: Screenshot_from_2024-06-05_00-45-21.png
|

|
| Attachment 9: Screenshot_from_2024-06-05_00-45-41.png
|

|
| Attachment 10: Screenshot_from_2024-06-05_00-47-33.png
|

|
| Attachment 11: Screenshot_from_2024-06-05_02-21-37.png
|
|
| Attachment 12: Screenshot_from_2024-06-05_02-22-15.png
|
|
| Attachment 13: Screenshot_from_2024-06-05_02-22-44.png
|
|
| Attachment 14: Screenshot_from_2024-06-05_04-06-59.png
|

|
| Attachment 15: Screenshot_from_2024-06-05_04-07-43.png
|

|
| Attachment 16: Screenshot_from_2024-06-05_05-55-15.png
|

|
| Attachment 17: Screenshot_from_2024-06-05_05-55-49.png
|

|
| Attachment 18: Screenshot_from_2024-06-05_05-56-34.png
|

|
| Attachment 19: Screenshot_from_2024-06-05_09-04-45.png
|
|
|
587
|
Tue Jun 4 15:25:36 2024 |
BD US CB | Run 33 |
16:26
Merger OK, Tape server OK
ADC data item statistics looks as before. OK
FEE temperatures look OK
System checks OK
Leakage current stable
Nicos came in to optimize target density.
18:39
aida02 in the MERGER aka aida03 elsewhere has a red background, but still appears to be transferring data. Rates are fine. Temps are fine. System wide checks unchanged.
See attachments. Checkloaded x2 - no difference. Unclear what the issue is. |
| Attachment 1: Screenshot_from_2024-06-04_18-33-23.png
|

|
| Attachment 2: Screenshot_from_2024-06-04_18-33-38.png
|

|
| Attachment 3: Screenshot_from_2024-06-04_18-35-26.png
|

|
| Attachment 4: Screenshot_from_2024-06-04_18-36-55.png
|

|
|
586
|
Tue Jun 4 14:13:17 2024 |
JM, CB, DB, US | Run 32- beam only background |
15:15
Run 32 started - Beam, no target
Beam energy = 3 MeV.
Horizontal beam position = 4.0 mm, vertical beam position = 0.0 mm.
Beam intensity at inj ~ 2.5e7
Detectors are positioned IN. Left arm = 36.54, right arm = 64.60 mm
Histograms and stats zero'd, monitoring code restarted.
Beam in the ring ~ 5 minutes.
Pressure in YR09 E target ~ 4.5e-11 mbar.
Motors code crashed. Beam removed from ring to re-home detectors.
15:20
Beam in the ring again, detectors homed, no target
Detectors have been set up to send signals on injection / dump
15:35
Merger OK, Tape server OK
ADC data item statistics looks as before. OK
FEE temperatures look OK
System checks OK
Leakage current stable
|
|
702
|
Thu May 29 18:04:47 2025 |
LB, CB, PMH, JM | Run 32,33,34 |
Oven temperature increased, current up to 3.5E7 pps.
Found beam-target overlap setting horizontal bump in RO9 to -2.5mm.
Target T1 30.5K, density increasing to 2.6E11 at/cm2.
19:08 Run 32 start
Moving left detectors (79.69->34.66mm).
Beam energy 1.85 MeV/u nominal
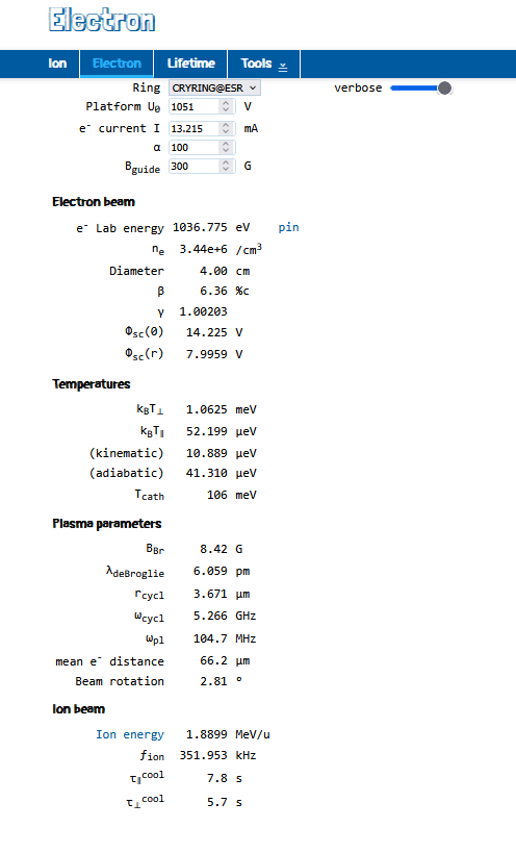
Electron cooler actual values: voltage 1.051 kV, current 0.013215 uA, [voltage divider G35 1.0504 kV]
Stopped run, beam was still in bunch mode.
19:15 Run 33 start
All checks Ok.
Target at 3E11 at/cm2
Attachment 1-2 with rates and temperatures
20:20
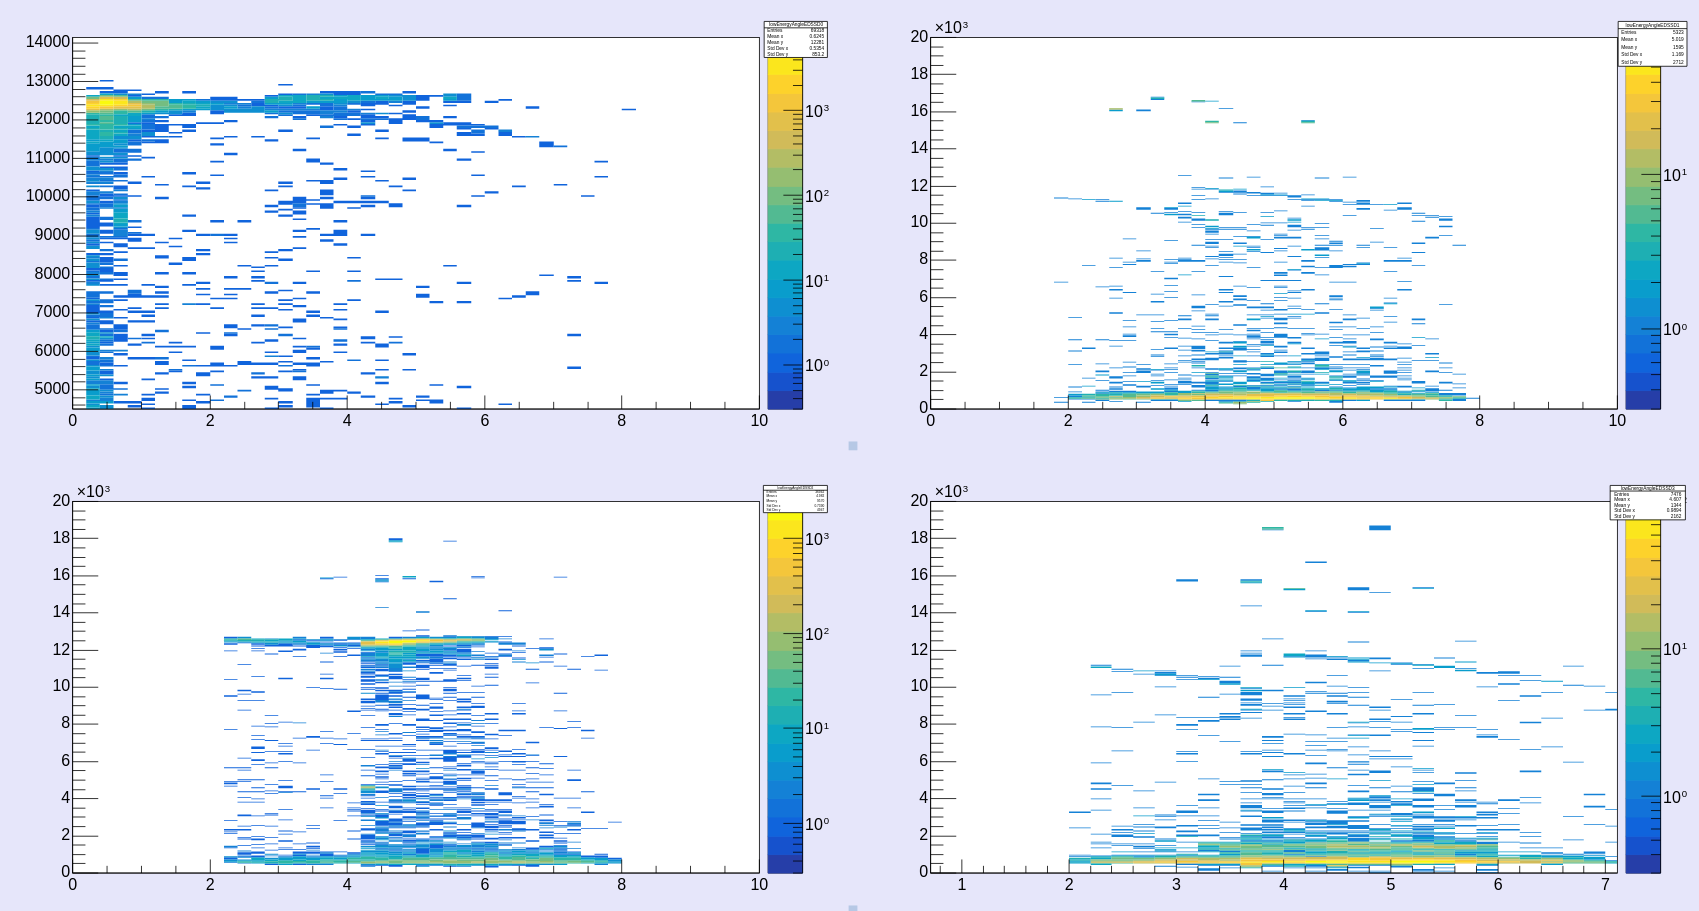
Target density 3.4E11 at/cm2. Beam around 2.2-3.6E7 pps.
Checks ok! Spectra attached in att.3.
21:25
all good. Target density 4E11 at/cm^2
22:24
All checks are OK
Noted some variability in the injection intensity. For 15 minutes about half of shots were below 1e7. Perhaps some variability due to end of lithium in oven or increased temperture.
Beam calc with read values - Attachment 4
01:30
All checks OK. Injection intensity has stabilised ~2E7
Target density is stable ~4e11 at/cm2
02:44
Suddenly see very high rates in DSSD4. Detector had tripped. Tried to re-bias but kept tripping.
Set to 70V, leakage current is about 17uA but fluctuates quite wildly. Set to 50V and leakage current is about 6uA but again has wild fluctuations. Not sure of the cause, this detector is not moving and is far from the beam.
Decided to turn detector off to try and protect it. We can re-bias and monitor in the day tomorrow when we do not have beam on target.
This detector has tripped previously but was able to be re-biased at the time. See attachments 5 and 6 for the detector leakage currents.
New Run started R34.
Same conditions as before. DSSD4 turned off. To stop crap writing to disk I have set the corresponding FEEs to the MEC.
In principle we do not need this detector now as it is not moving to see the reaction.
Note I also observed in the system messages we semi regularly get a DHCP request from aida11. It seems to be functioning fine as I see the pulser signal in the spectrum browser. May be worth following up on at a later date. See attachment 7
All other checks OK
Data rate is now ~140 kB/sec
03:15
Tried to bias DSSD4 again. Leakage currents appear fine again.
Left for 5 minutes to gauge stability -> seems fine.
03:22
Have returned aida13, 14, 15, 16 back to LEC. Maintaing the same run (34)
Scratch that. 03:27 detector tripped again. Will just leave it off tonight. Turned those FEEs back to MEC.
06:00
I have quickly looked at Run 33. We clearly see the 7Be again in both detectors. Locus on detector much smaller than at higher energies.
All checks OK
07:07
Run stopped, switching to deuterium.
Detectors moved out
Shutter for gas target off.
Moved to next run -> no storage mode. |
| Attachment 1: Screenshot_from_2025-05-29_19-16-09.png
|

|
| Attachment 2: Screenshot_from_2025-05-29_19-12-46.png
|

|
| Attachment 3: Screenshot_from_2025-05-29_20-23-50.png
|
|
| Attachment 4: beamCalc.png
|
|
| Attachment 5: Screenshot_from_2025-05-30_02-37-55.png
|

|
| Attachment 6: Screenshot_from_2025-05-30_02-51-21.png
|

|
| Attachment 7: Screenshot_from_2025-05-30_02-38-10.png
|

|
|
585
|
Tue Jun 4 06:56:02 2024 |
DFF, PC, LB, JM,NP,AB | Run 31 contd |
8:13
Since 6:40 the target density dramatically dropped to 10^9 since then it has been unstable and did not recover. Currently it is around 8e8.
09:00
Target density has been increased to the high -10, very low -11 region. We will keep this run going unless the density is increased further.
10:21
Beam energy = 3 MeV.
Horizontal beam position = 4.0 mm, vertical beam position = 0.0 mm.
Target density ~ 1e9 at/cm2 (no target, get lost quite quckly)
Beam intensity at inj ~ 1.7e7
Detectors are positioned IN. Left arm = 36.54, right arm = 64.60 mm
Histograms and stats zero'd, monitoring code restarted.
Beam in the ring ~ 6 minutes.
Pressure in YR09 E target ~ 4.36e-11 mbar.
Merger OK, Tape server OK
ADC data item statistics looks as before. OK
FEE temperatures look OK
System checks OK
Leakage current stable
target density has been fluctuating between E9 to E12. We can very clearly see the increase in elastic counts on our detector during high density periods.
Attachment 1 - rate plots at 1E12 at/cm2
Attachment 2 - rate plots at 1E9 at/cm2
12:26
Merger OK, Tape server OK
ADC data item statistics looks as before. OK
FEE temperatures look OK
System checks OK
Leakage current stable
After reaching a density of > 10^12 a bit before 11:00, the valve got closed. When a valve is closed, can be observed a dramatic change in the plot and one of the three green ligths of atps7vaccrz1 (0,2,4) is turned off. Nikos opened it, and now it seems stable again around 1e11.
14:07
Merger OK, Tape server OK
ADC data item statistics looks as before. OK
FEE temperatures look OK
System checks OK
Leakage current stable
15:05
Run stopped as target density is rubbish. Might as well get beam background |
| Attachment 1: Screenshot_from_2024-06-04_10-53-58.png
|

|
| Attachment 2: Screenshot_from_2024-06-04_10-58-02.png
|

|
|
584
|
Tue Jun 4 00:04:39 2024 |
DR, EH | Run 31 |
Beam energy = 3 MeV
Horizontal beam position = 4.0 mm, vertical beam position = 0.0 mm.
Beam intensity at inj ~ 2.5e7
Detectors are positioned IN. Left arm = 36.54, right arm = 64.60 mm
Cycle time ~ 6 minutes
01:05
Target density still very unstable
02:45
Target density has dropped to ~1e9 and has been at that level for 30 minutes. We will try to move the target a bit and see if we can get an increase. Target position is currently x=-12400, y=2900
Merger OK, Tape server OK
ADC data item statistics looks as before. OK
FEE temperatures look OK
System checks OK
04:15
We were able to recover some target, but it is still very unstable. The new position is x=-12800, y=2000
Merger OK, Tape server OK
ADC data item statistics looks as before. OK
FEE temperatures look OK
System checks OK
06:15
Target still unstable, fluctuating around the 5e10 region
Merger OK, Tape server OK
ADC data item statistics looks as before. OK
FEE temperatures look OK
System checks OK |
|
701
|
Thu May 29 14:39:52 2025 |
CB LB PMH | Run 31 |
15:40
Waiting for Serge to come in to change beam energy.
Remaining at the same beam energy and settings as before, except RIGHT arm now moving.
Run 31
37.96 -> 83.69 mm
16:53
Serge arrived. Run ended. Motors out. No storage.
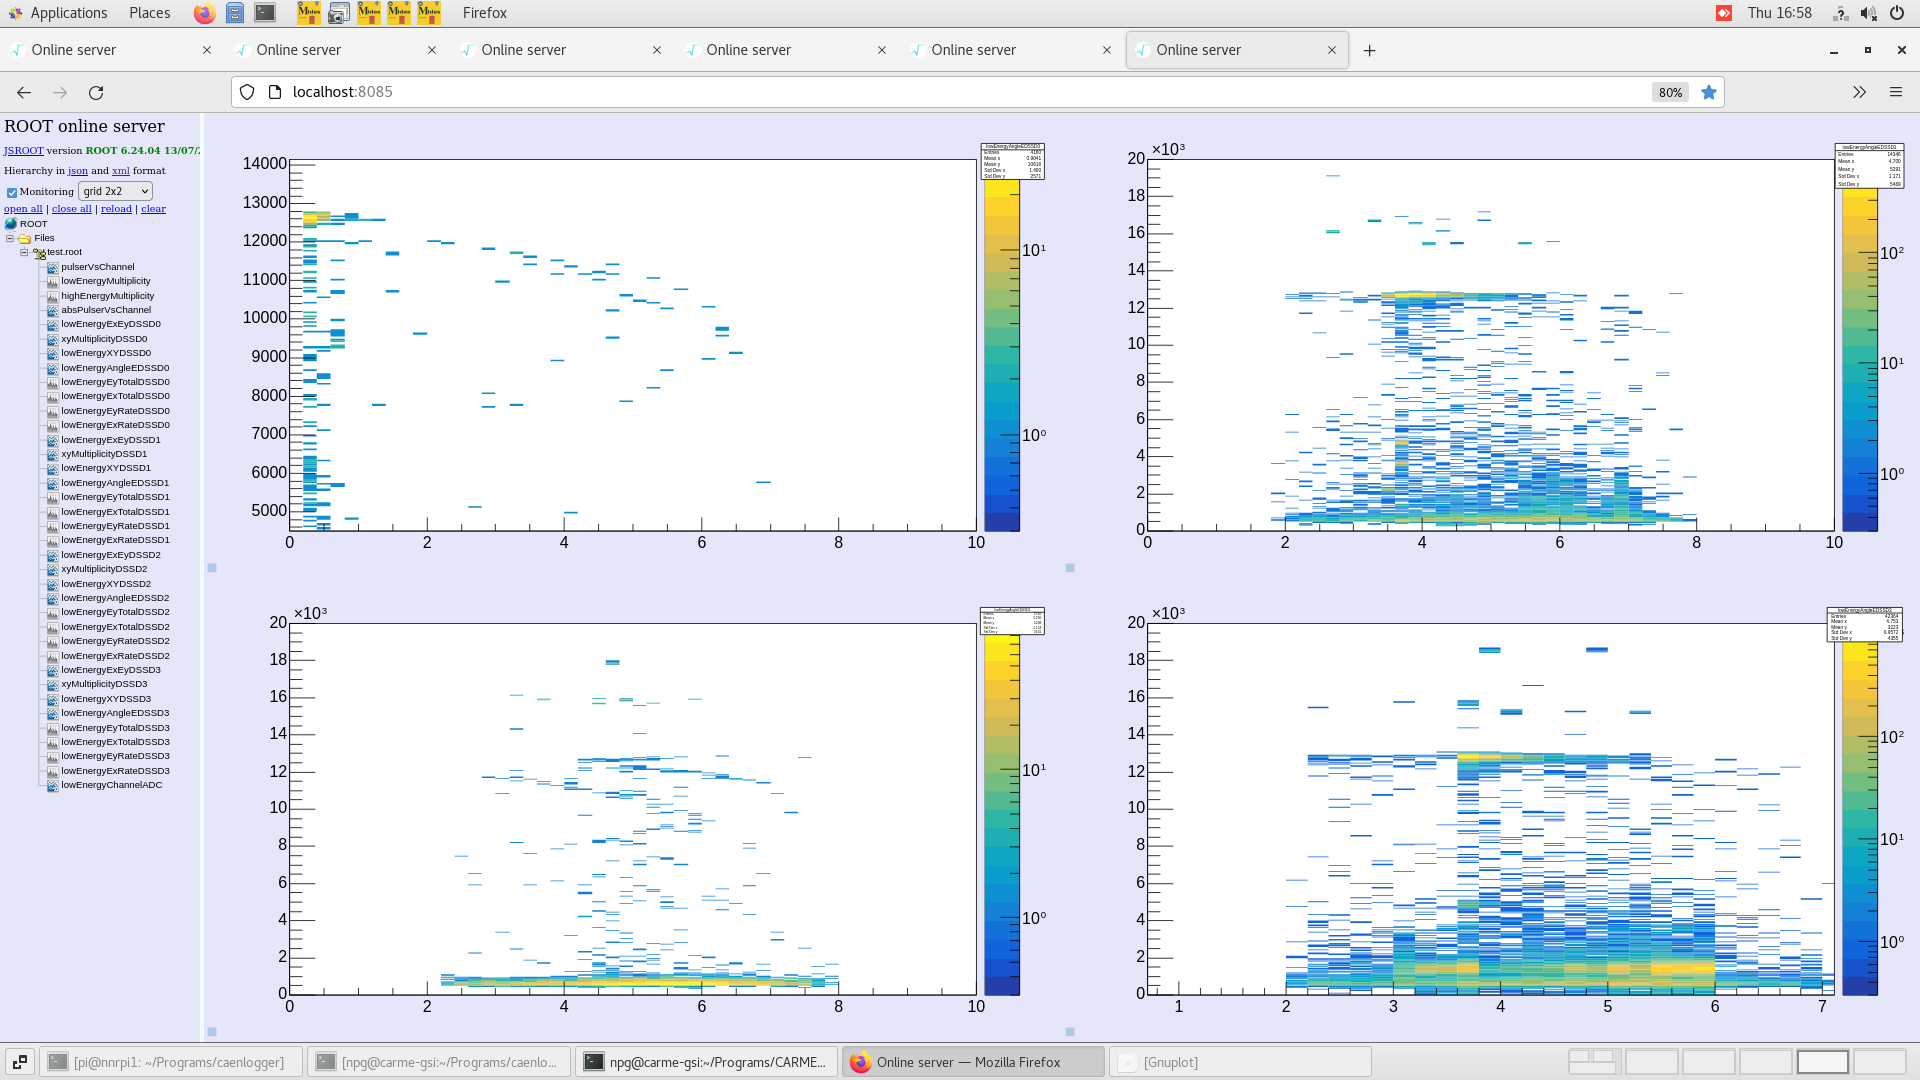
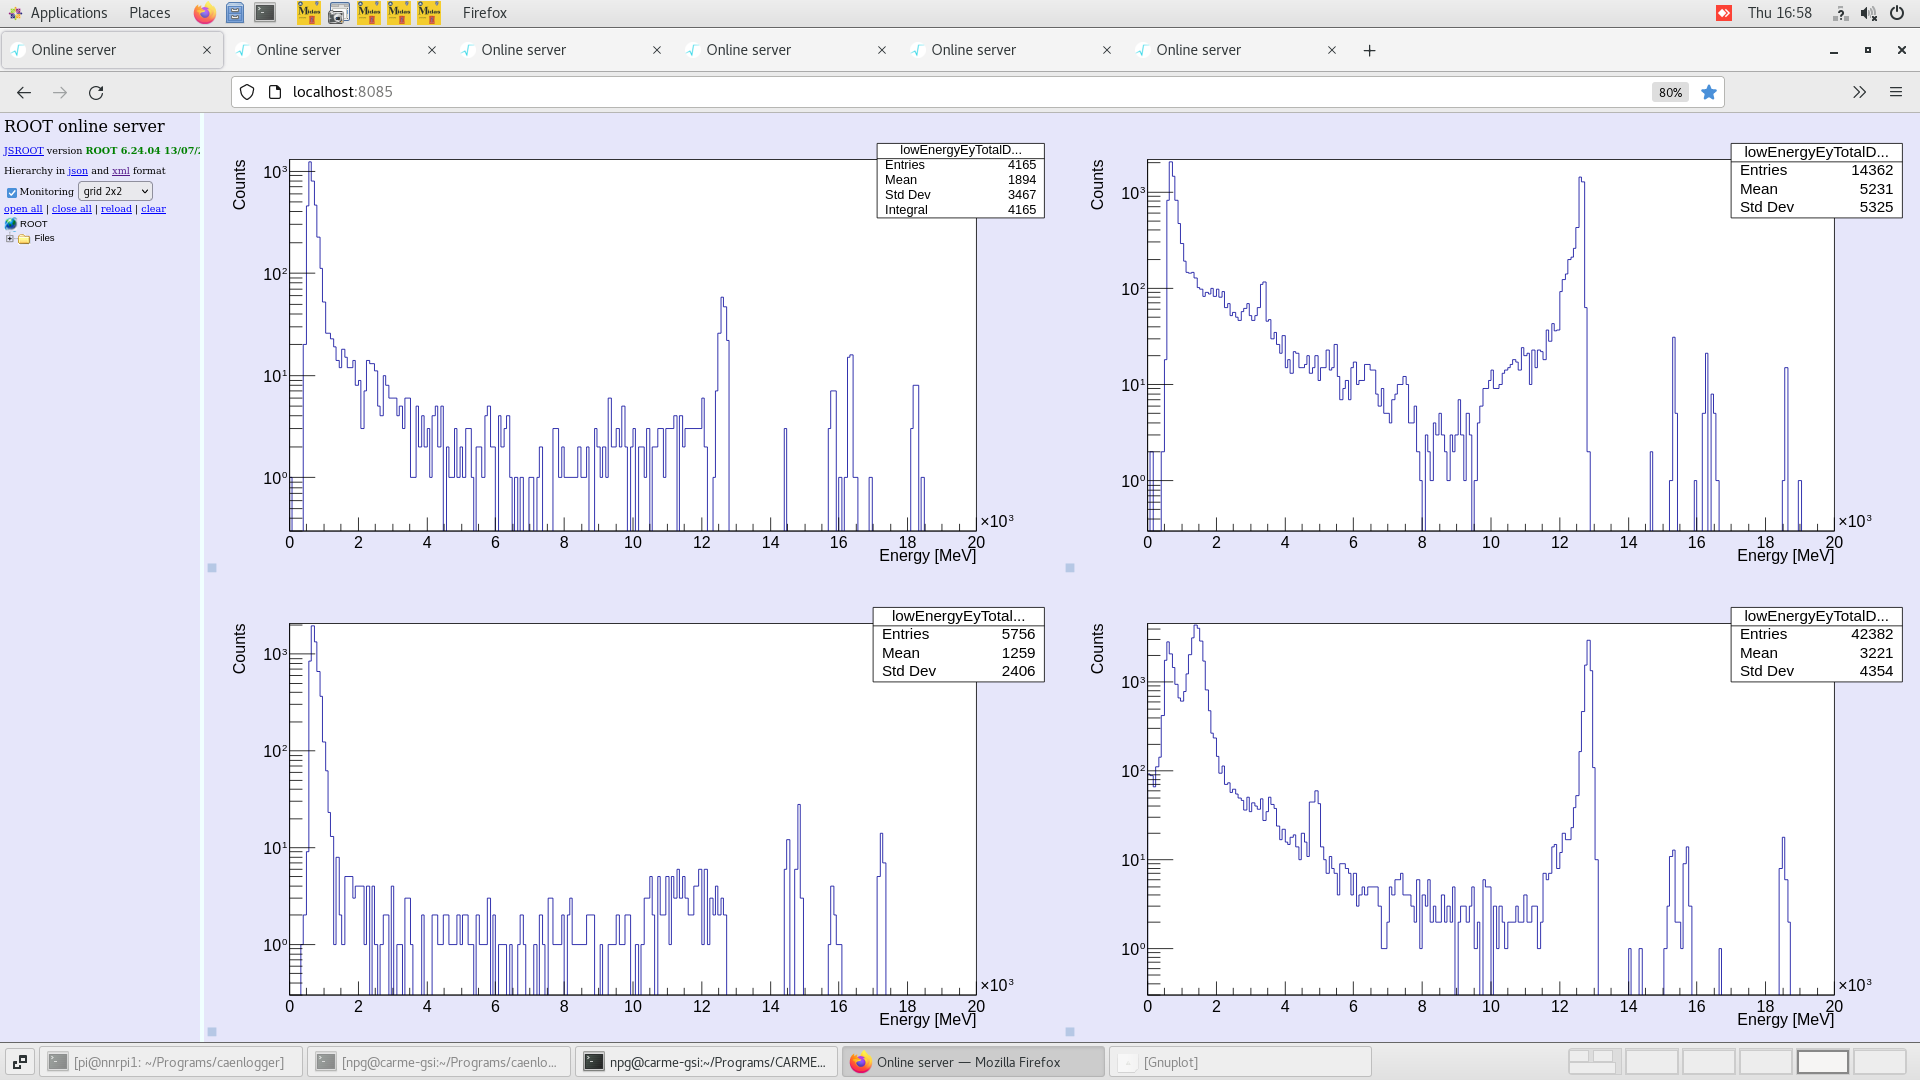
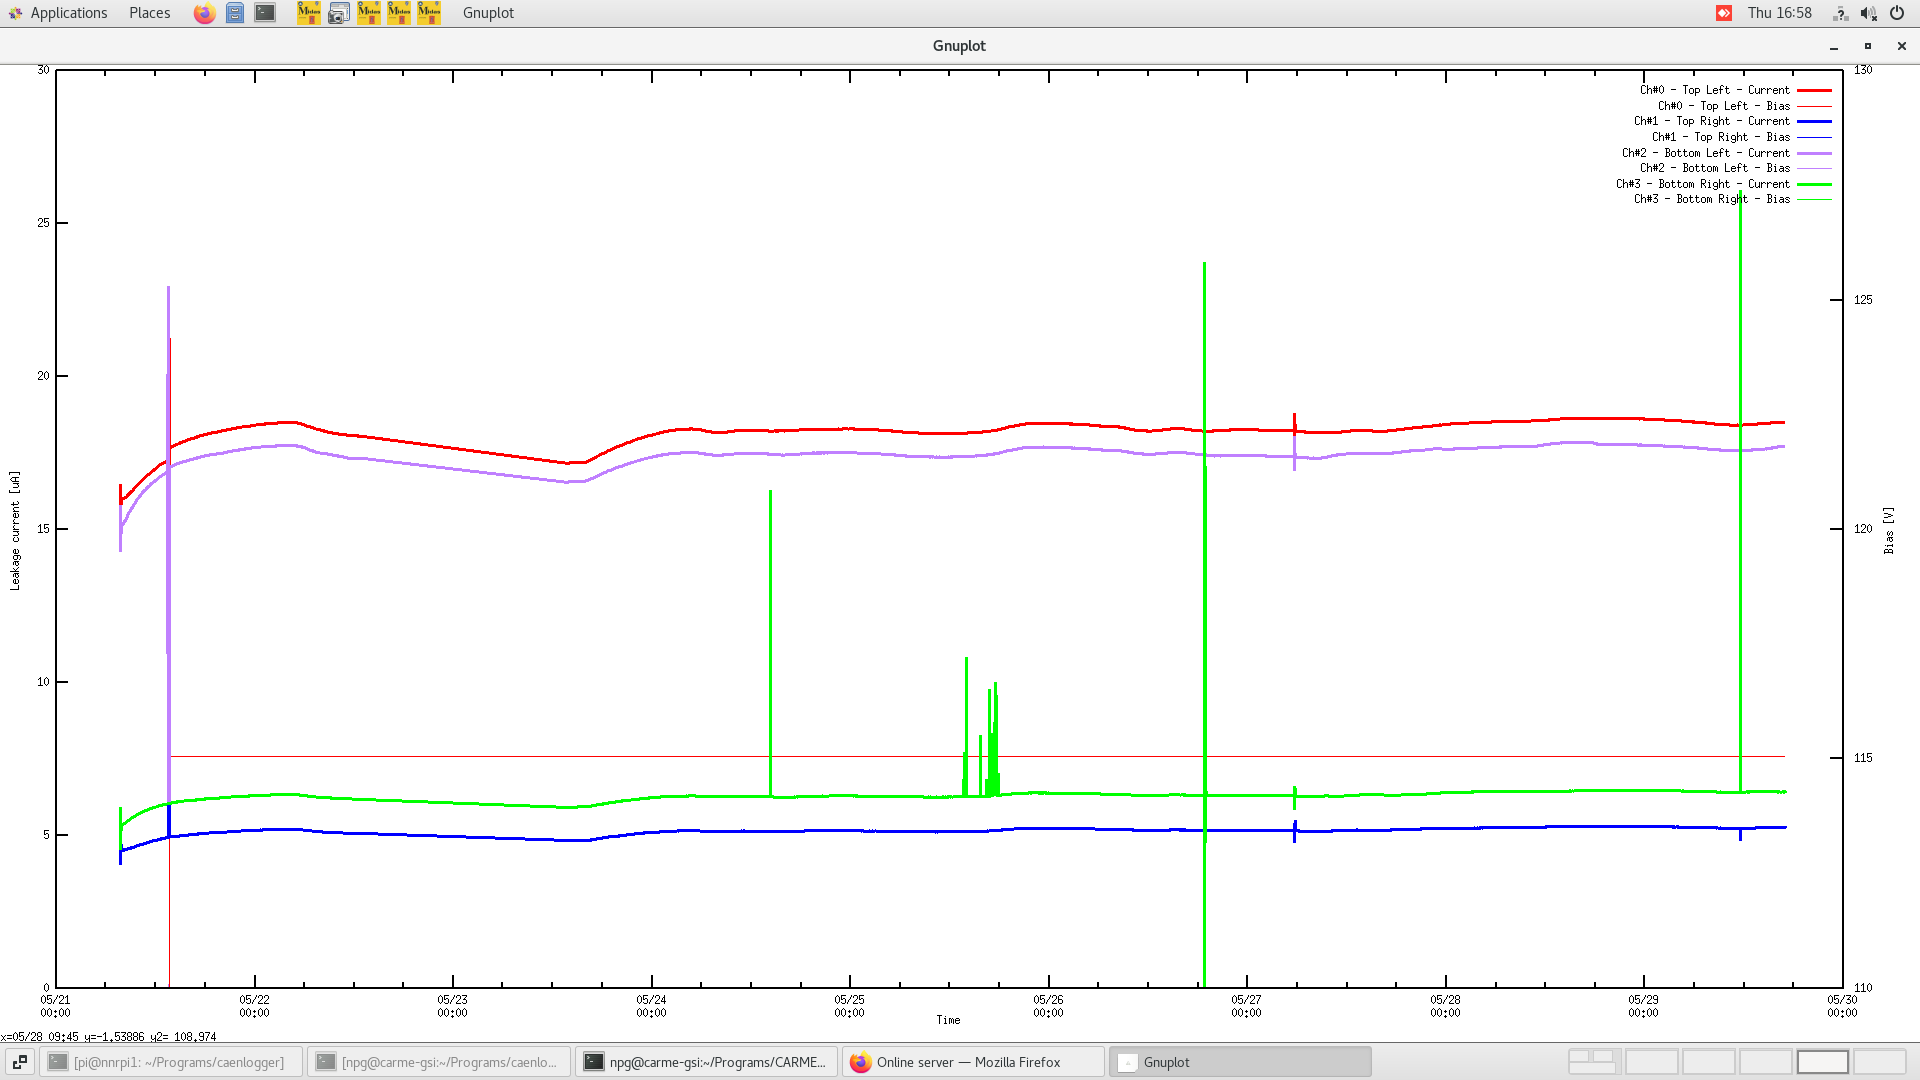
Temps OK
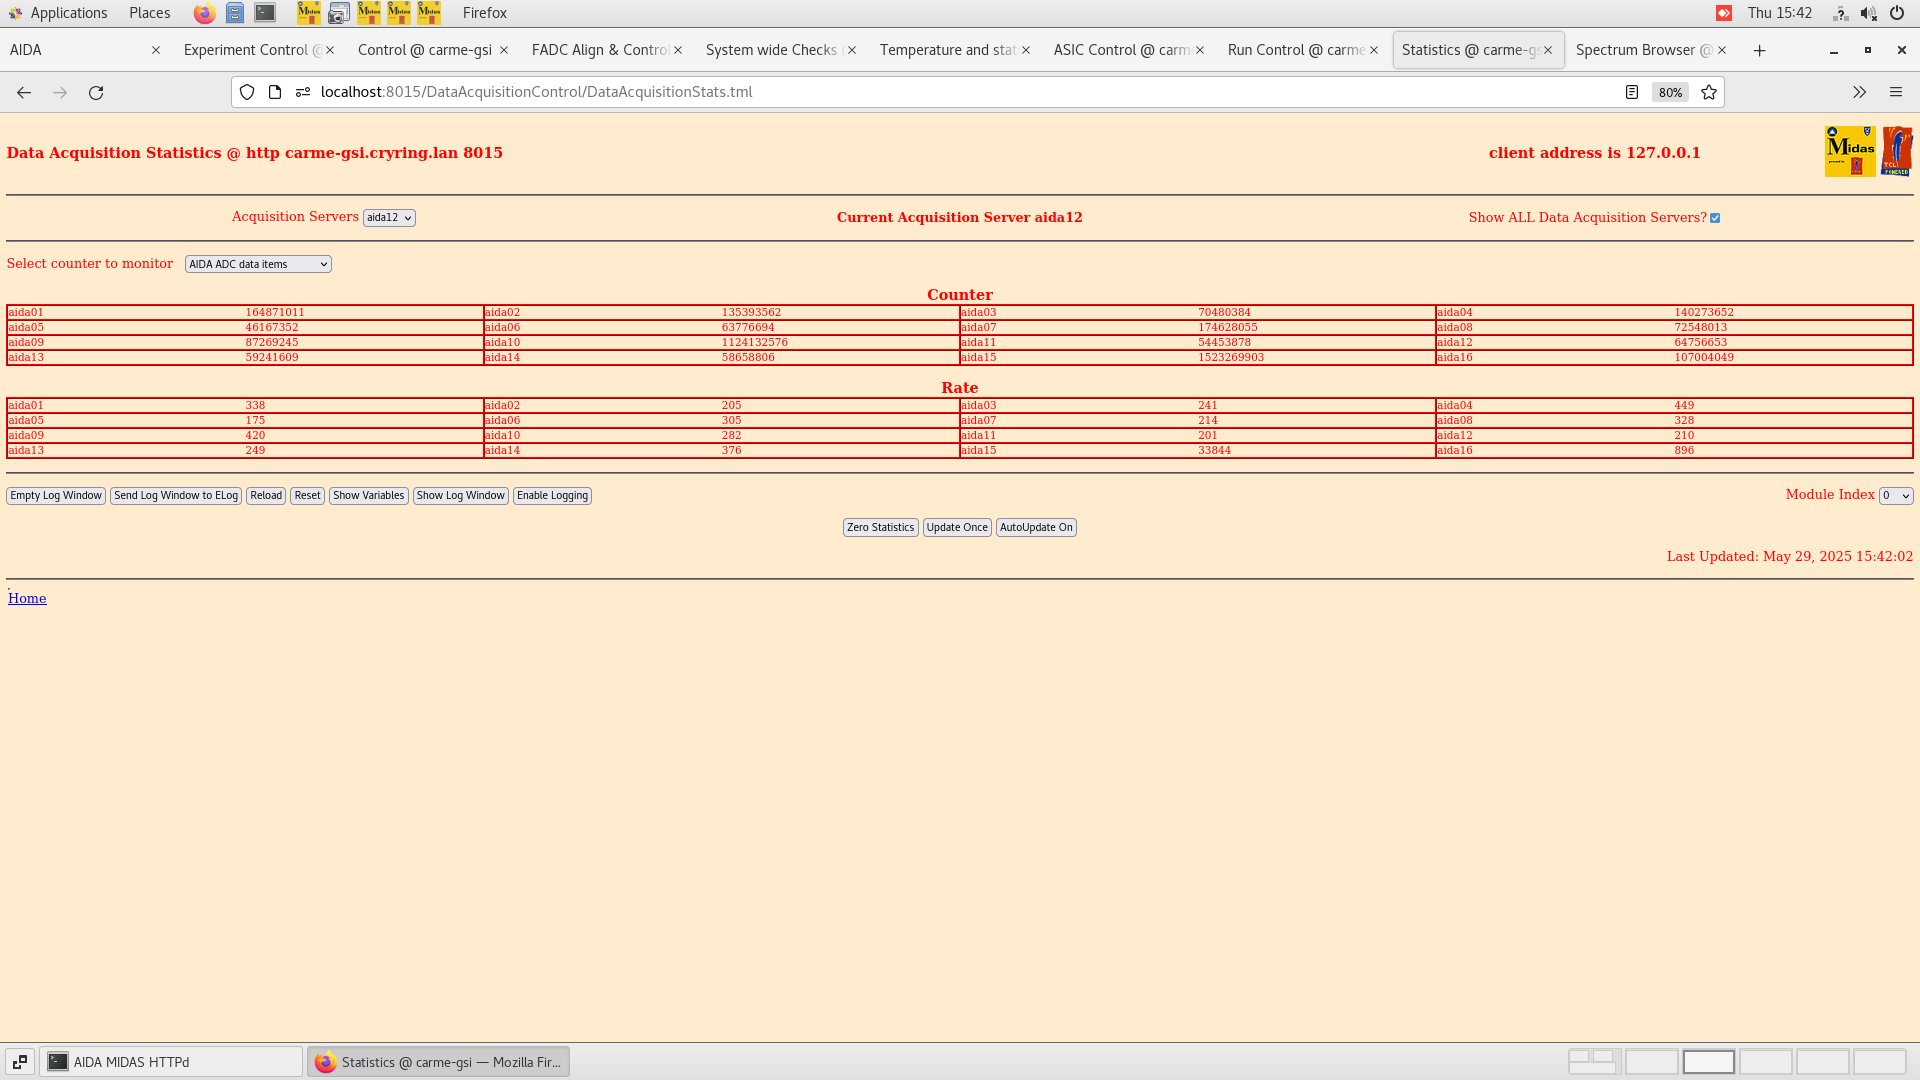
Rates OK
|
| Attachment 1: Screenshot_from_2025-05-29_15-41-46.png
|

|
| Attachment 2: Screenshot_from_2025-05-29_15-42-11.png
|
|
| Attachment 3: Screenshot_from_2025-05-29_15-42-49.png
|

|
| Attachment 4: Screenshot_from_2025-05-29_16-58-12.png
|
|
| Attachment 5: Screenshot_from_2025-05-29_16-58-16.png
|

|
| Attachment 6: Screenshot_from_2025-05-29_16-58-18.png
|

|
| Attachment 7: Screenshot_from_2025-05-29_16-58-21.png
|

|
| Attachment 8: Screenshot_from_2025-05-29_16-58-23.png
|
|
| Attachment 9: Screenshot_from_2025-05-29_16-58-26.png
|
|
|
700
|
Wed May 28 16:40:48 2025 |
EH, SN, LB, OF, EBM, CB | Run 28/29/30 - 1.88 MeV/A |
We start a new run with real data taking condititon: beam is ok, target density is 1e12 cm-2, detectors are moving in-out periodically.
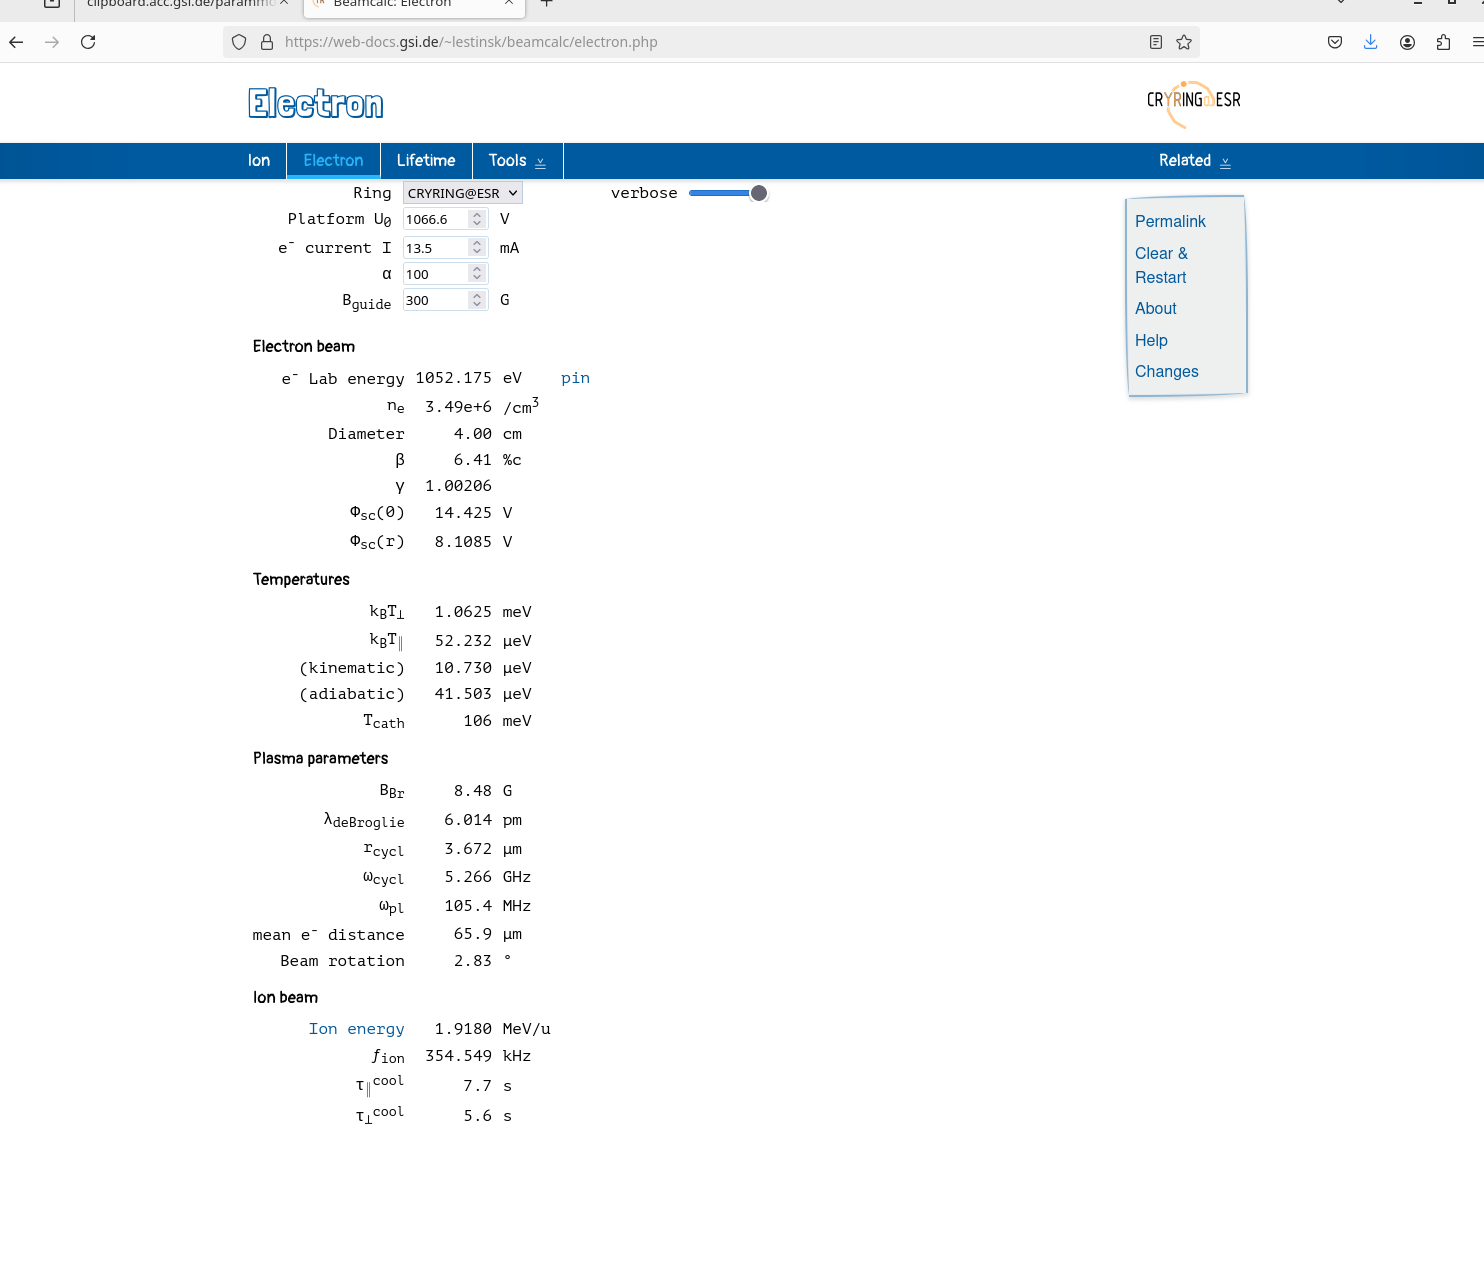
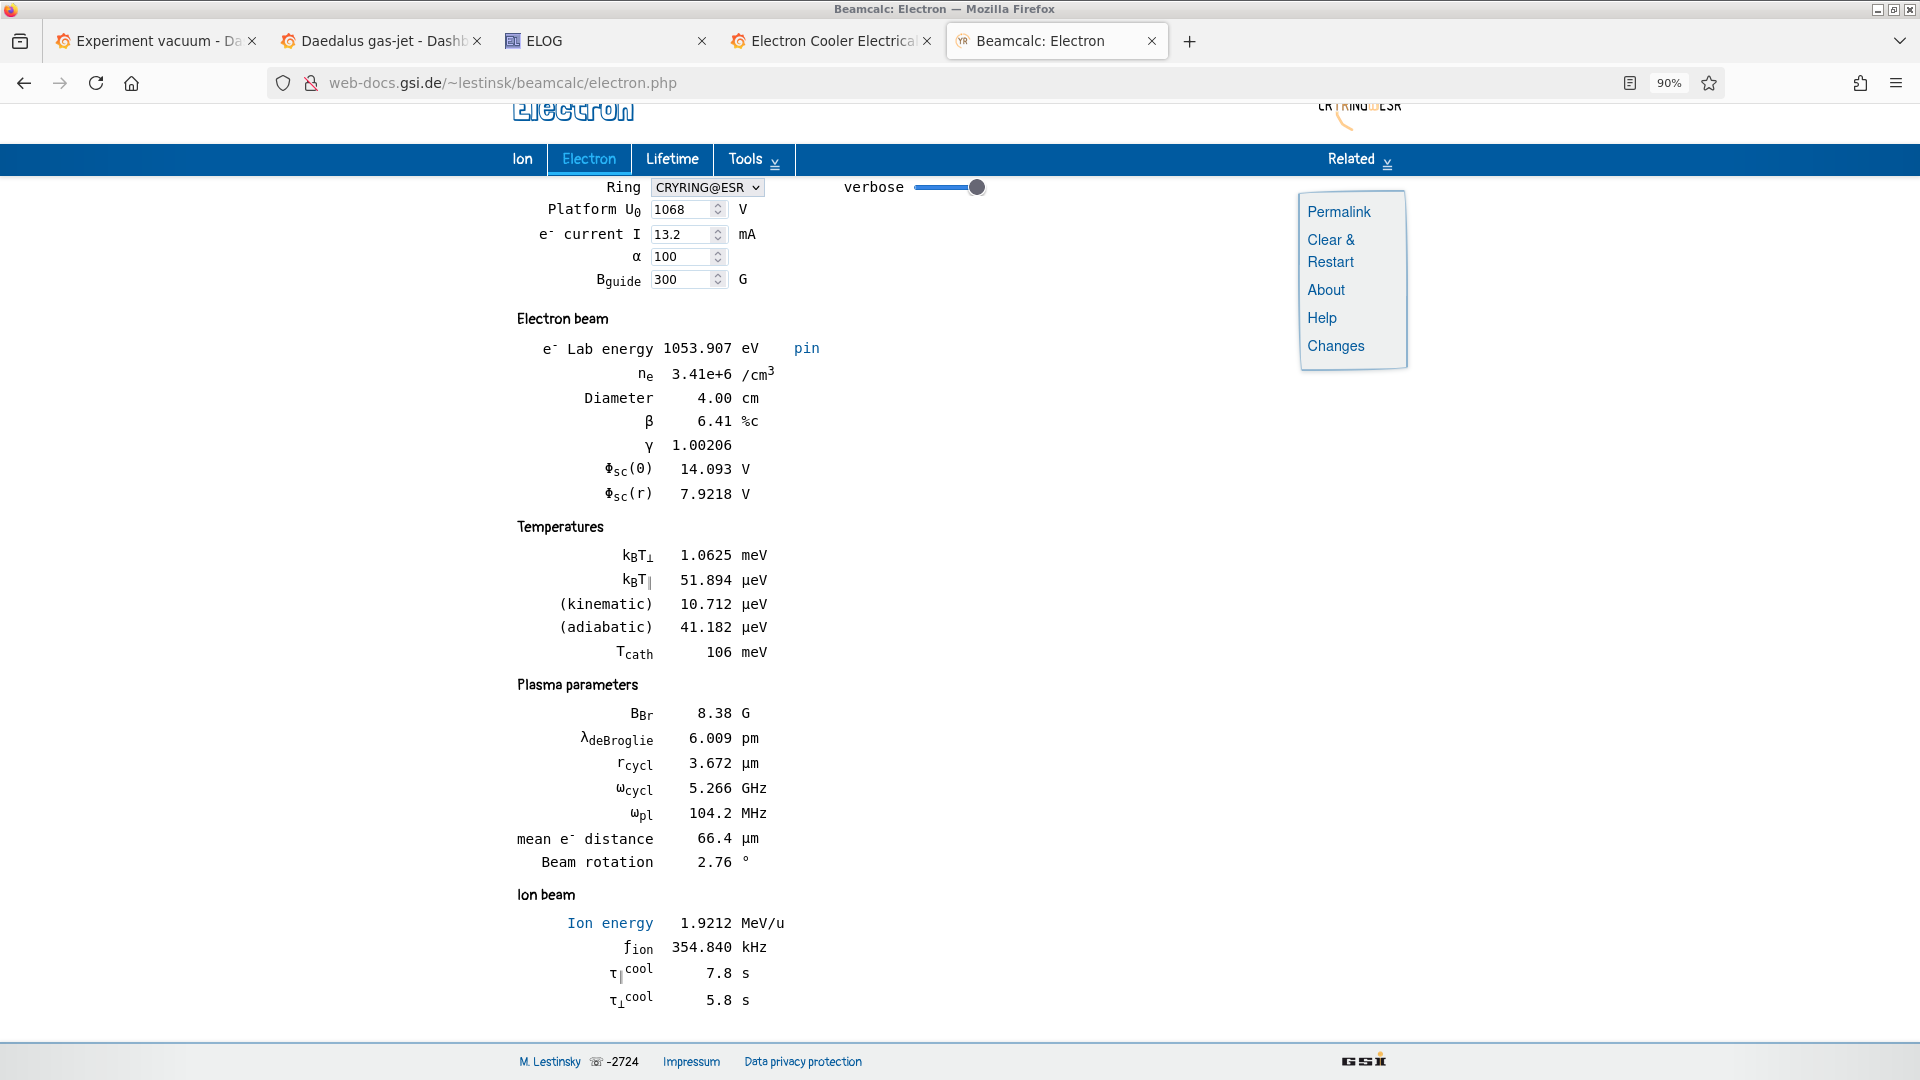
Cooler voltage setpoint 1066.6 V. Read value 1068 V.
Current read = 0.01325 uA
Beam energy = 1.88 MeV/u (from HKR)
Attachment 1 - beamcalc with nominal values
Attachment 32 - beamcalc with actual values
Right arm at 19.80 mm
Left arm IN at 77.56 mm (OUT 32.77 mm)
vertical beam position 0.0 mm
horizontal beam position -3.0mm
Beam intensity ~1.8e+7 particles.
Target density ~1e12 at/cm2
Target temperatures: T1=31.4 K T2=35.1 K
17:48
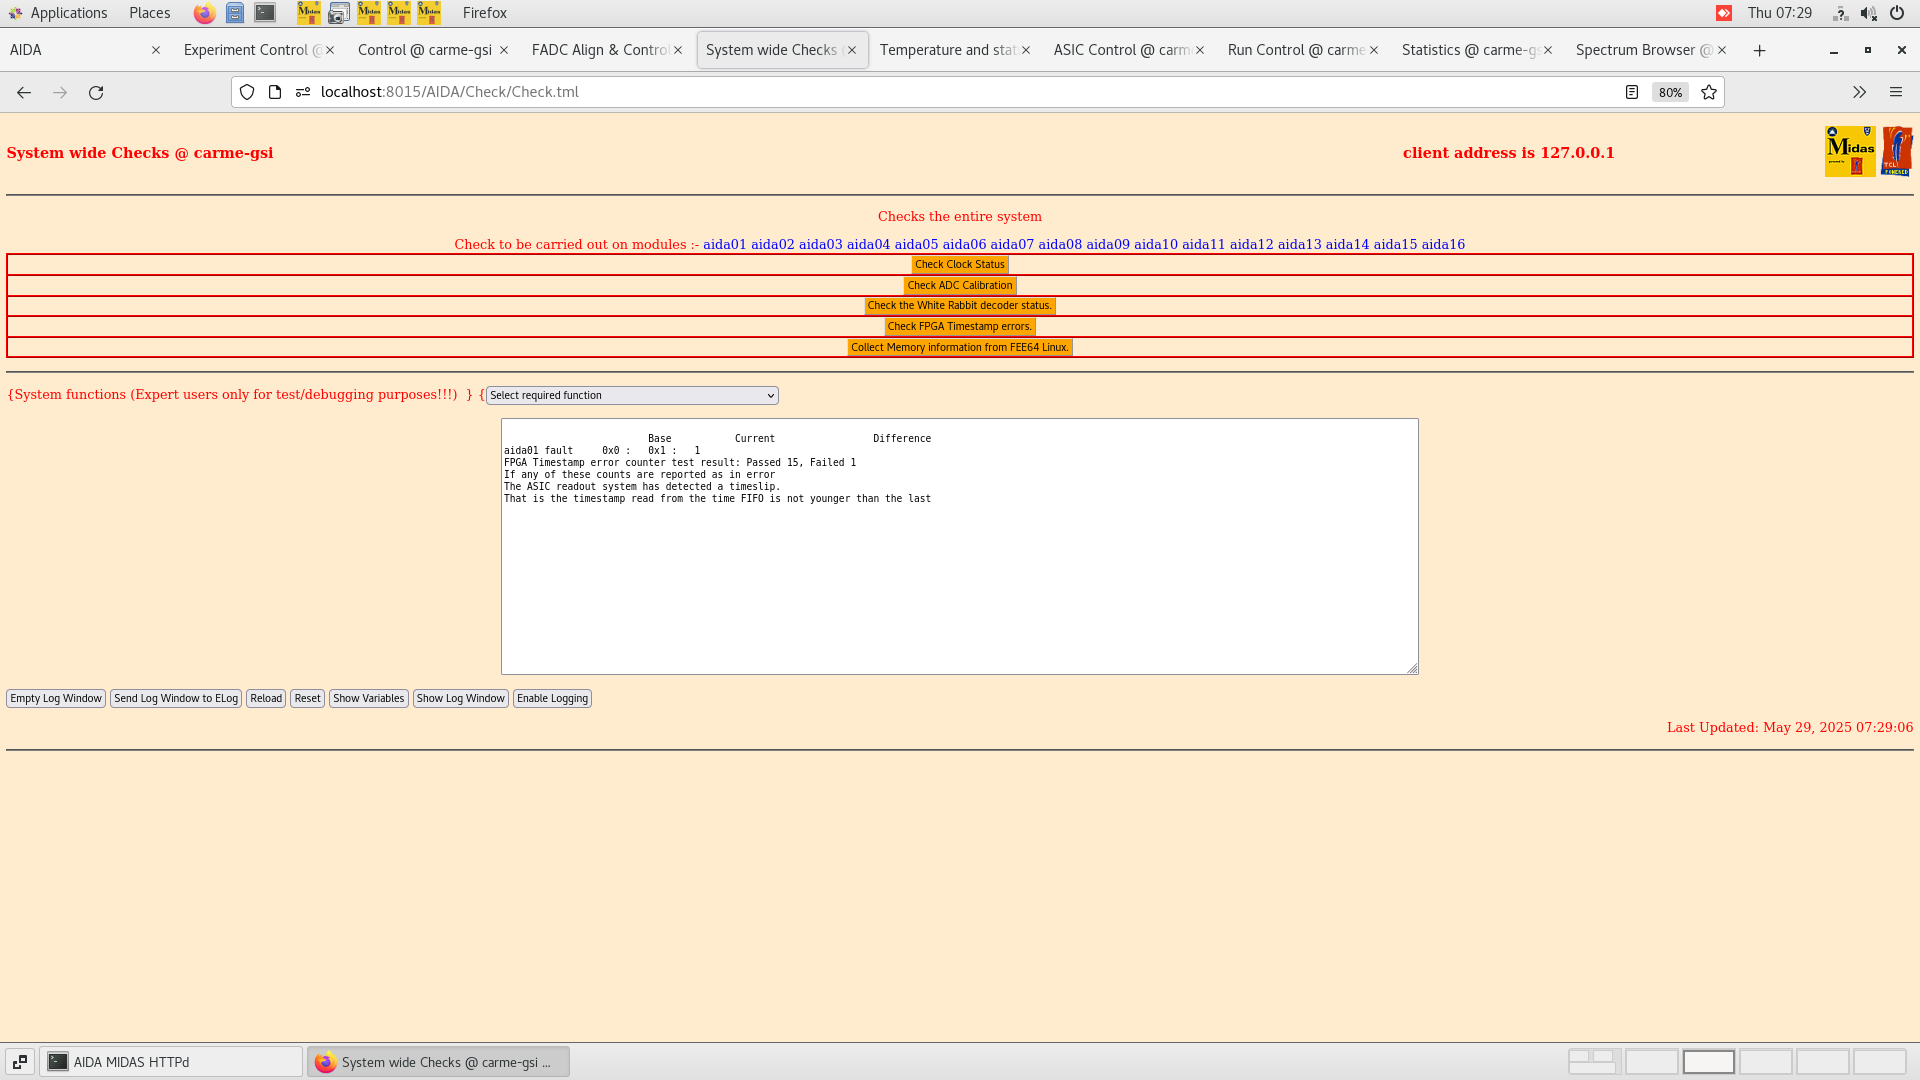
aida01 fault 0x0 : 0x1 : 1
FPGA Timestamp error counter test result: Passed 15, Failed 1
All checks OK.
The electron current from beamcalc is the setvalue.
18:51
aida01 fault 0x0 : 0x1 : 1
FPGA Timestamp error counter test result: Passed 15, Failed 1
All checks OK.
20:20
aida01 fault 0x0 : 0x1 : 1
FPGA Timestamp error counter test result: Passed 15, Failed 1
All checks OK.
22:02
Base Current Difference
aida01 fault 0x0 : 0x1 : 1
FPGA Timestamp error counter test result: Passed 15, Failed 1
All checks OK.
23:13
All checks OK. Target stabilized at ~6.7E11 at/cm^2
00:23
All checks good.
01:01
We are observing what seems to be a steady decrease of the target density, currently at around 5e11 at/cm2, whihc also seems to be following a decrease in the temperature T2.
1;40
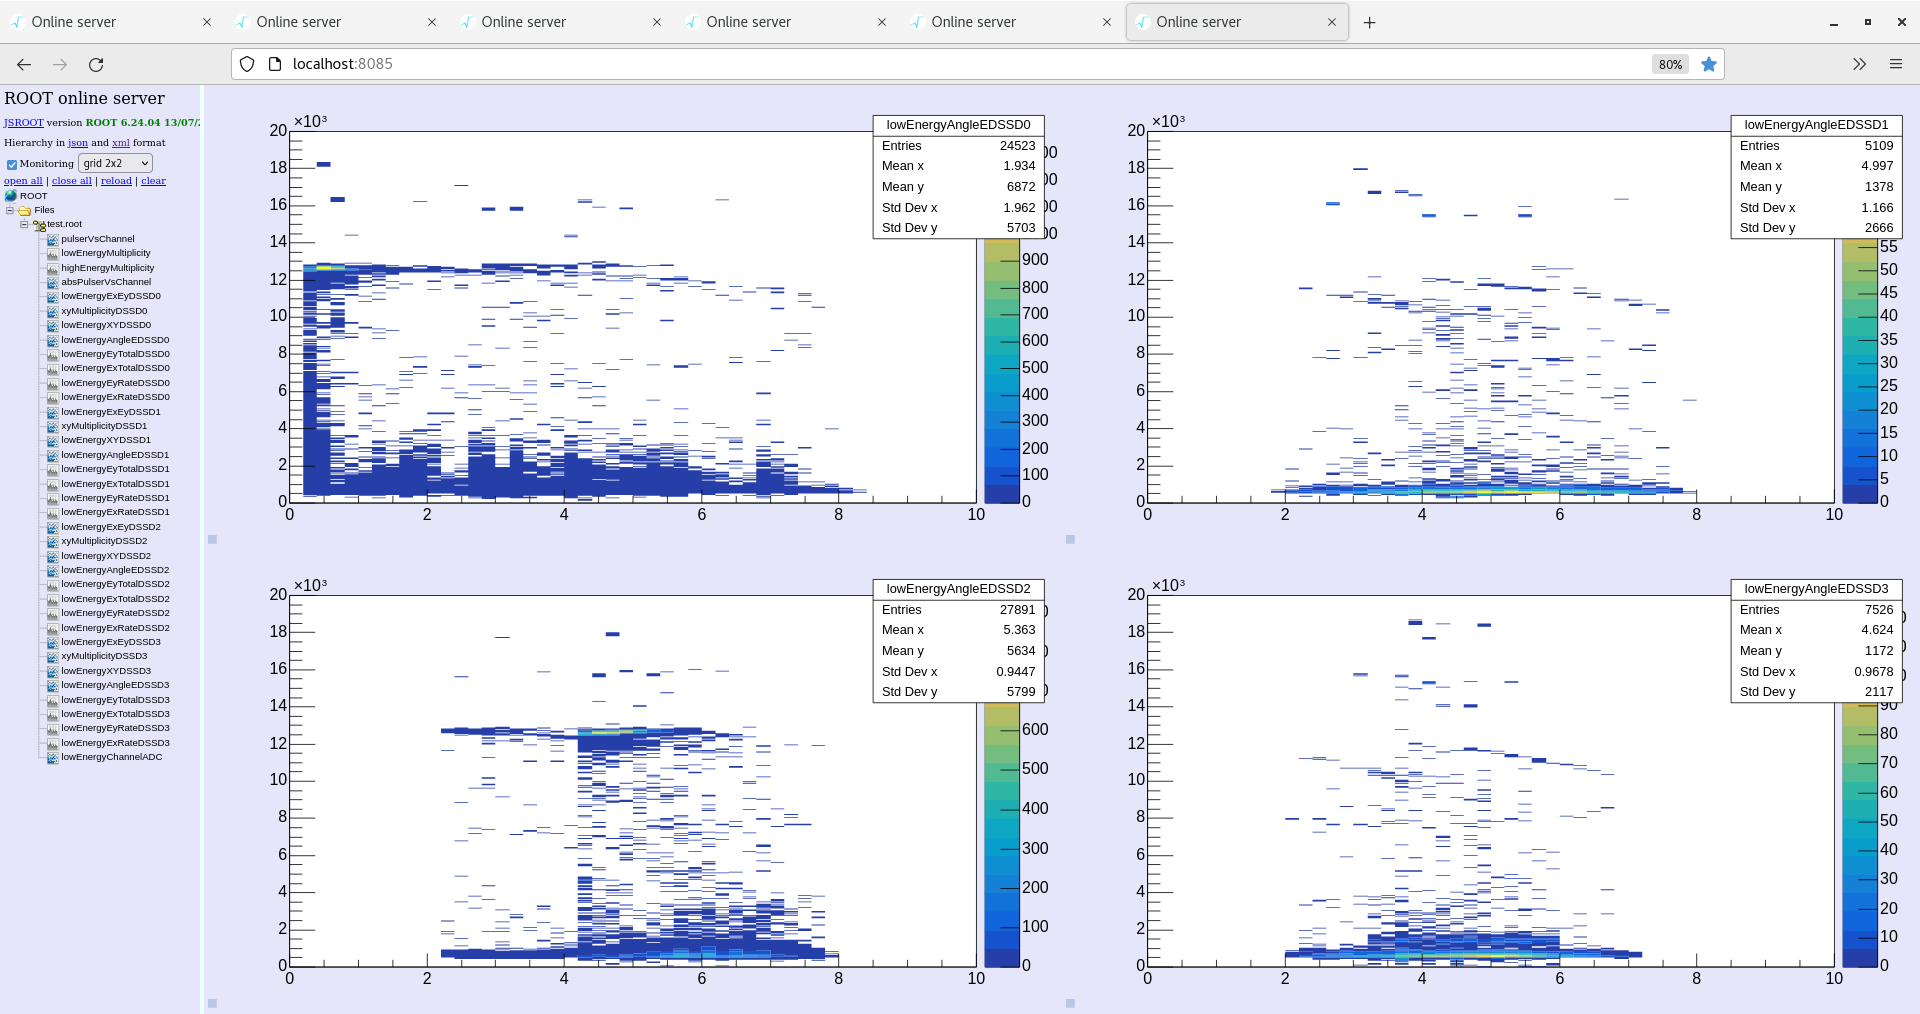
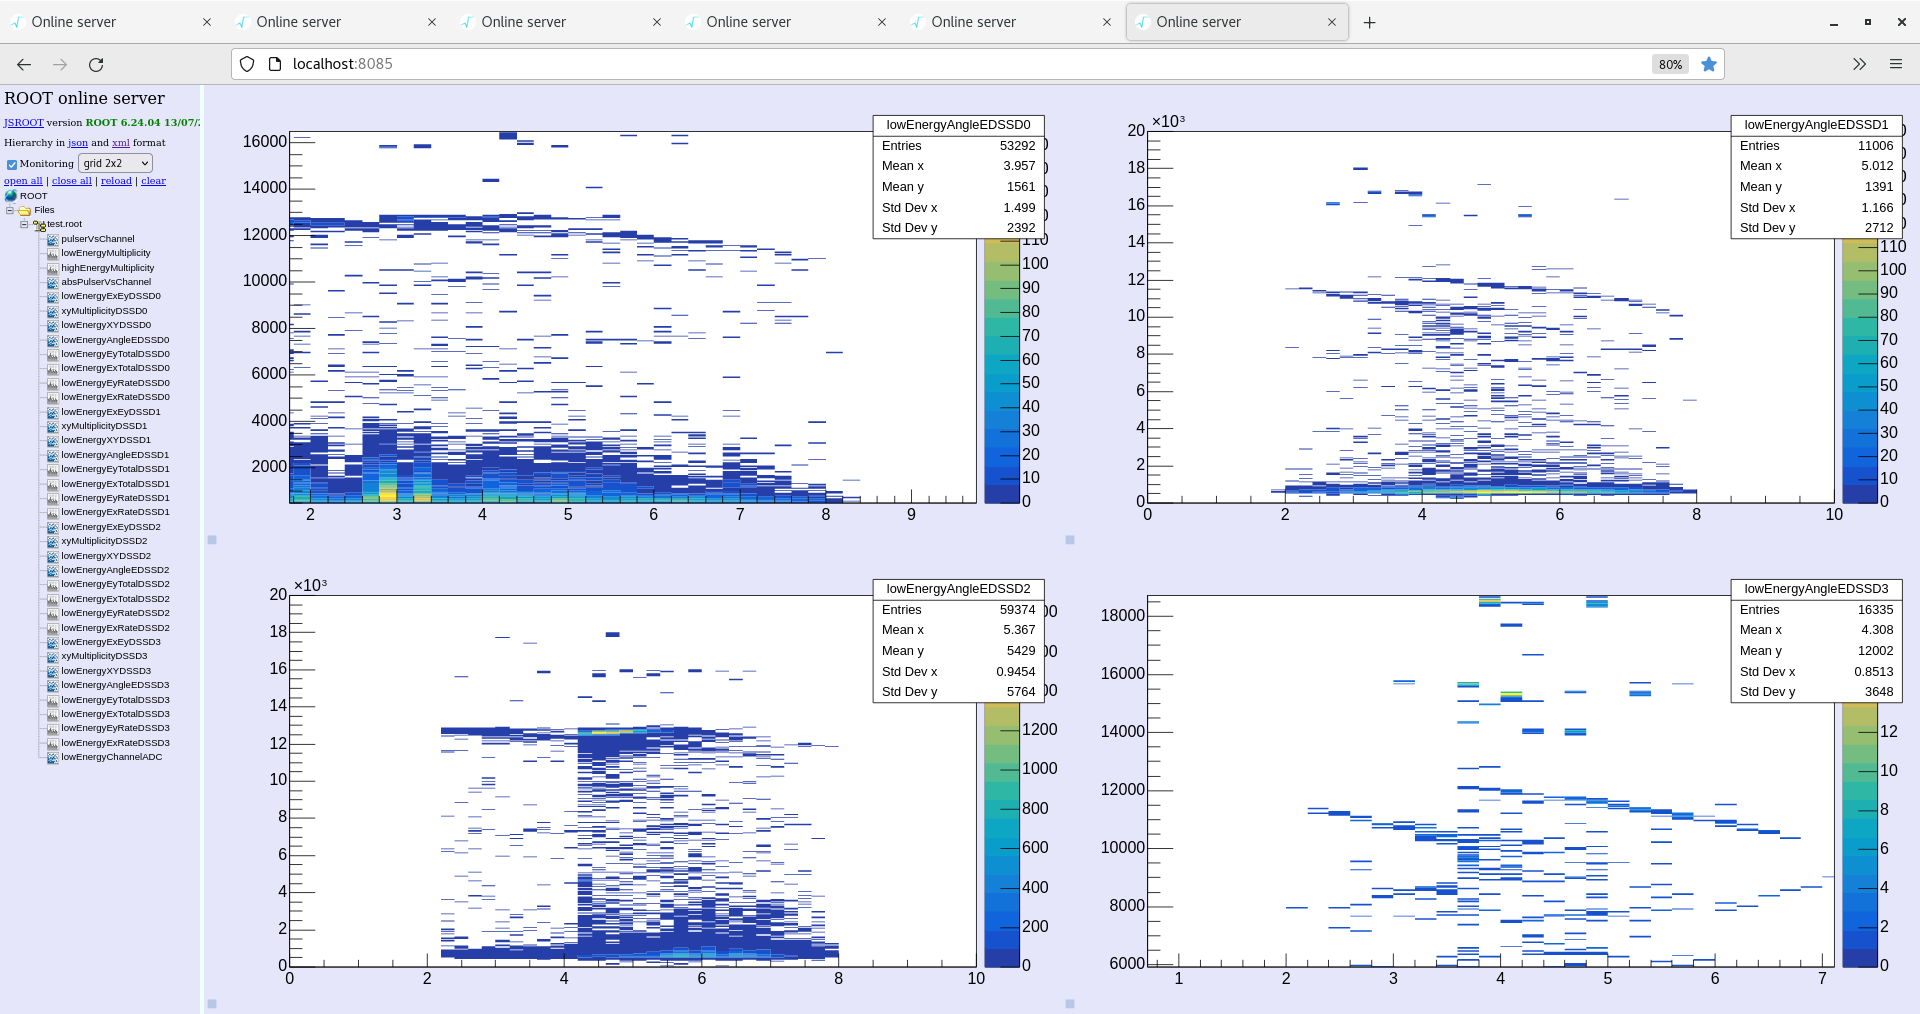
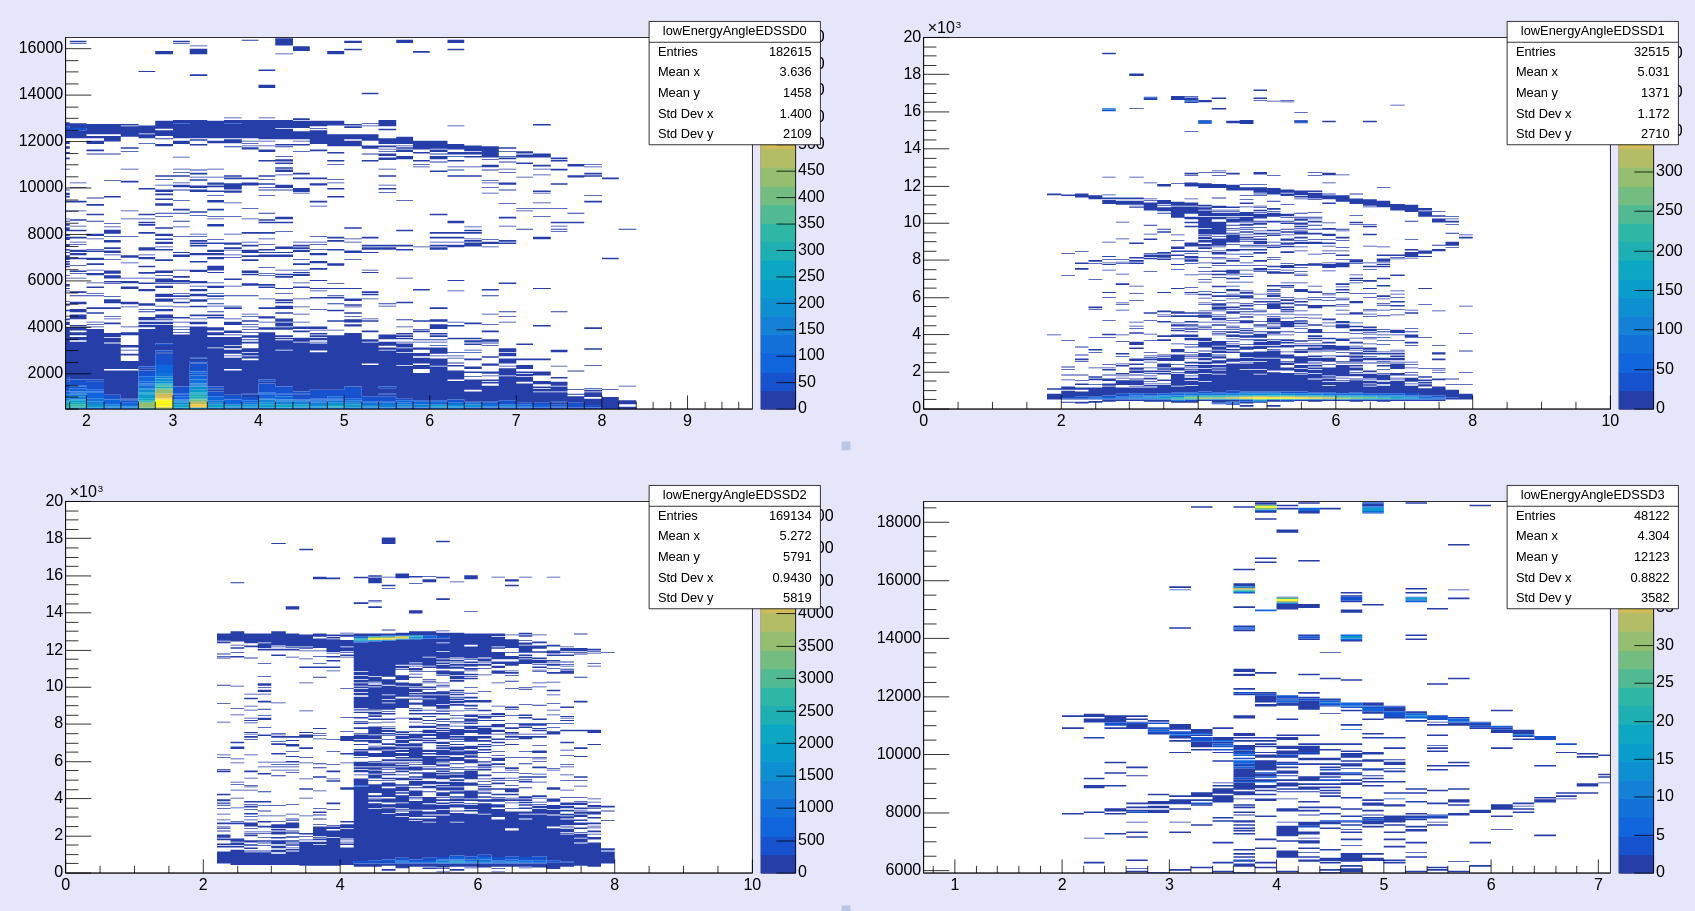
All checks good. Spectra attached in att. 18. Target density still decreasing (3.7E11 at/vcm2)2
2:54
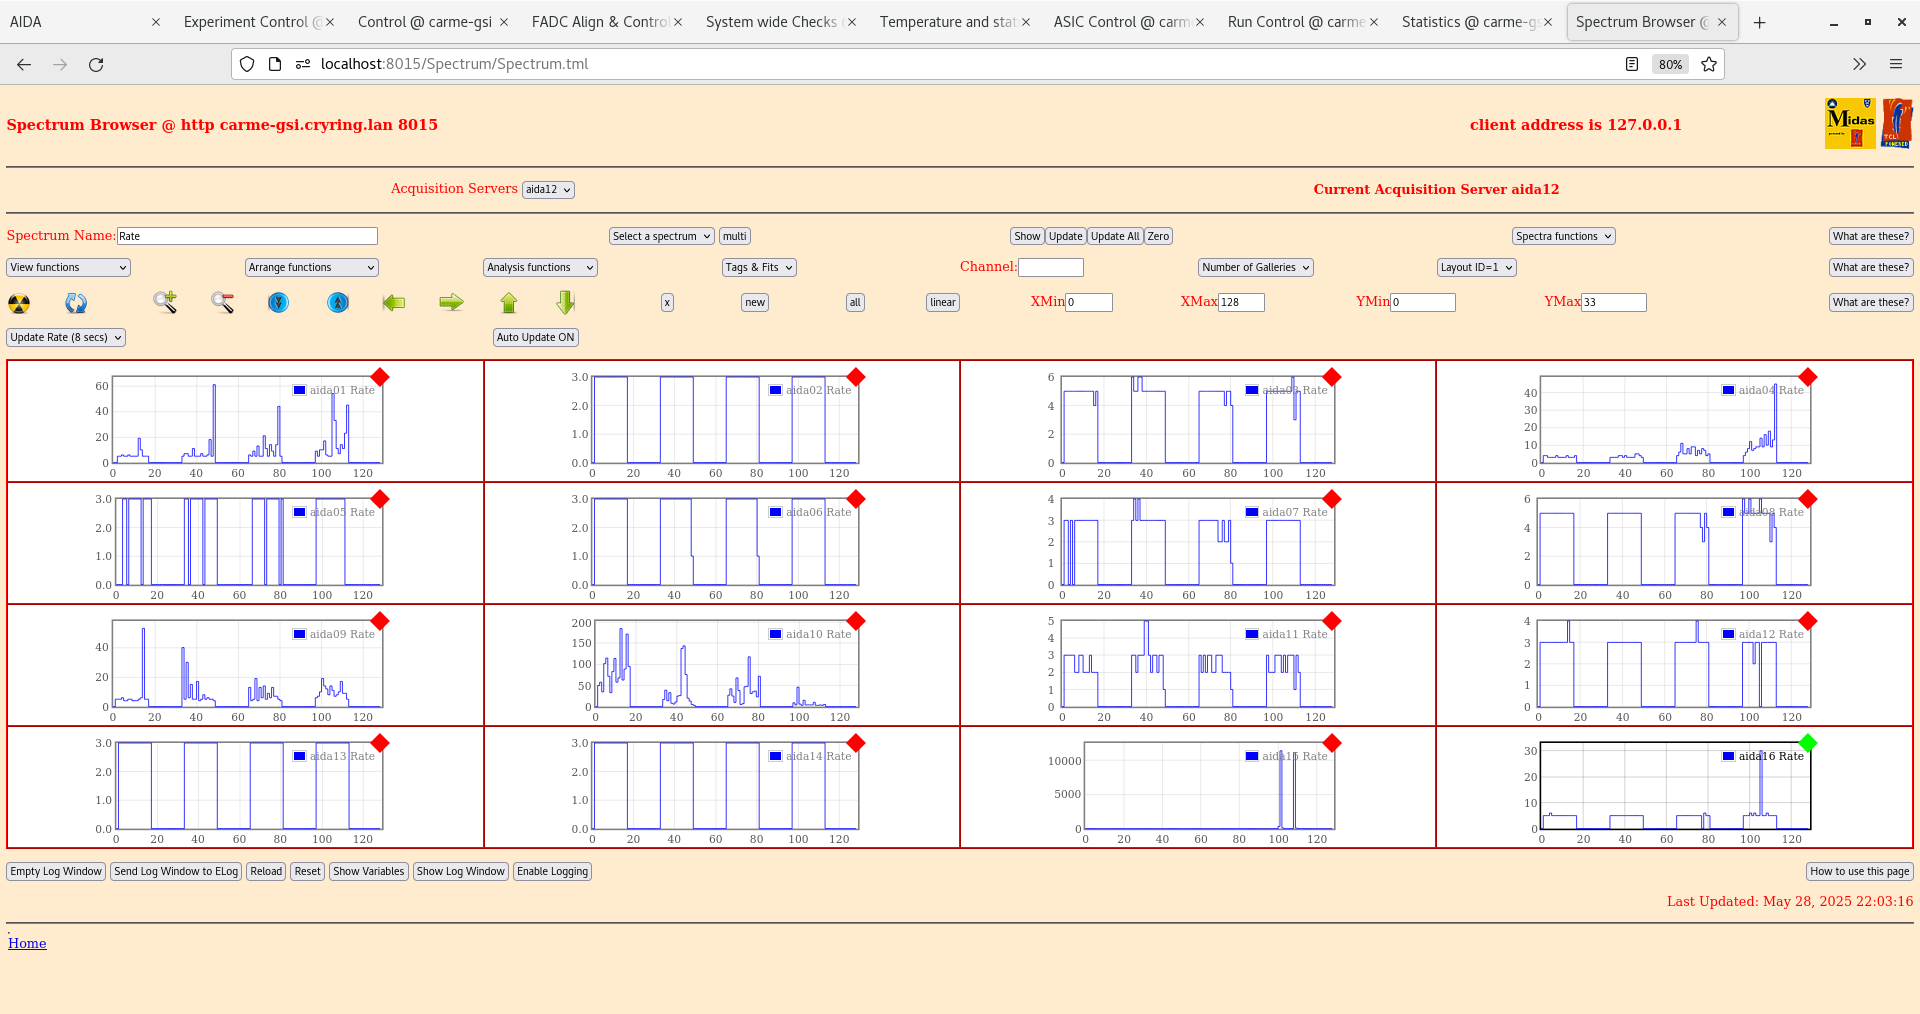
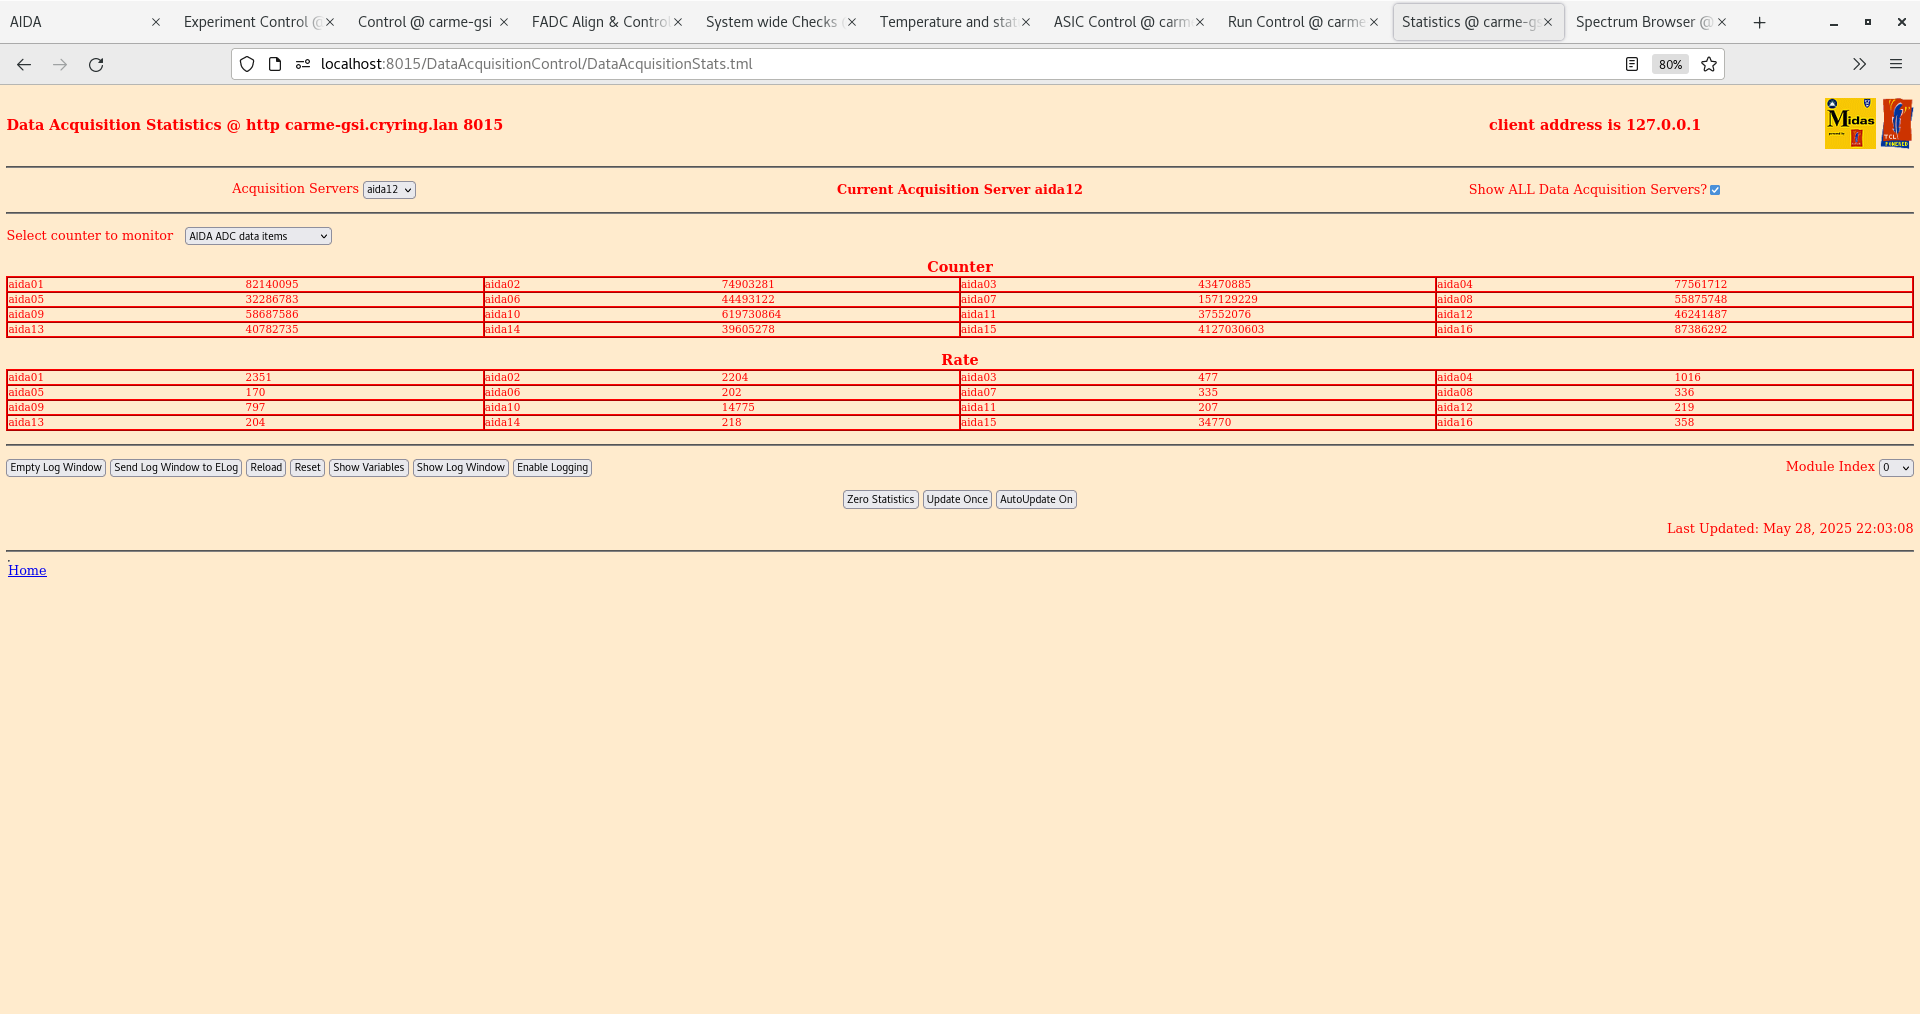
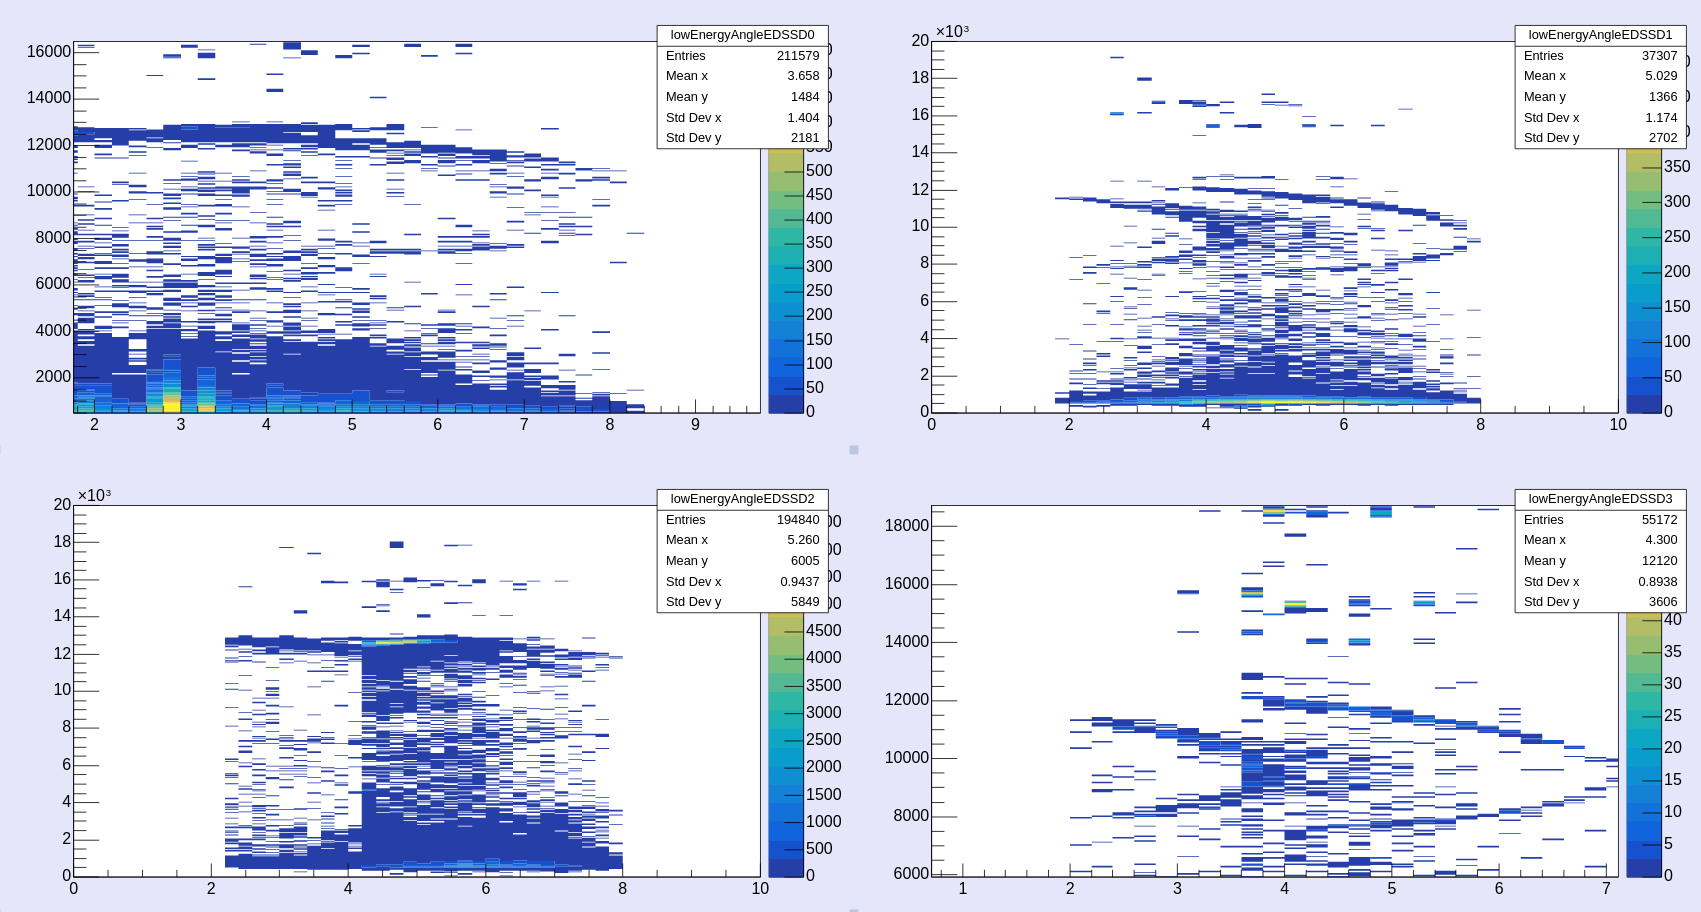
All checks ok. Attached rates and spectra in att. 19-20. target density decreased as continued, now around 2.5E11 at/cm^2.
We tried to move a bit around the nozzle/target, no effect.
Gone back to original value of x=1000, y=-4200.
Moreover, the screen with the program to move the detector seems to be bugged (gray background, a double window): however, the potentiometer value is chnaging and I see the usual effect of detector moving on the statistics, so i think it is fine
3:38
Checks Ok. Target 2.5E11 at/cm2
4:05
The bug disappeared
4:56
Target density is now 1.9E11 at/cm2. It is very low with respect to before, but our reasoning is that nothing can be done about it at night anyway (apart from moving the nozzle, which we tried without effect). O. pointed out that the beam lifetime is still such that the beam is gone before the next injection.
Checks ok. Attachments 21-22 spectra and xy plot. Some structure in top left?
06:00
All check ok. Target density 1.8E11 at/cm2
6:49
all goo, target 1.7E11 at/cm2
07:30
All checks ok, except timestamp (15 passed, 1 failed, see screenshot)
8:30
Tried moving the nozzle. Minor improvement in target density only. x=-1000 y=-4200
Stopped writing to disk while moving nozzle and stopped the motors. Restarted everything and moved to run 29 - no differences vs. 28.
09:11
Temps OK.
Nautilus does not respond to user commands. Attempint to make it work again without rebooting.
10:05
Stopped to reconsider which arm we are moving. Started to move arms around. Decided to stick with left arm.
Started run 30. Same as 28 and 29.
10:30
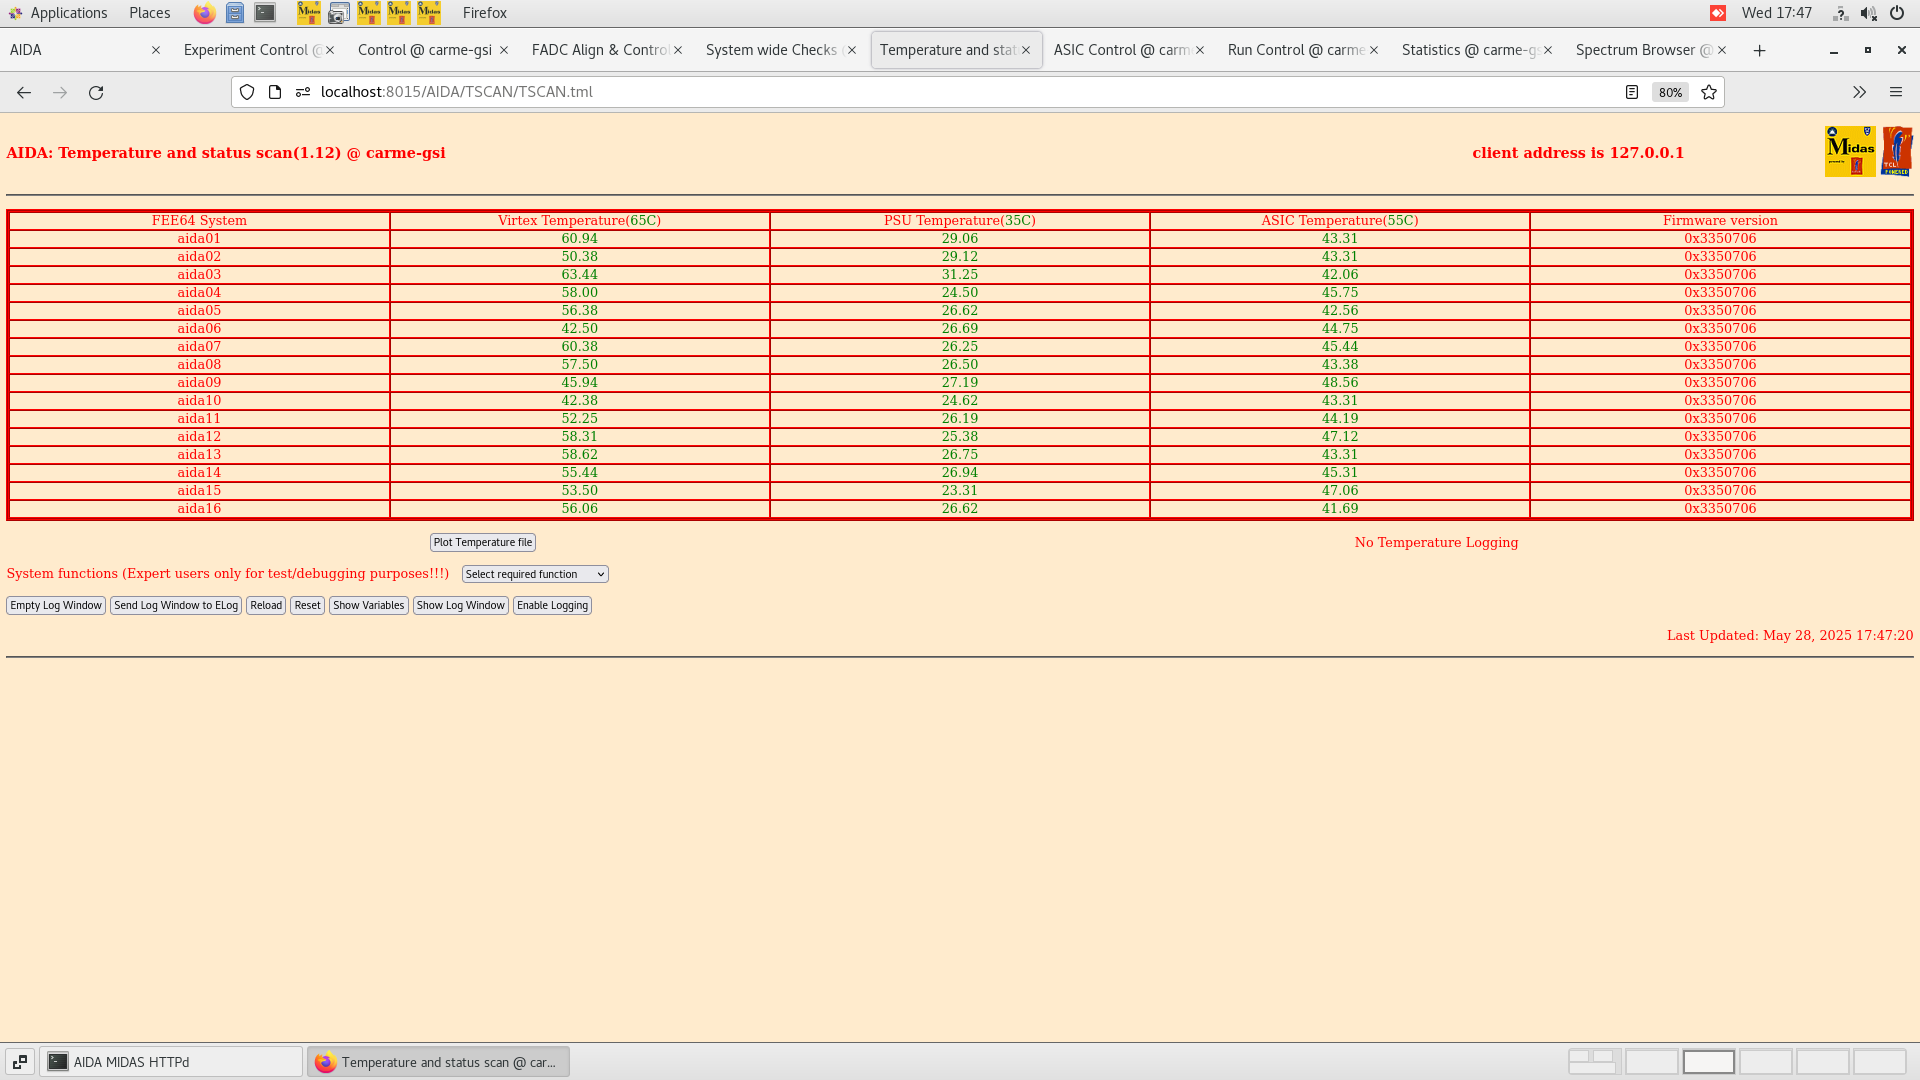
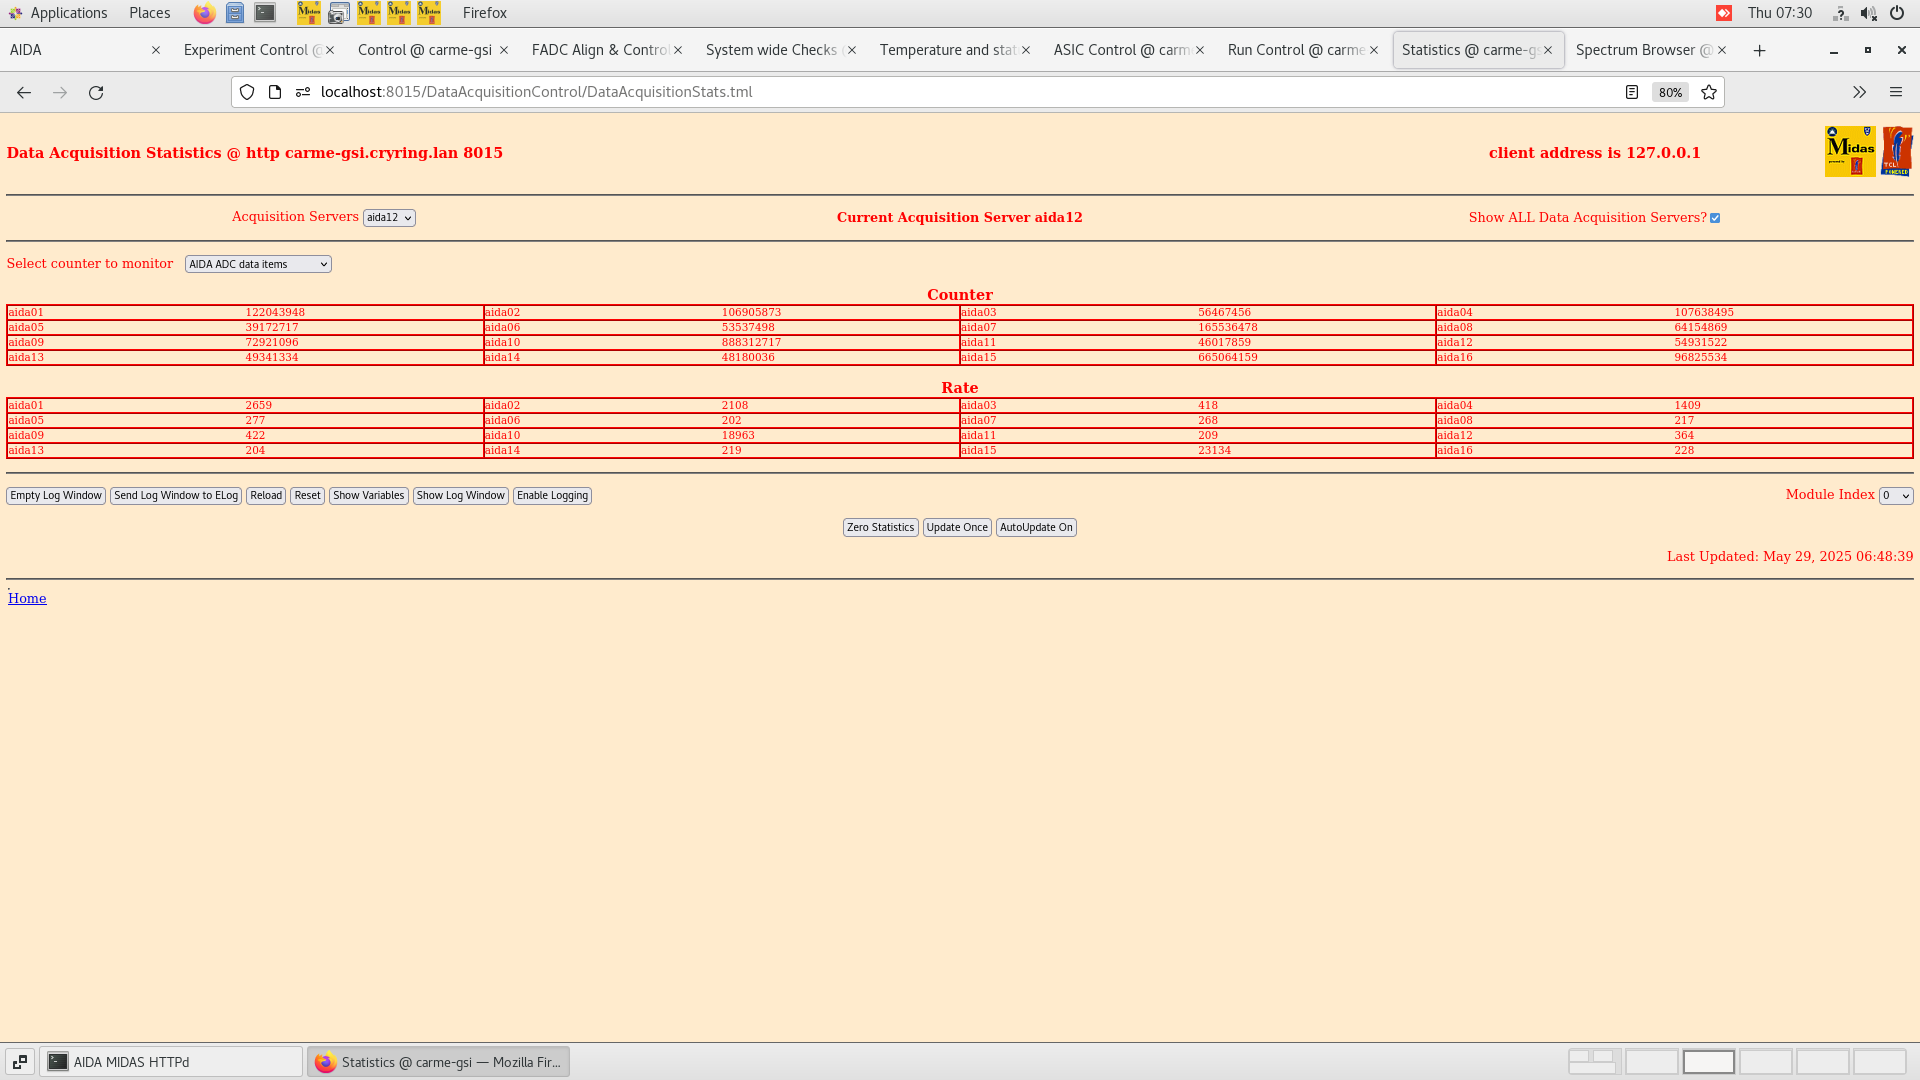
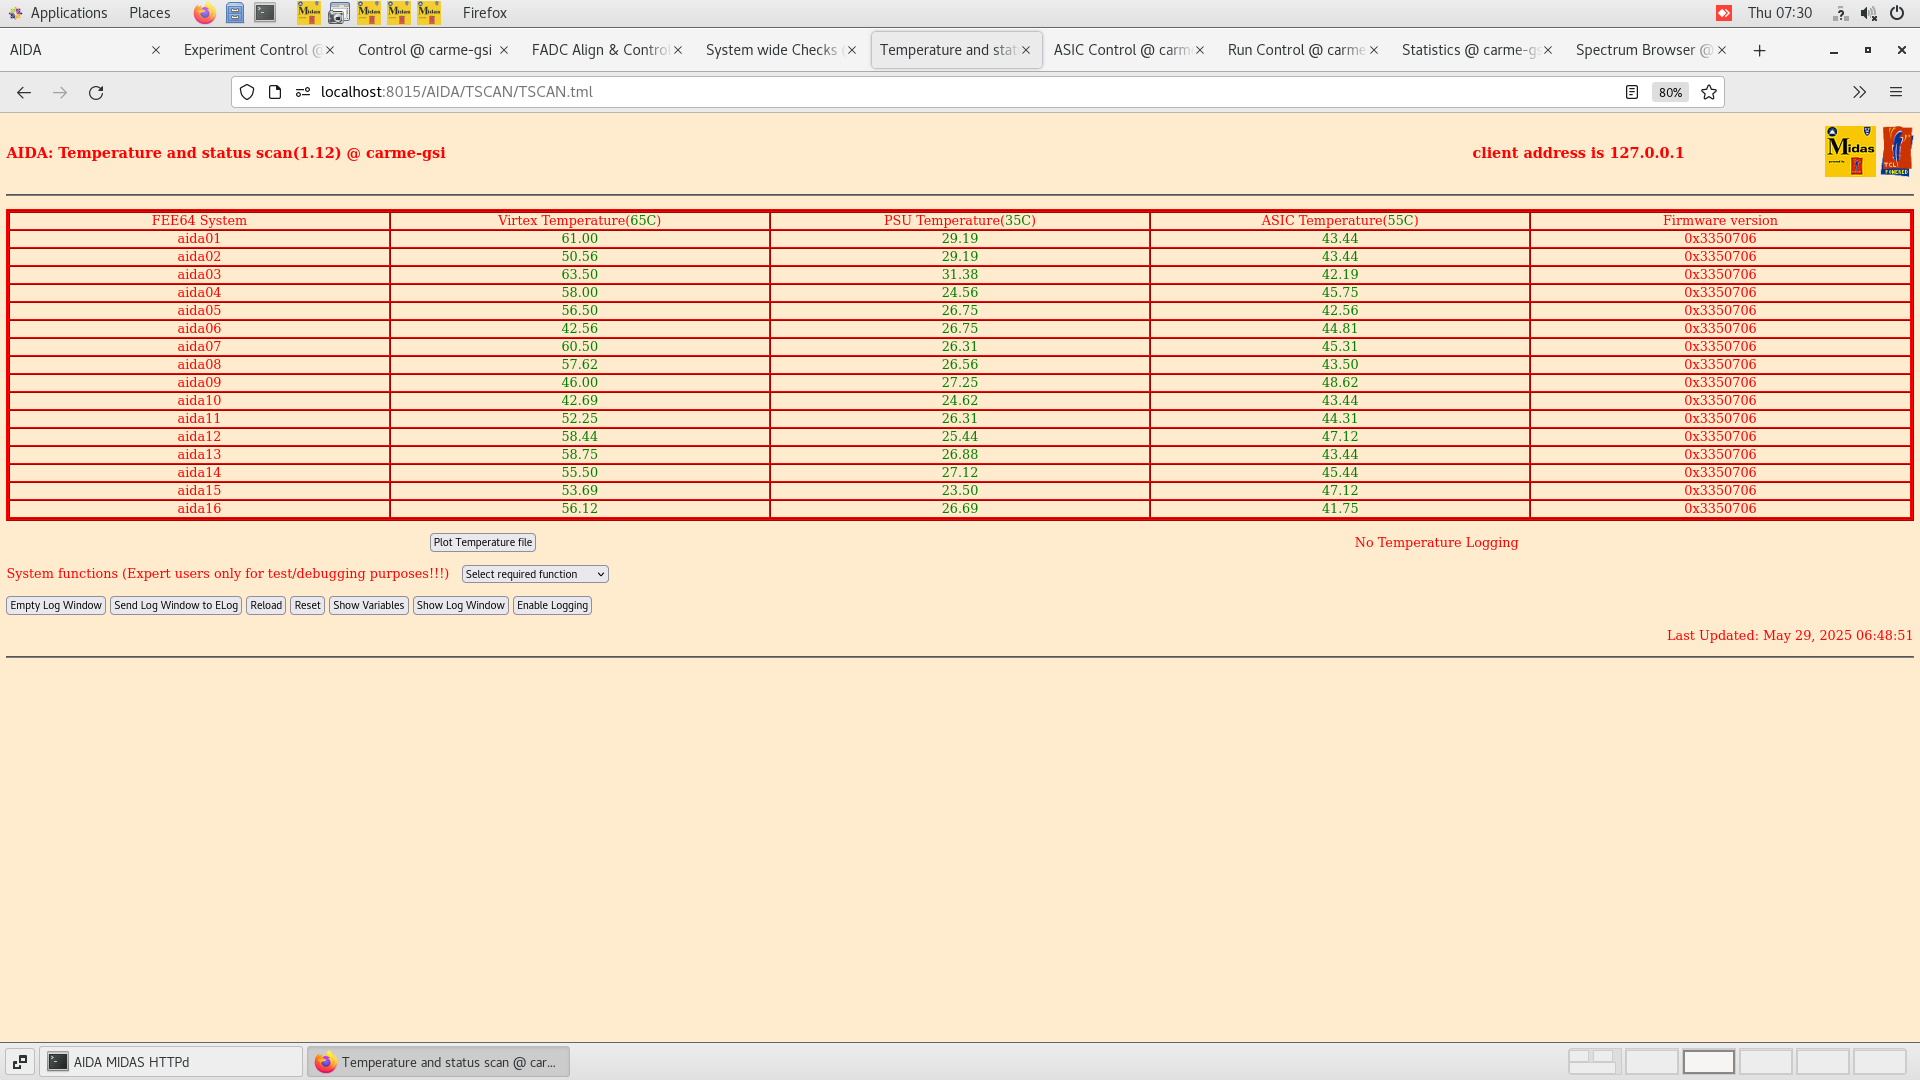
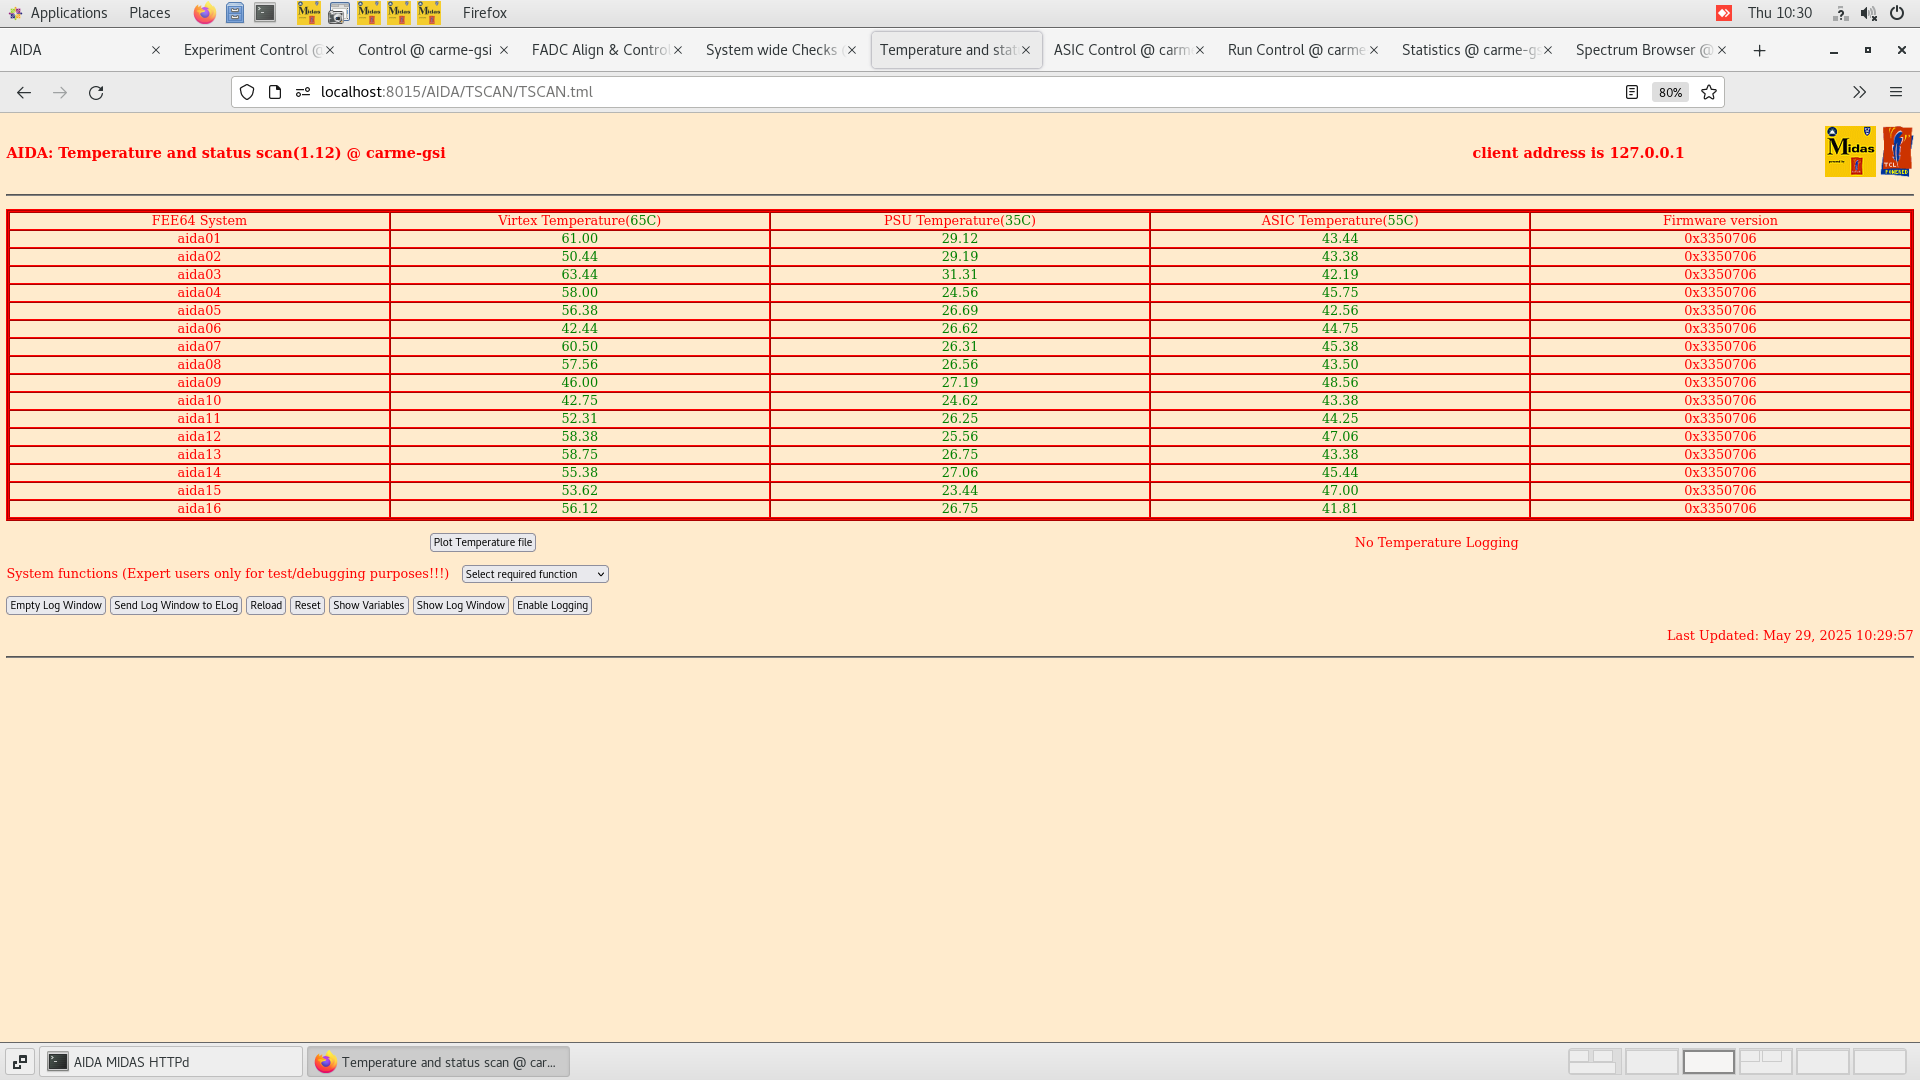
Temps OK - attach
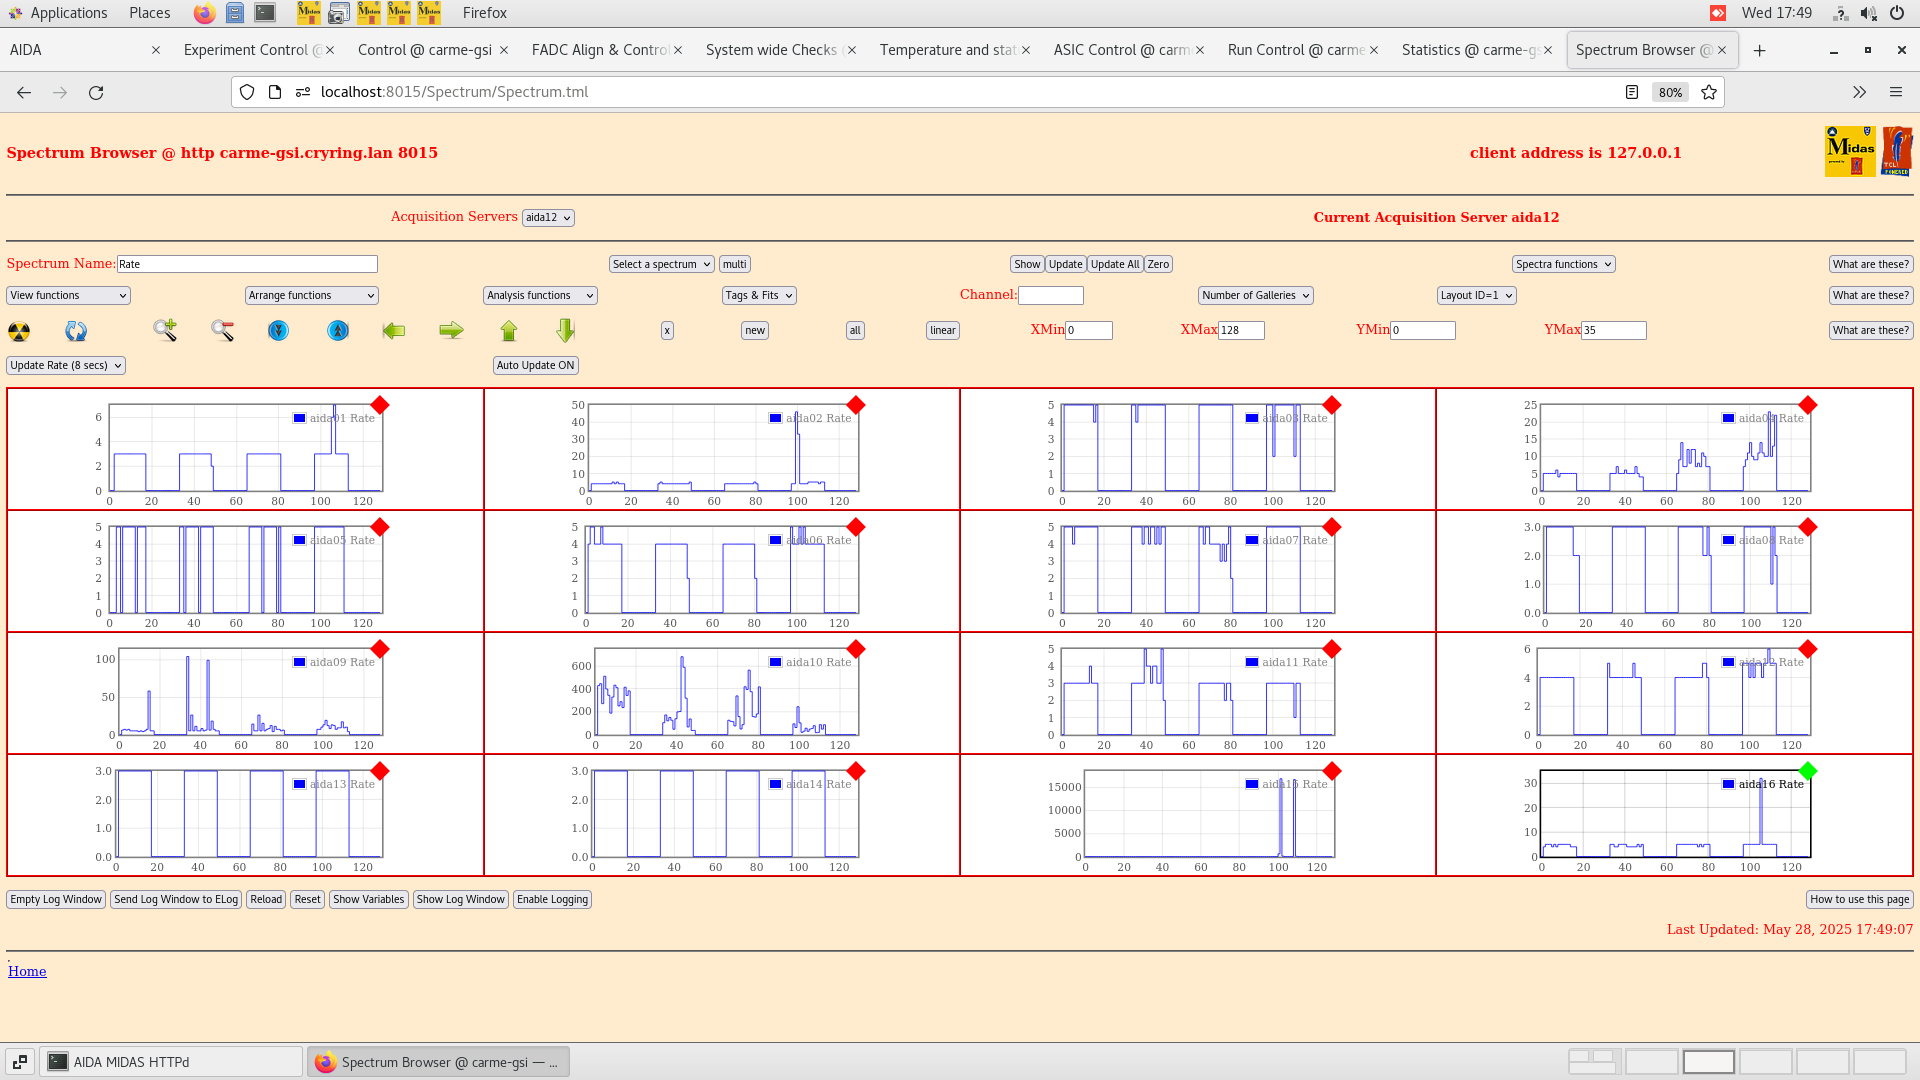
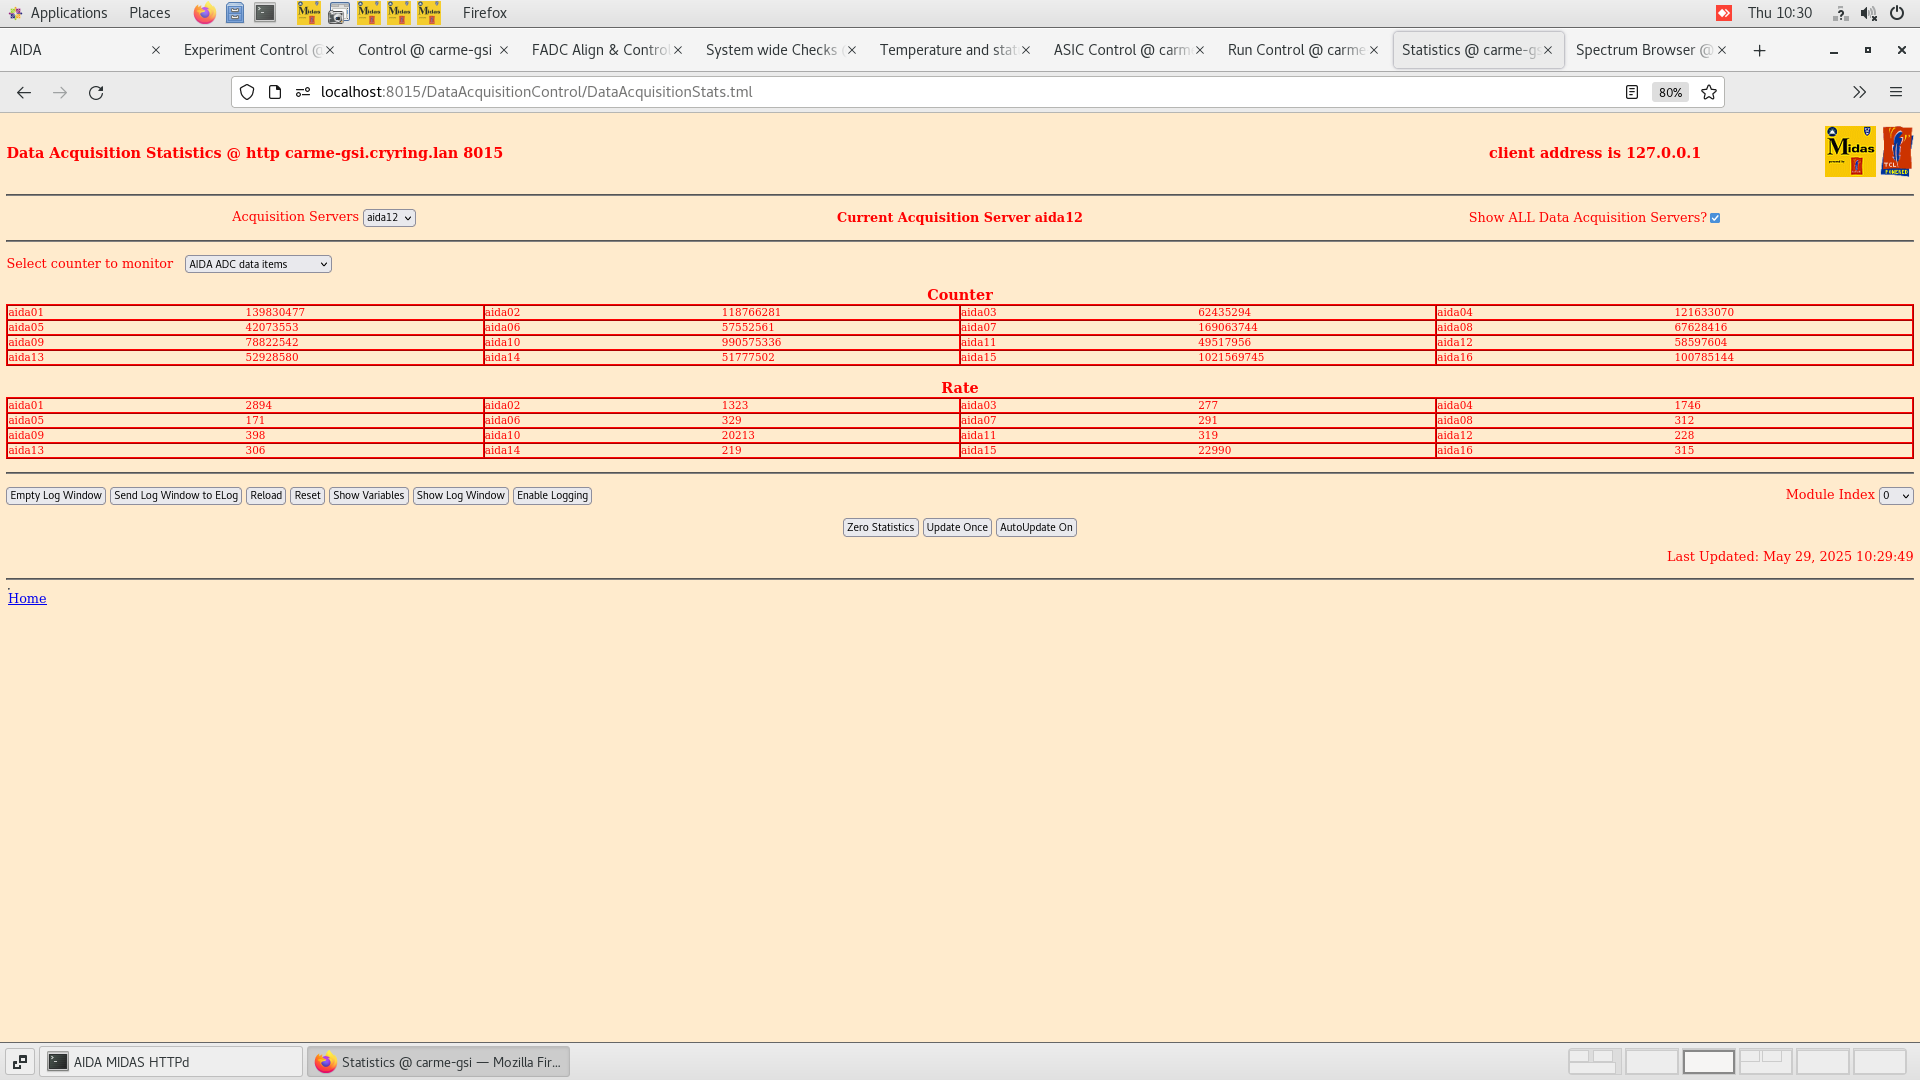
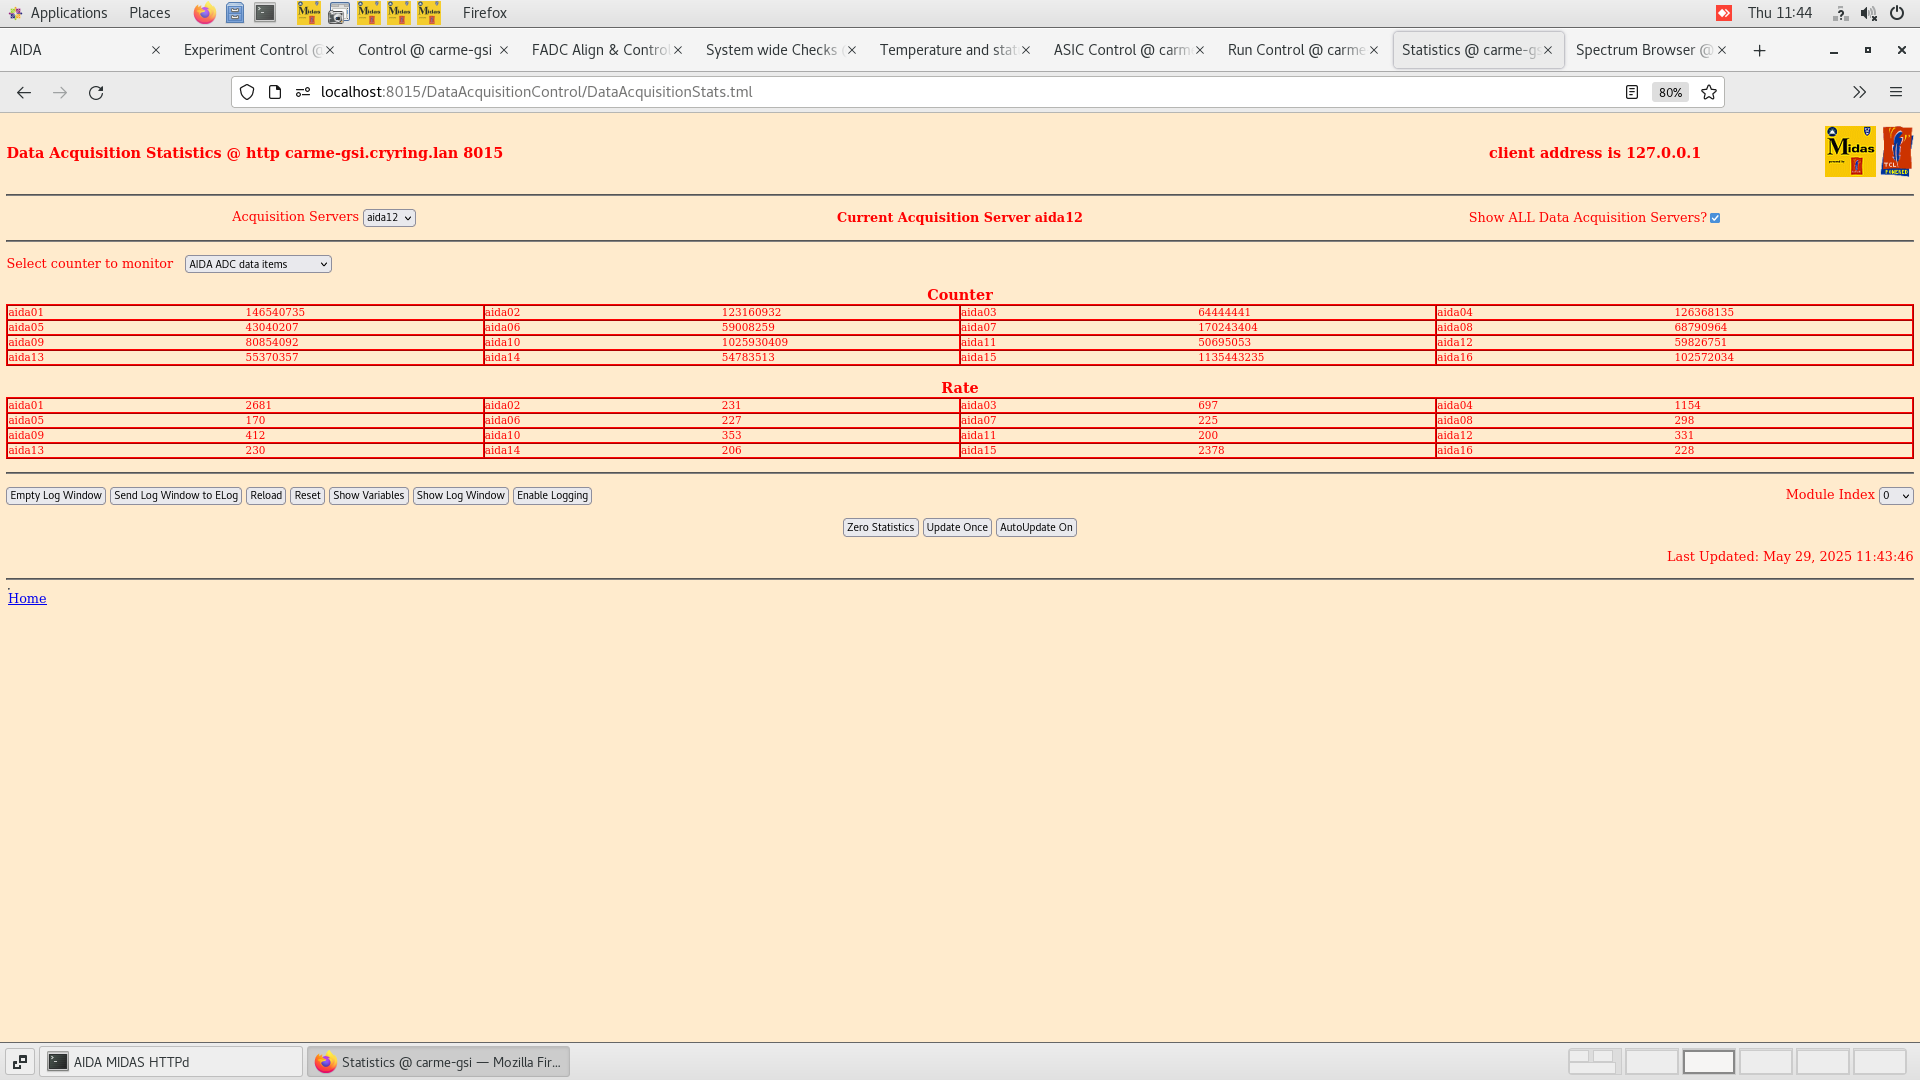
Rates OK - attach
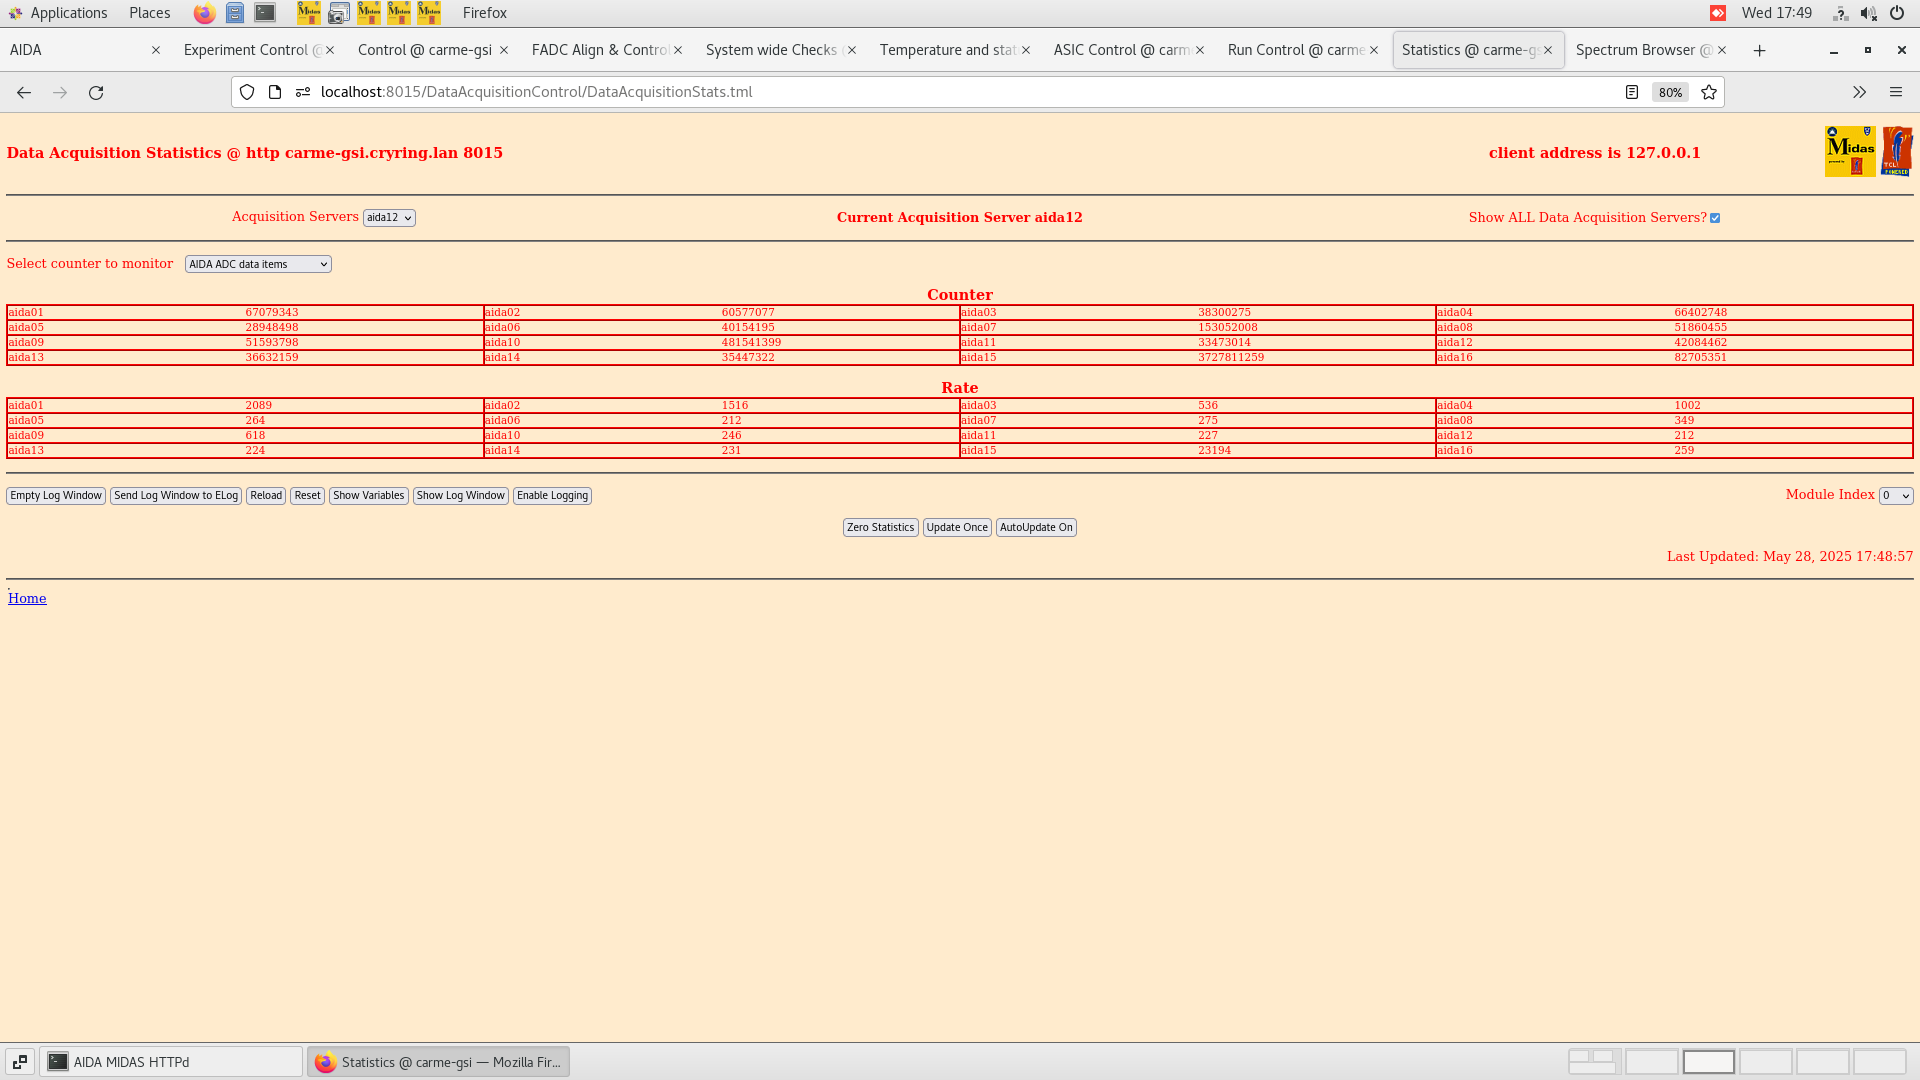
Stats OK (taken with arm in) - attach
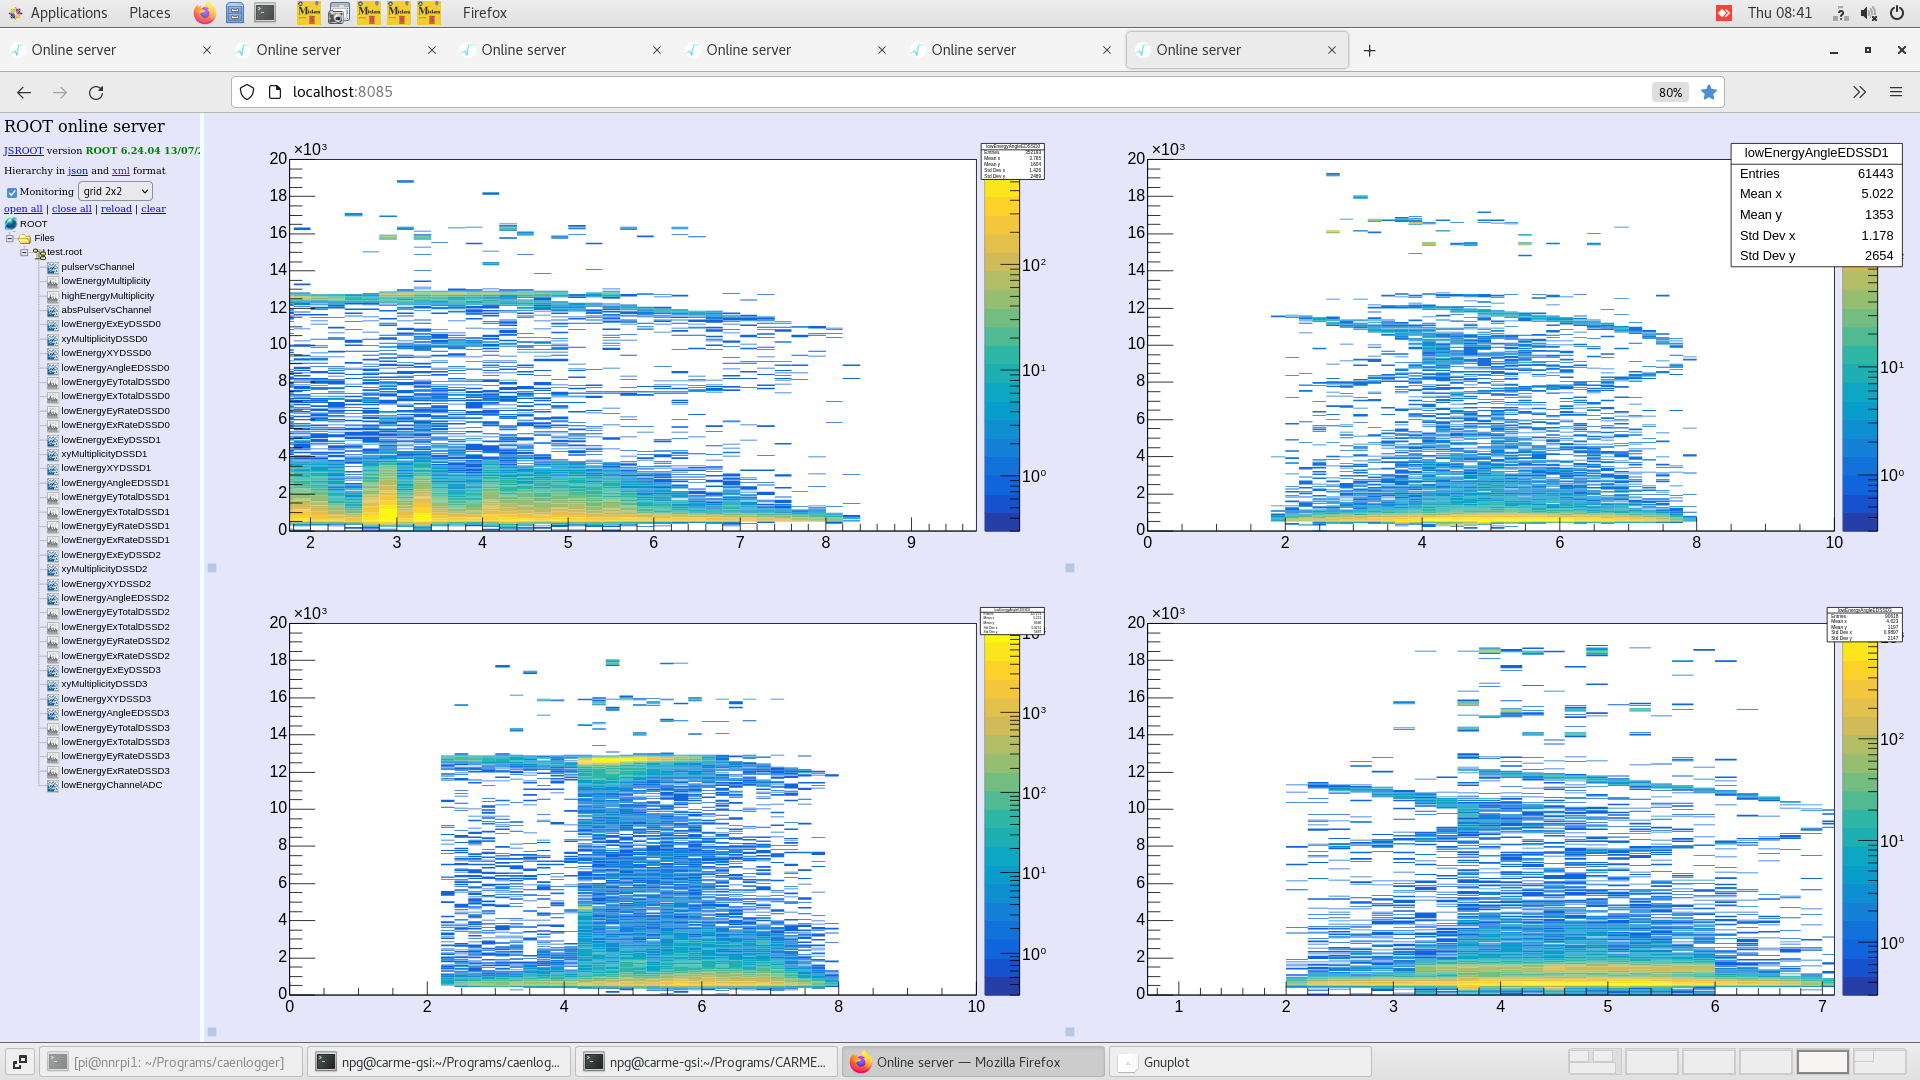
Current histogram attached
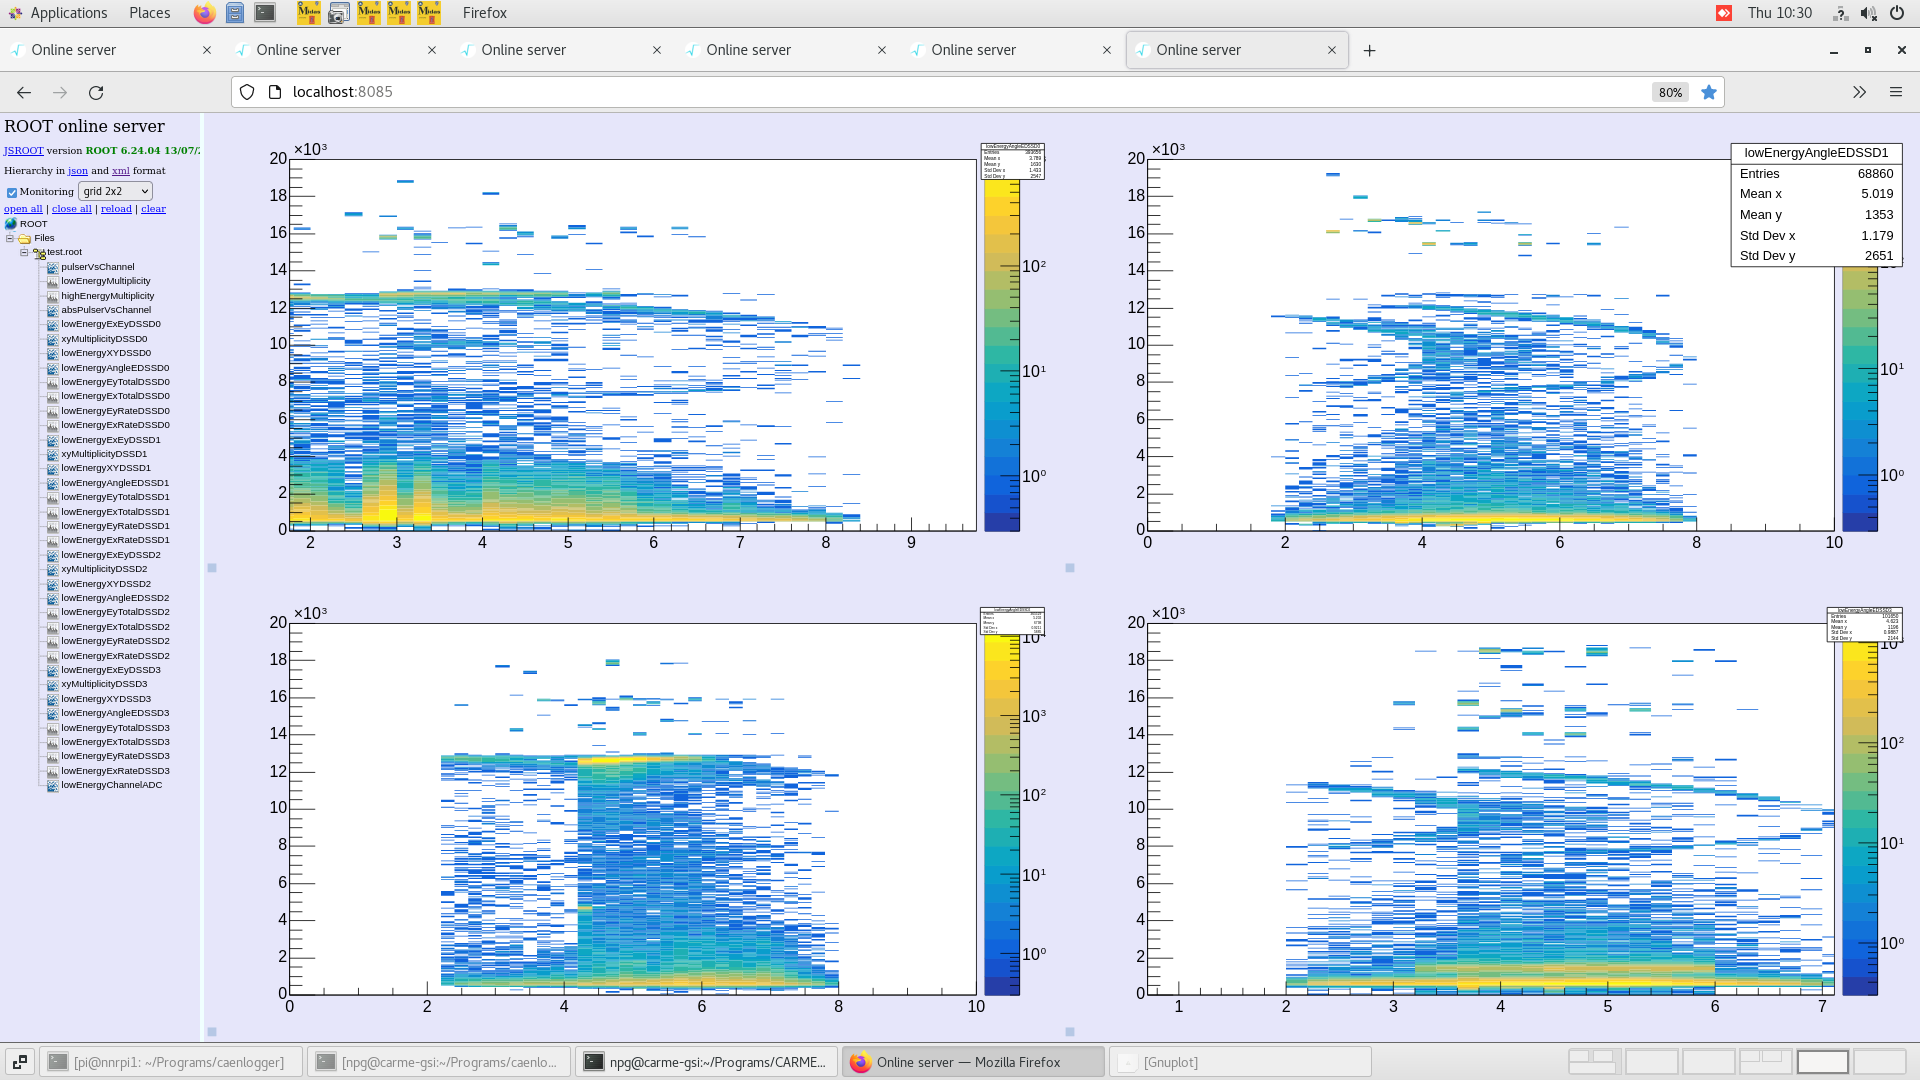
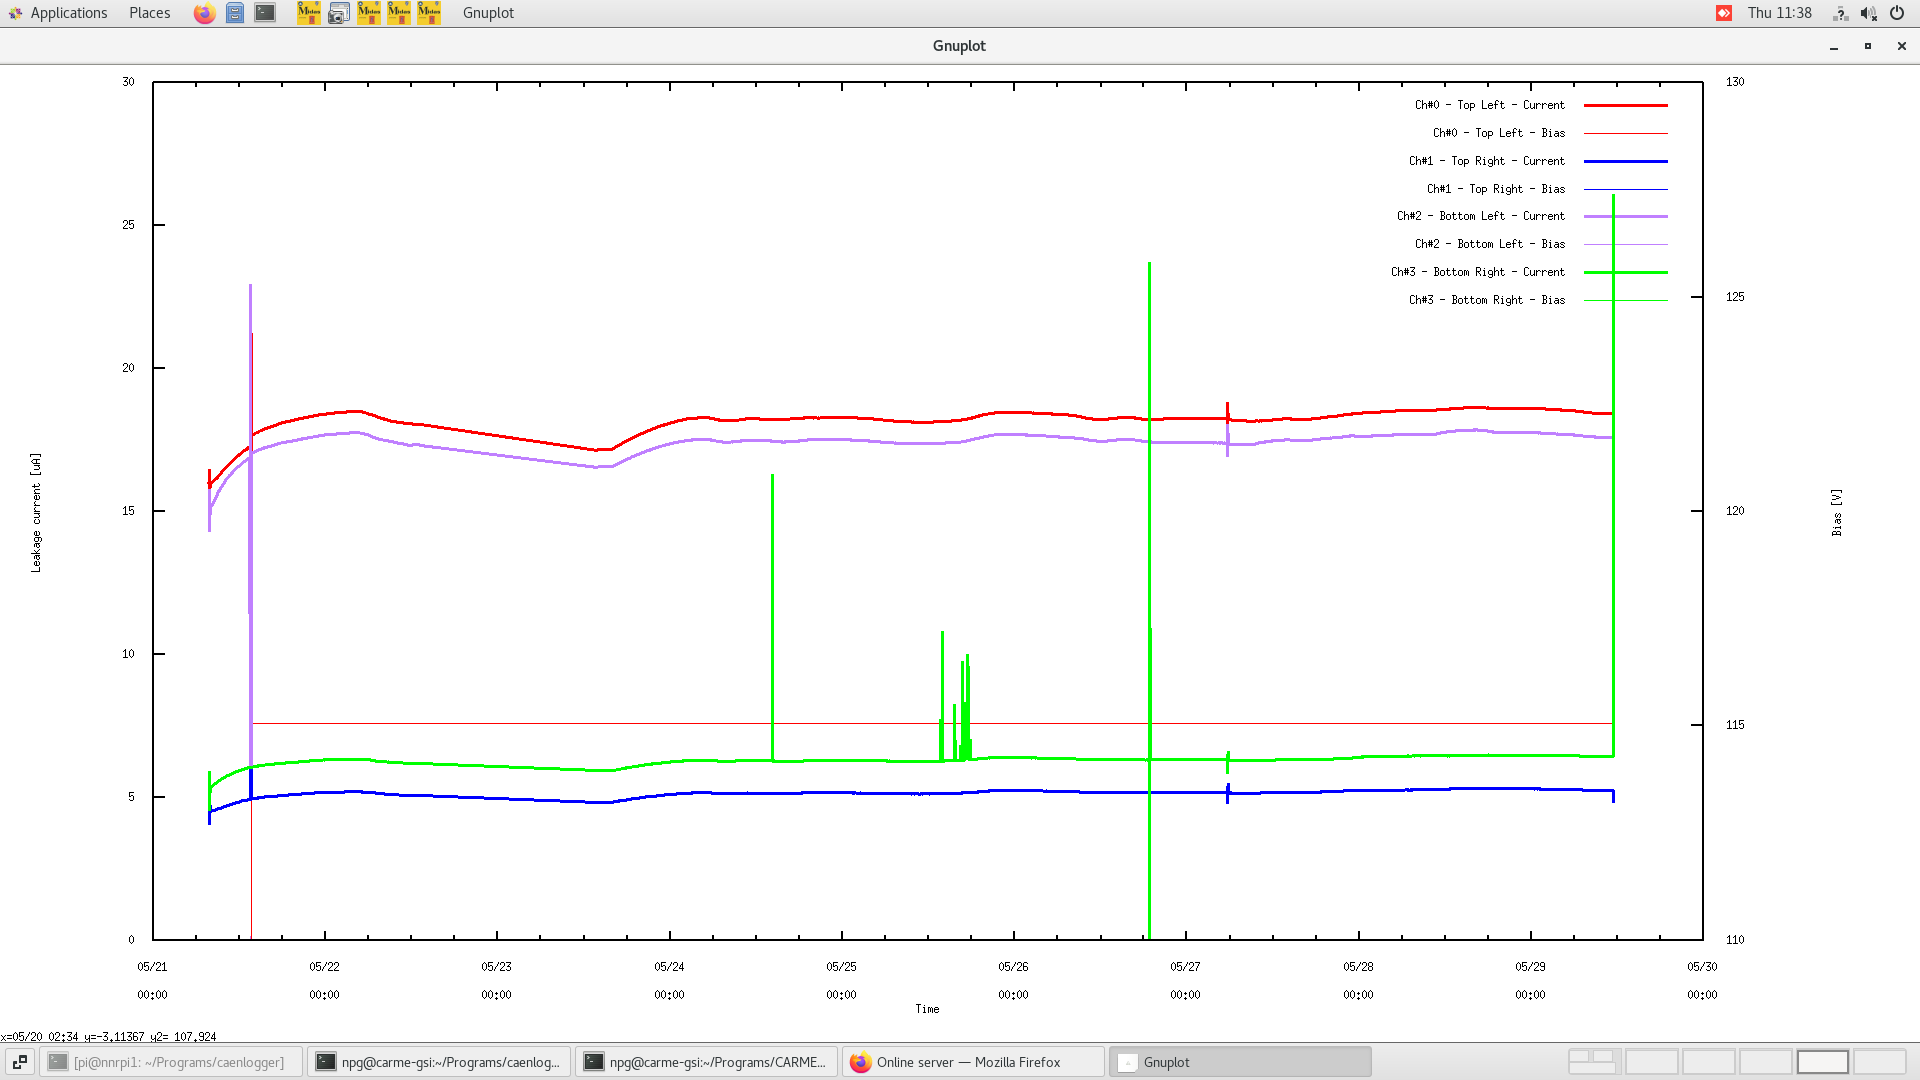
11:40
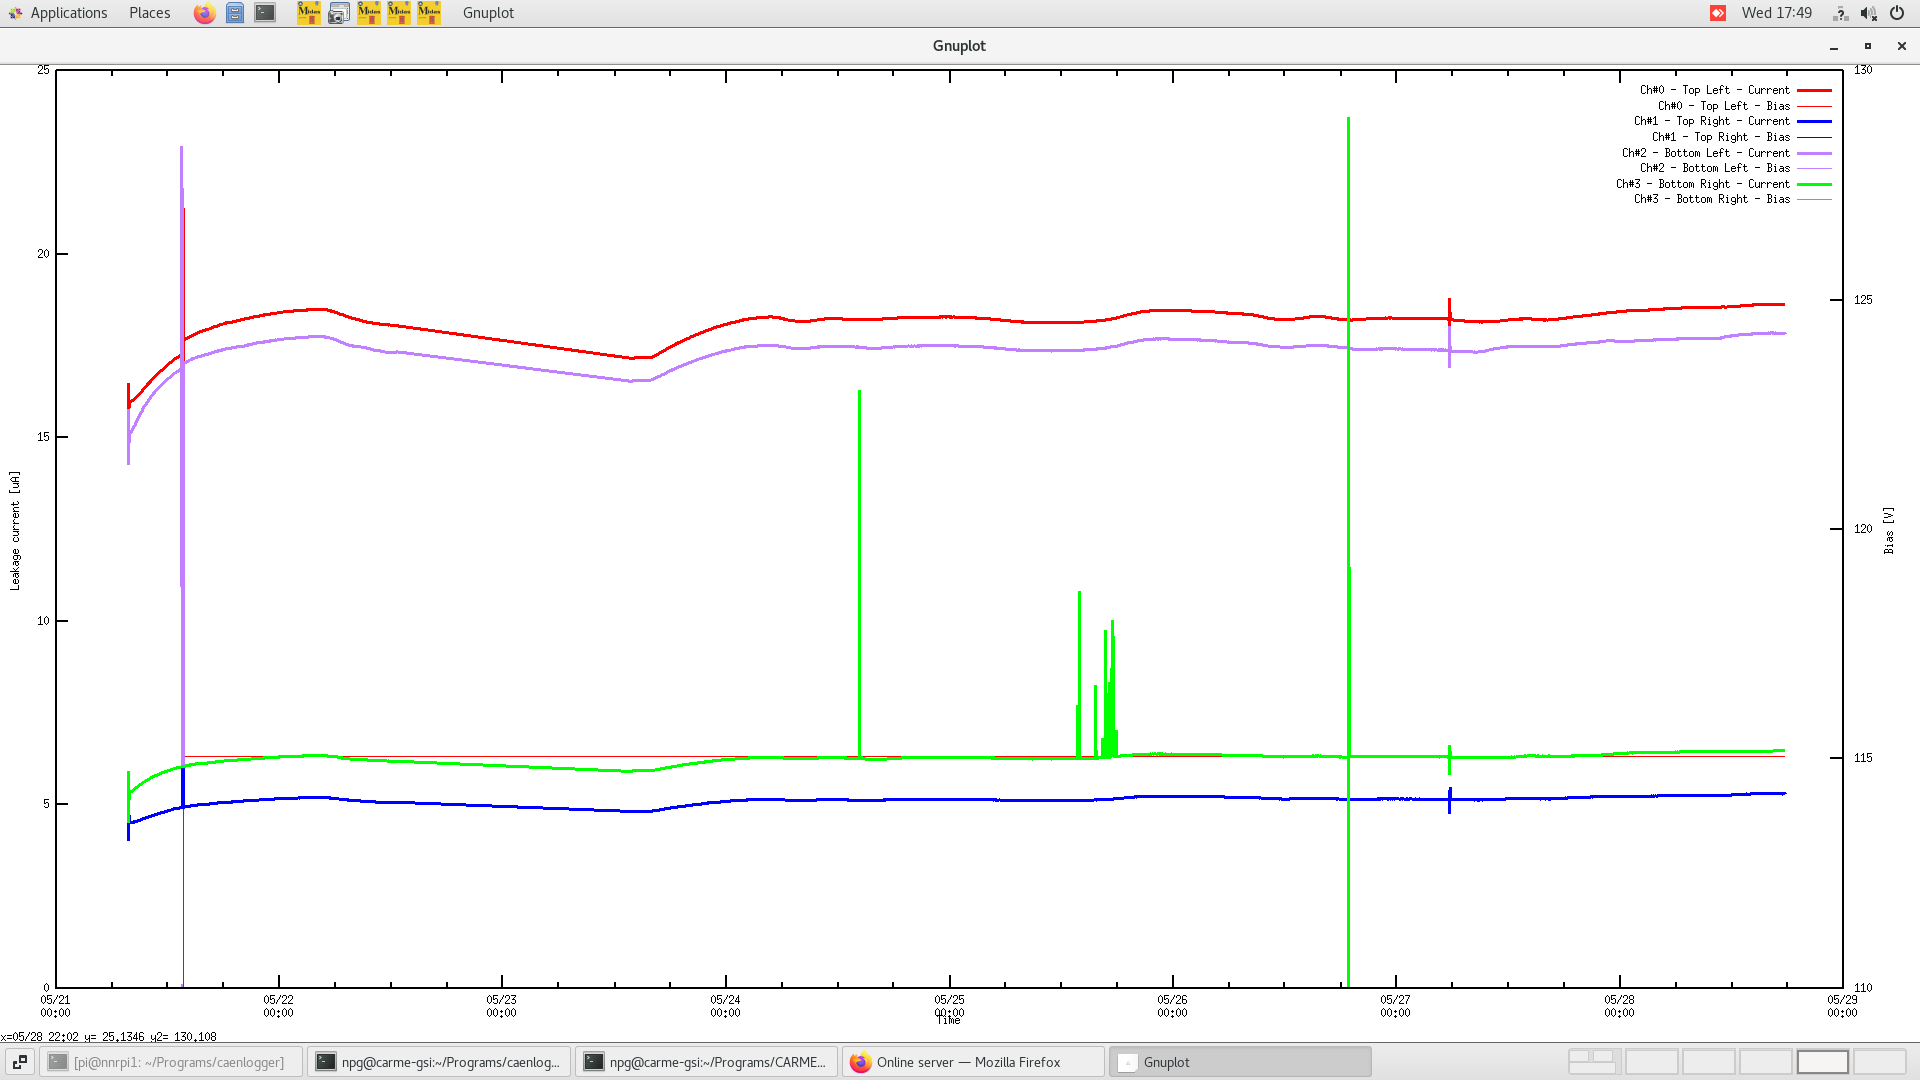
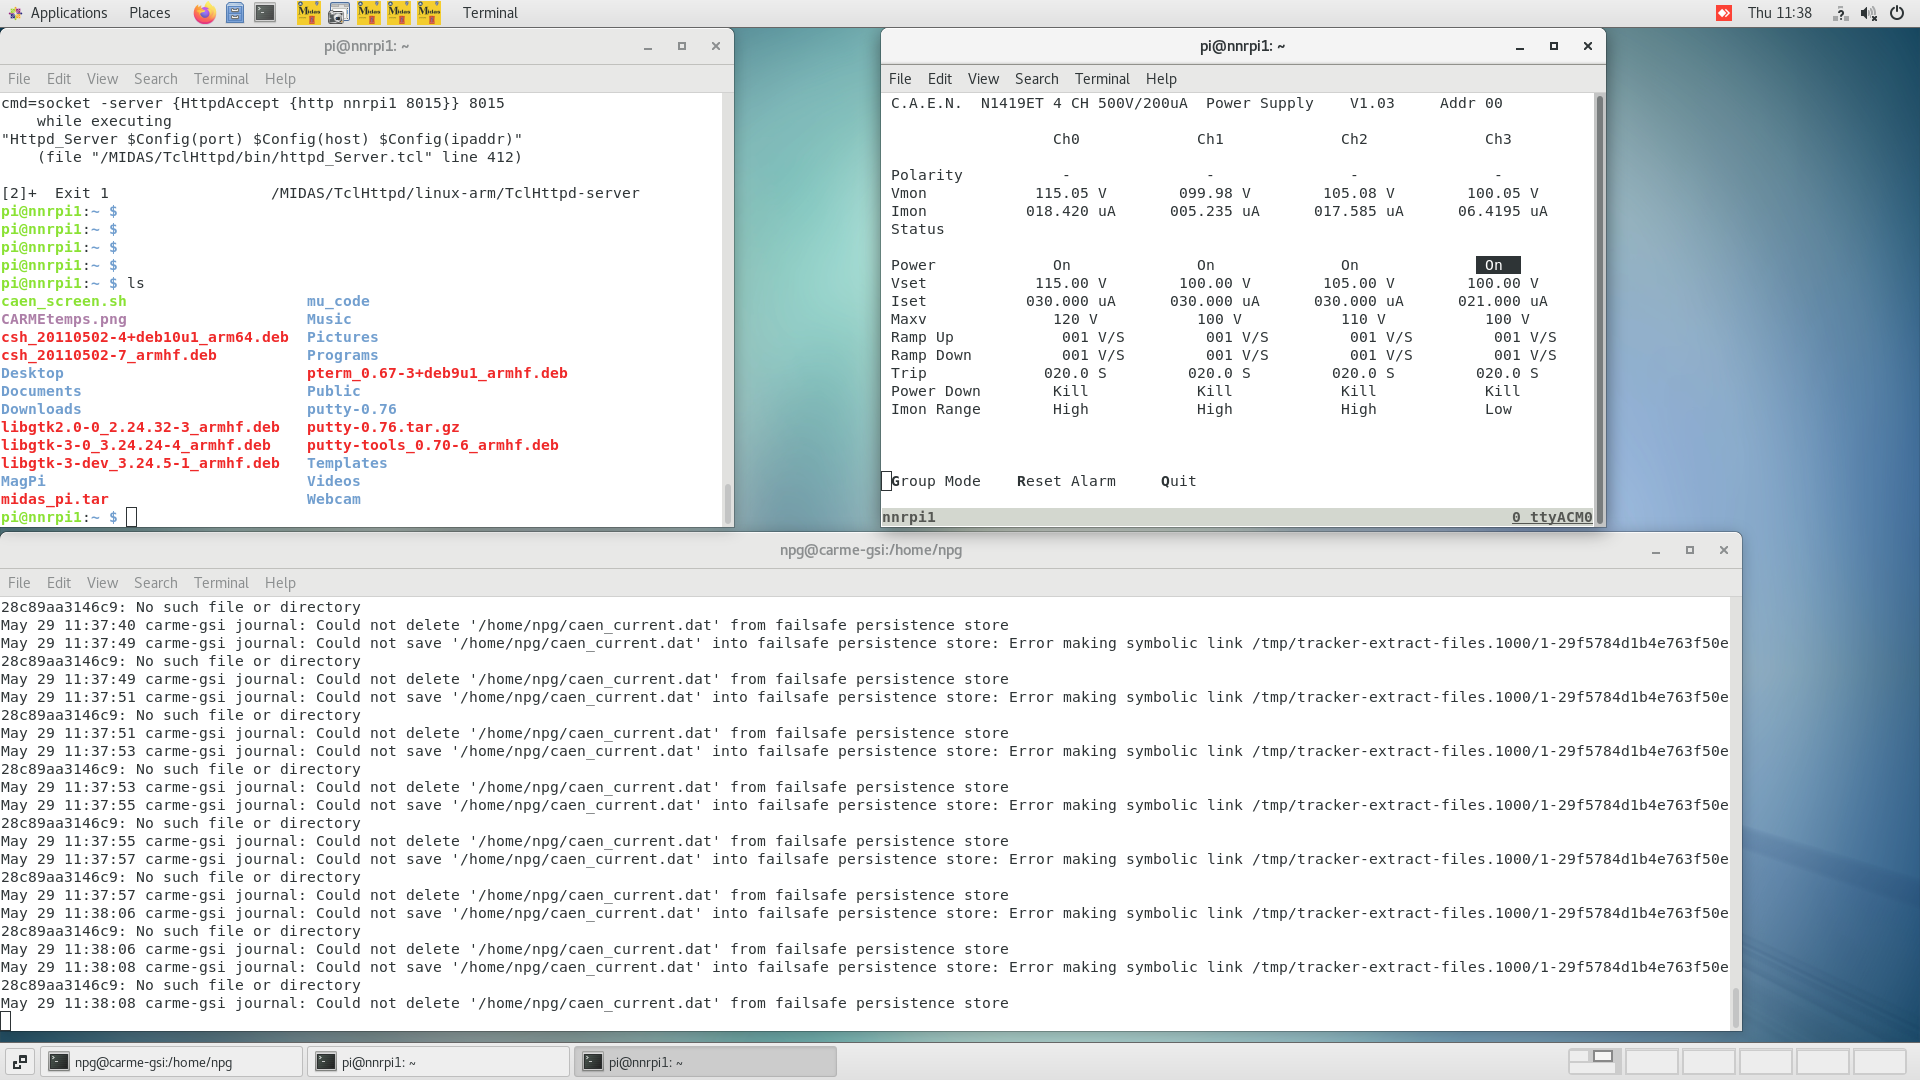
Something happened to leakage currents. We see an increase in the top-right detector (which recovered) and a decrease in the bottom-right. Neither is moving.
No changes to left arm detectors, which are moving.
Temperature in the cave stable. No effects on the DAQ.
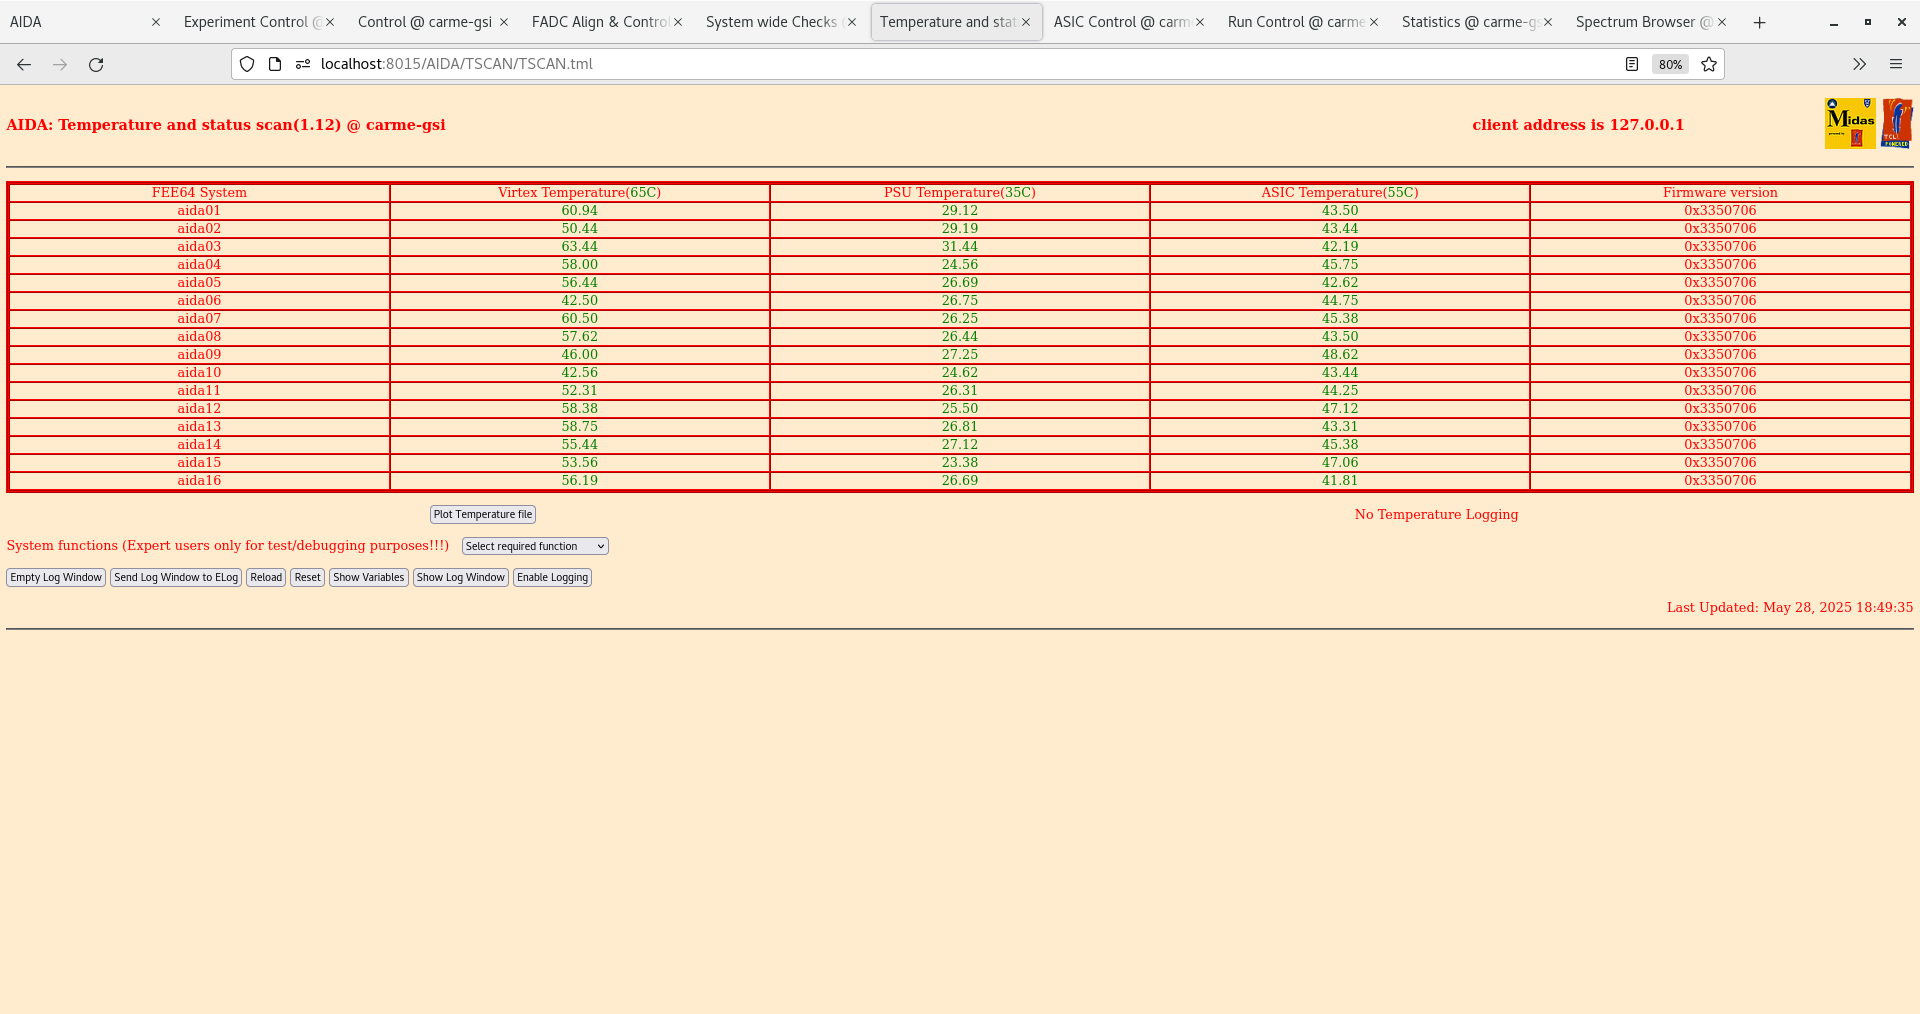
Temps OK
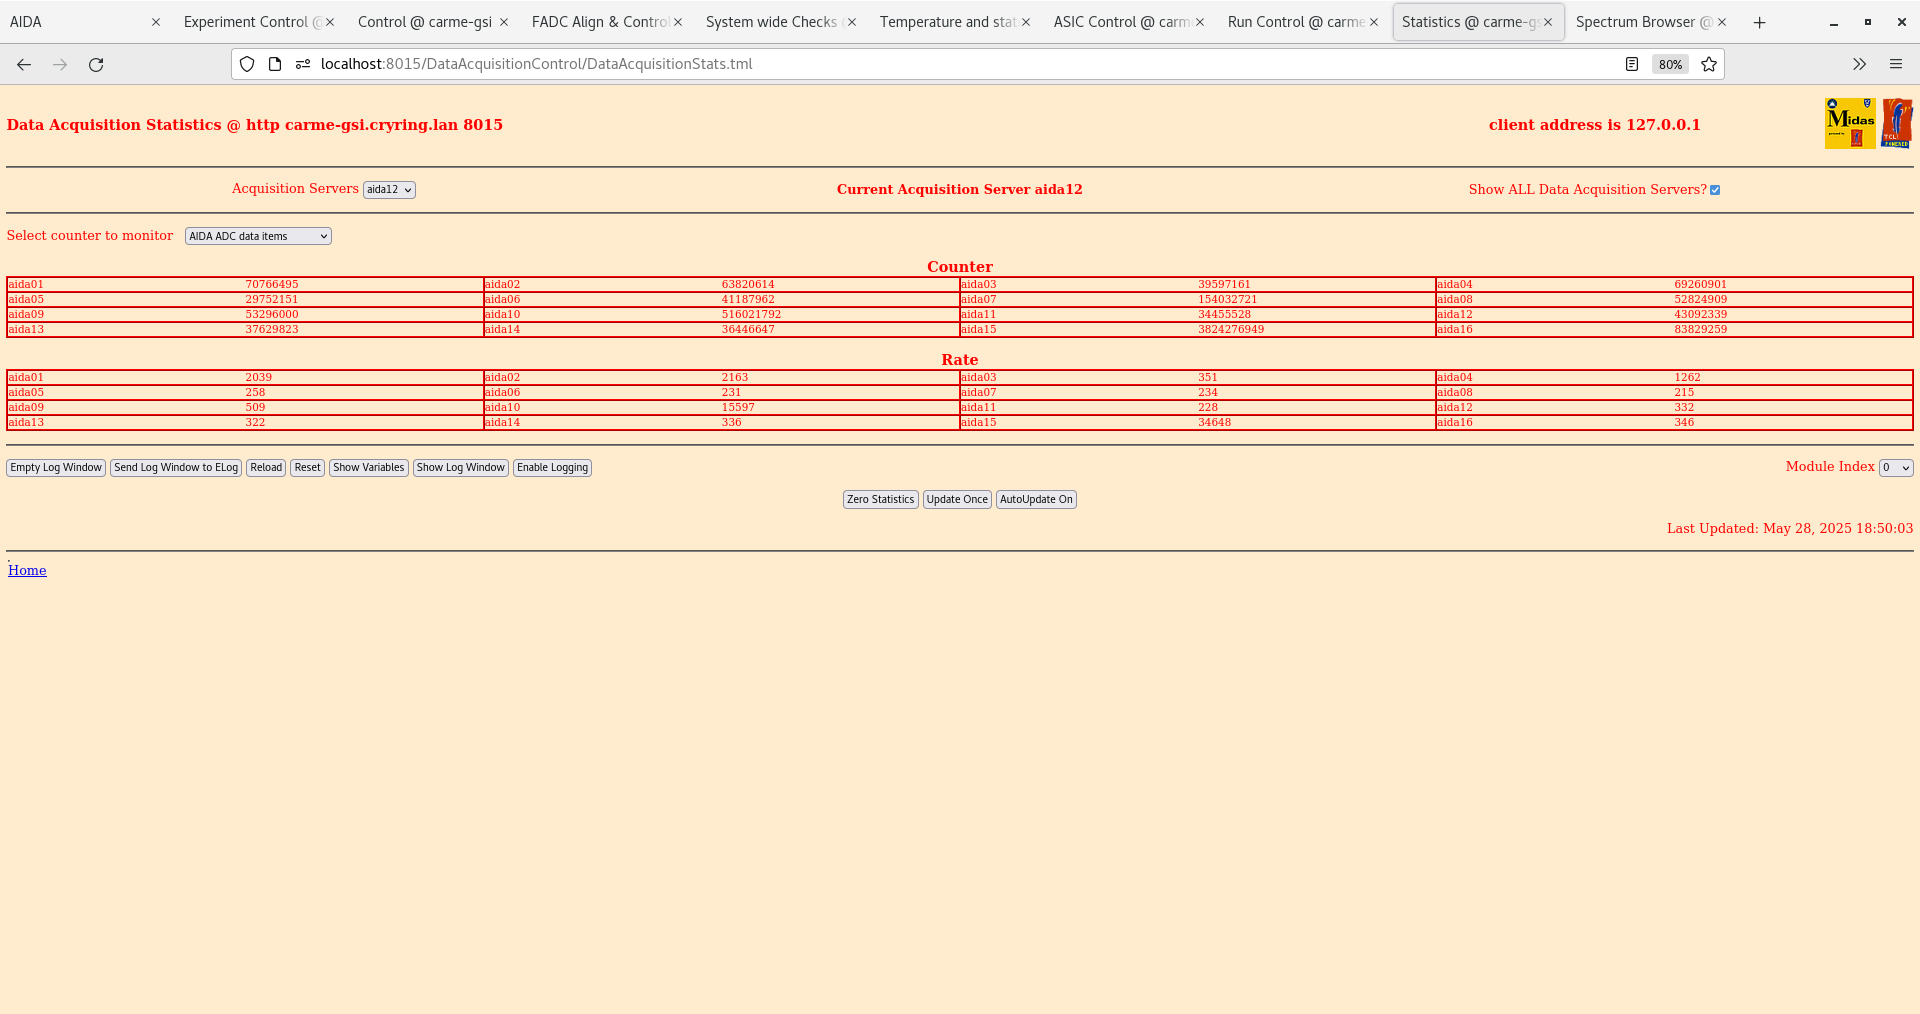
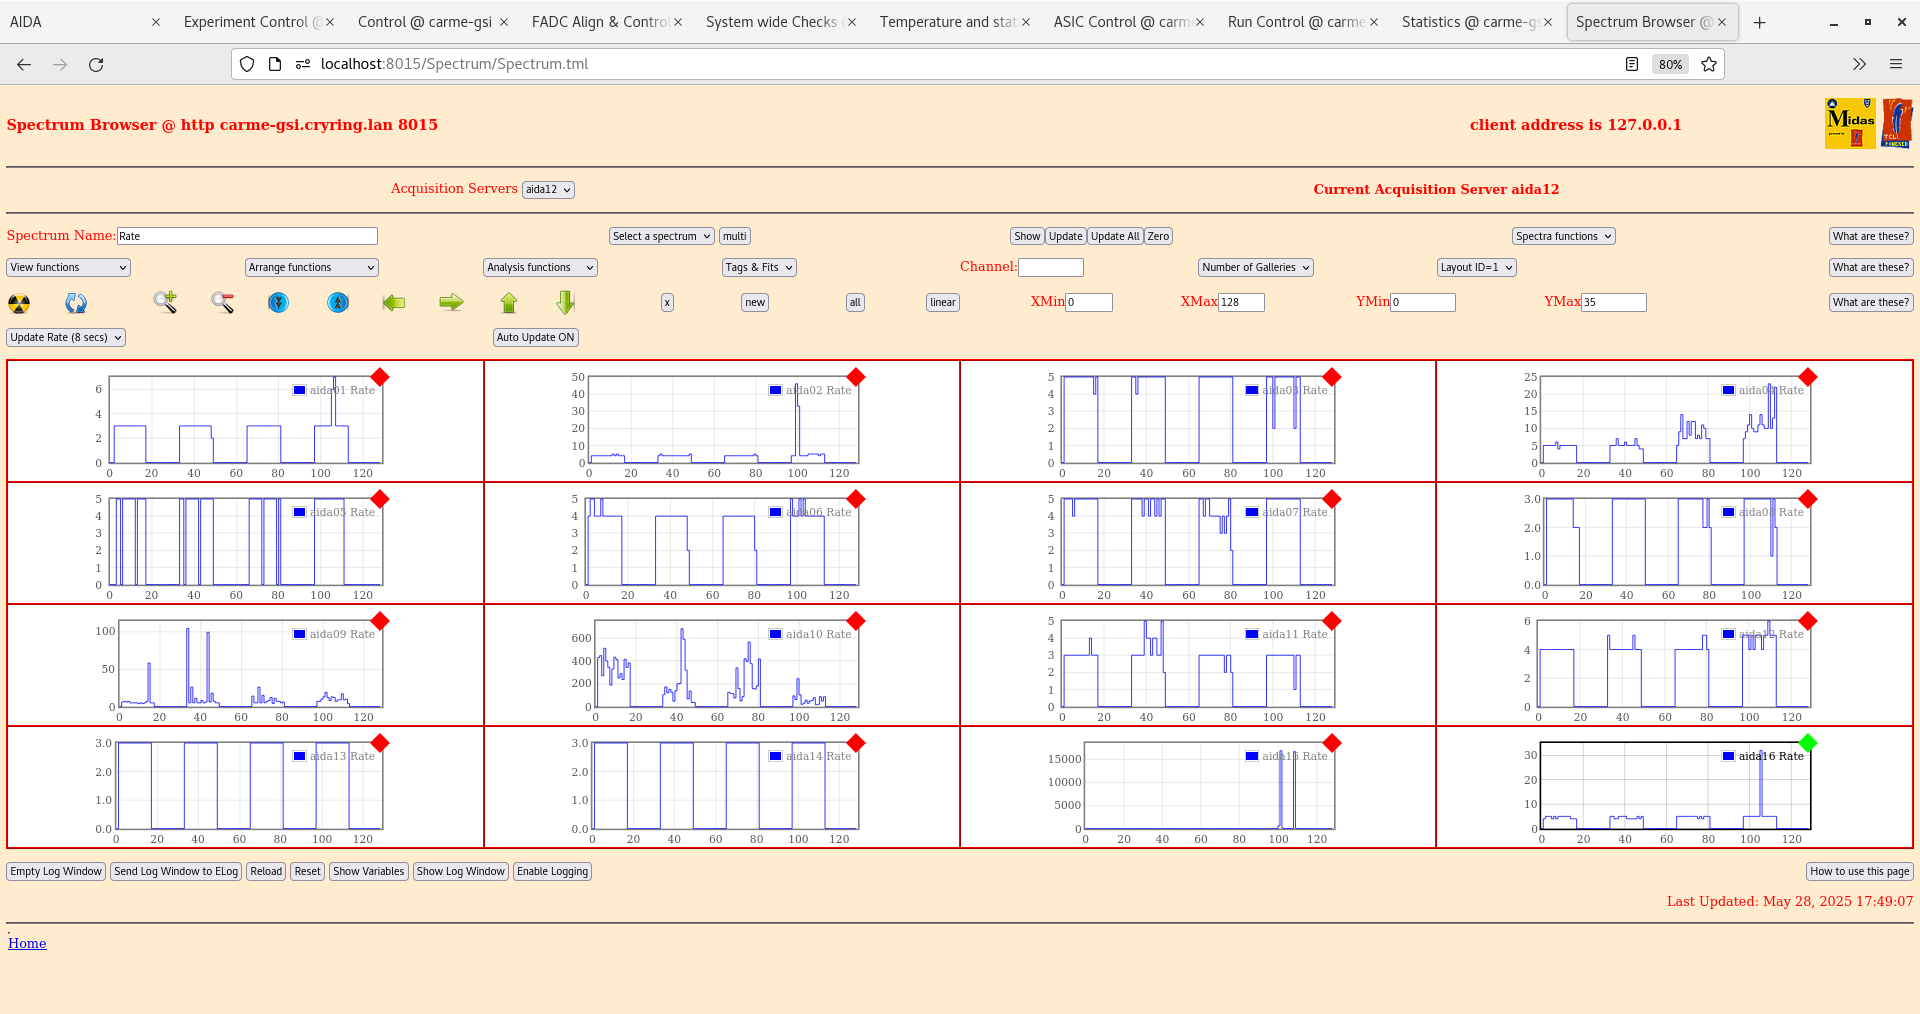
Rates in aida06 at 10k. Fast discriminator at 100k. Checkloaded. OK. Other rates fine.
Will keep monitoring.
11:50
aida06 fast discriminator over 100k. Checkloaded x2. OK now. Other rates fine.
No changes to leakage current.
13:20
Temps OK
Rates OK (aida 06 is no longer counting fast)
Leakage current stable
14:20
Run continues OK
Temps OK
Stats OK
|
| Attachment 1: Screenshot_2025-05-28_17-51-17.png
|
|
| Attachment 2: Screenshot_from_2025-05-28_17-47-21.png
|
|
| Attachment 3: Screenshot_from_2025-05-28_17-49-00.png
|
|
| Attachment 4: Screenshot_from_2025-05-28_17-49-11.png
|
|
| Attachment 5: Screenshot_from_2025-05-28_17-49-30.png
|
|
| Attachment 6: Screenshot_from_2025-05-28_17-49-41.png
|

|
| Attachment 7: Screenshot_from_2025-05-28_18-52-35.png
|
|
| Attachment 8: Screenshot_from_2025-05-28_18-52-46.png
|
|
| Attachment 9: Screenshot_from_2025-05-28_18-52-56.png
|
|
| Attachment 10: Screenshot_from_2025-05-28_18-53-04.png
|

|
| Attachment 11: Screenshot_from_2025-05-28_18-53-34.png
|
|
| Attachment 12: Screenshot_from_2025-05-28_20-21-22.png
|
|
| Attachment 13: Screenshot_from_2025-05-28_22-04-57.png
|

|
| Attachment 14: Screenshot_from_2025-05-28_22-04-40.png
|
|
| Attachment 15: Screenshot_from_2025-05-28_22-04-26.png
|

|
| Attachment 16: Screenshot_from_2025-05-28_22-04-36.png
|
|
| Attachment 17: Screenshot_from_2025-05-28_22-04-52.png
|

|
| Attachment 18: Screenshot_from_2025-05-29_01-43-22.png
|
|
| Attachment 19: Screenshot_from_2025-05-29_02-53-41.png
|

|
| Attachment 20: Screenshot_from_2025-05-29_02-54-03.png
|
|
| Attachment 21: Screenshot_from_2025-05-29_05-00-39.png
|

|
| Attachment 22: Screenshot_from_2025-05-29_05-00-13.png
|

|
| Attachment 23: Screenshot_from_2025-05-29_07-31-25.png
|

|
| Attachment 24: Screenshot_from_2025-05-29_07-30-25.png
|
|
| Attachment 25: Screenshot_from_2025-05-29_07-30-10.png
|
|
| Attachment 26: Screenshot_from_2025-05-29_07-29-42.png
|
|
| Attachment 27: Screenshot_from_2025-05-29_08-41-51.png
|
|
| Attachment 28: Screenshot_from_2025-05-29_10-30-00.png
|
|
| Attachment 29: Screenshot_from_2025-05-29_10-30-03.png
|
|
| Attachment 30: Screenshot_from_2025-05-29_10-30-16.png
|

|
| Attachment 31: Screenshot_from_2025-05-29_10-30-19.png
|
|
| Attachment 32: screenshot-2025-05-29_11-13-385986126969656182153.png
|
|
| Attachment 33: Screenshot_from_2025-05-29_11-38-07.png
|
|
| Attachment 34: Screenshot_from_2025-05-29_11-38-10.png
|
|
| Attachment 35: Screenshot_from_2025-05-29_11-44-55.png
|
|
| Attachment 36: Screenshot_from_2025-05-29_11-44-55.png
|

|
| Attachment 37: Screenshot_from_2025-05-29_14-19-52.png
|

|
|
513
|
Wed Feb 14 14:59:13 2024 |
JM, CB, NP, ML, AG, AB | Run 27 -Beam on target optimisation |
Run 27 Started to check optimsation of the beam - target overlap.
Beam intensity at injection is roughly 1e7 particles
Target density apporx 4.2e11 atoms/cm2 and stable.
Ring pressure is below 1e-10 mbar for all ring sections and stable
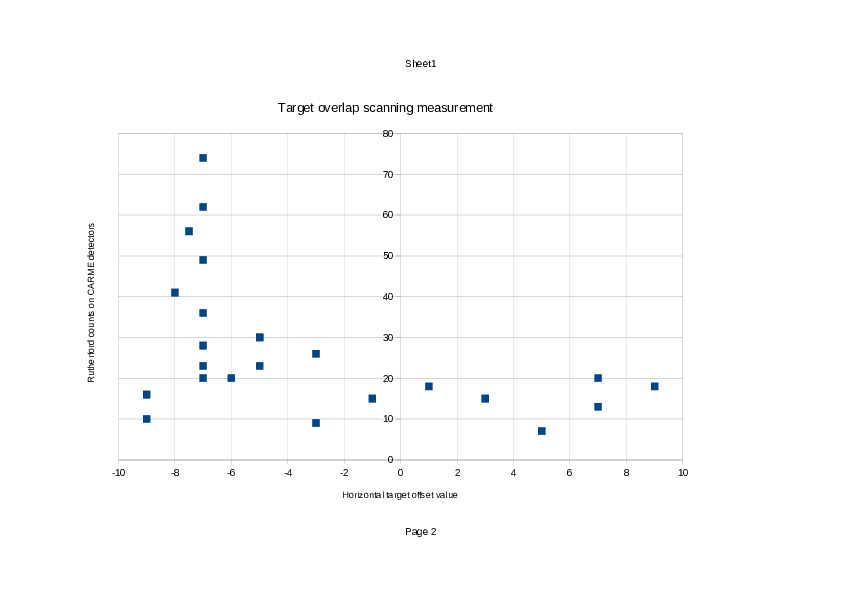
First optimisation procedure was to vary the horizontal beam position and see the effect on the count rate in detector #0 (top left) (see elog 509). Beam position was scanned from -9 and -4. Attachment 1 shows the maximum in count rate around the -7.5 position.
Second optimisation procedure was to change the time ions are allowed to circulate in the ring before being dumped. The count rate over 5 minutes in detector #0 (top left) at ~20 MeV was used as a gauge. This is the only part of the cycle we can control.
Time (s) Counts
2 148
3 200
4 178 |
| Attachment 1: Target-overlap-scan-optimized.pdf
|


|
|
580
|
Mon Jun 3 11:46:07 2024 |
SD, SHB, JM, CN, EM | Run 27 |
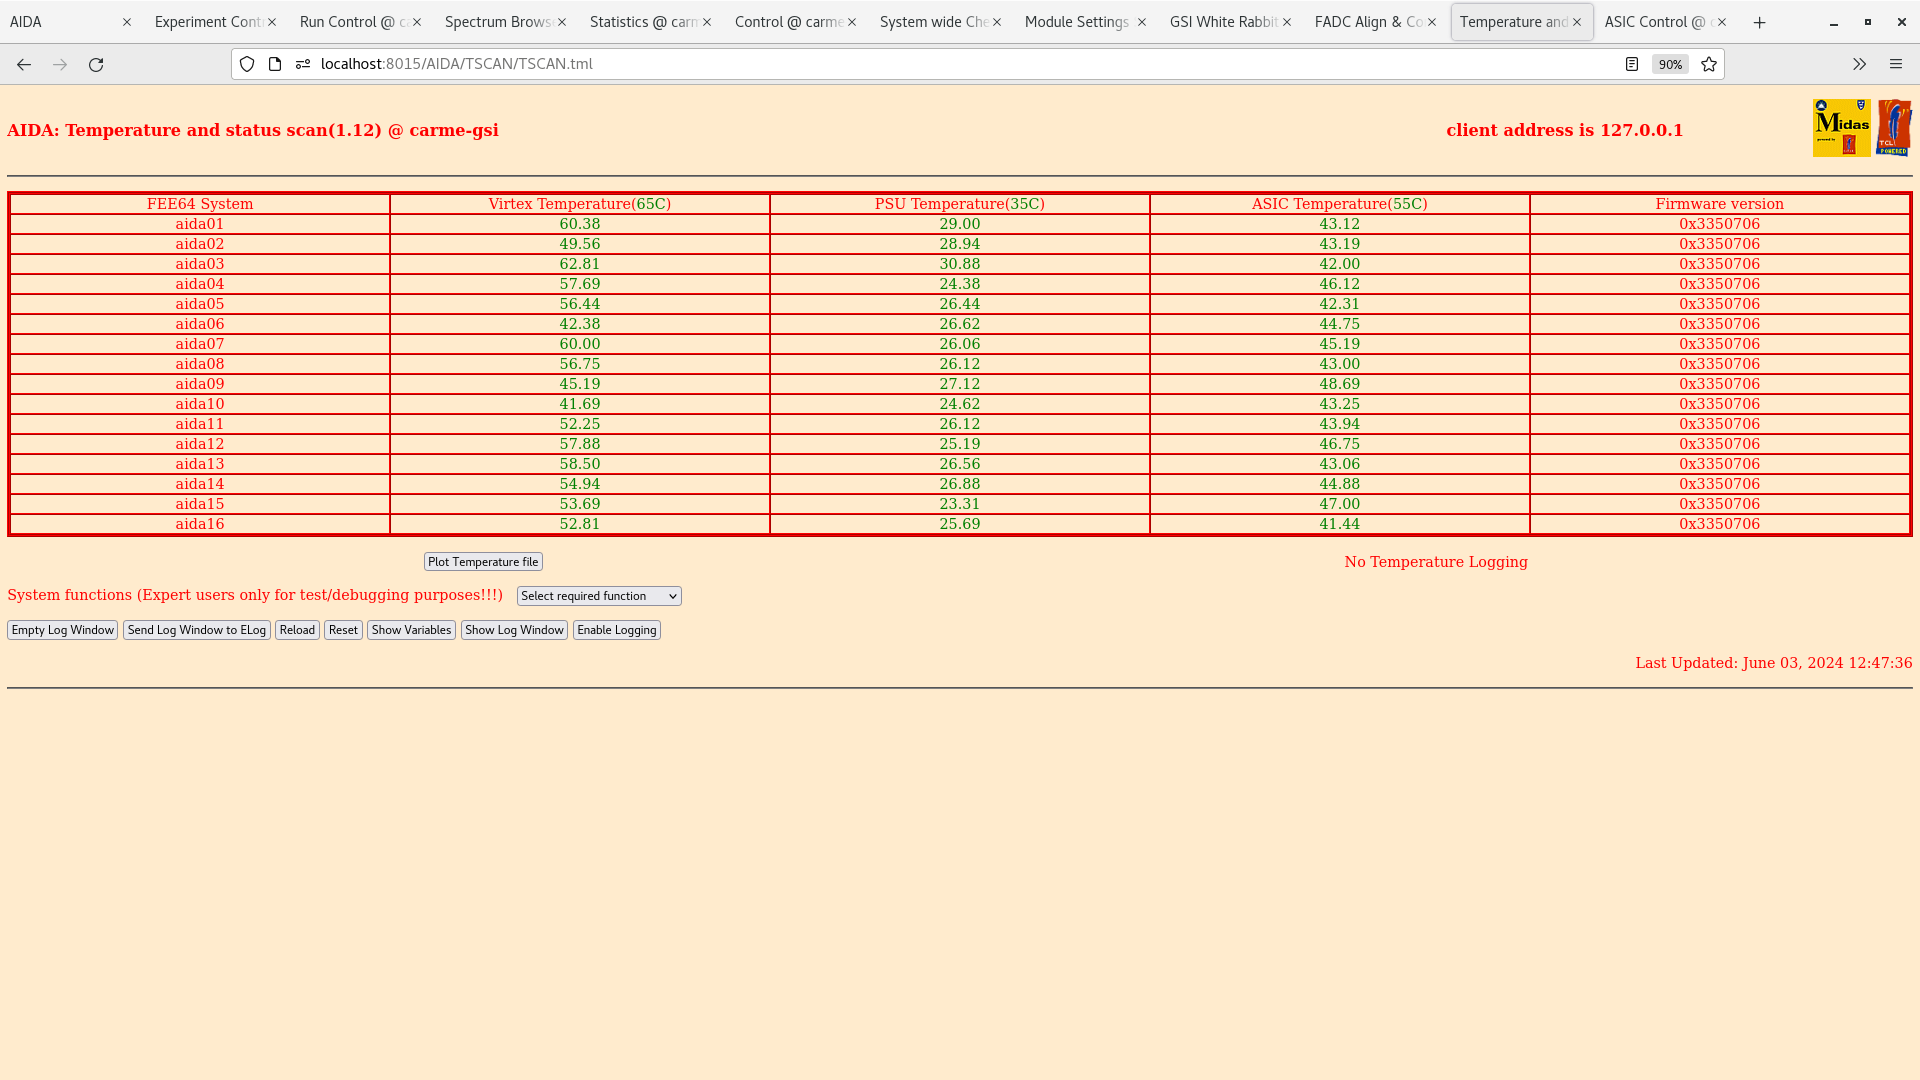
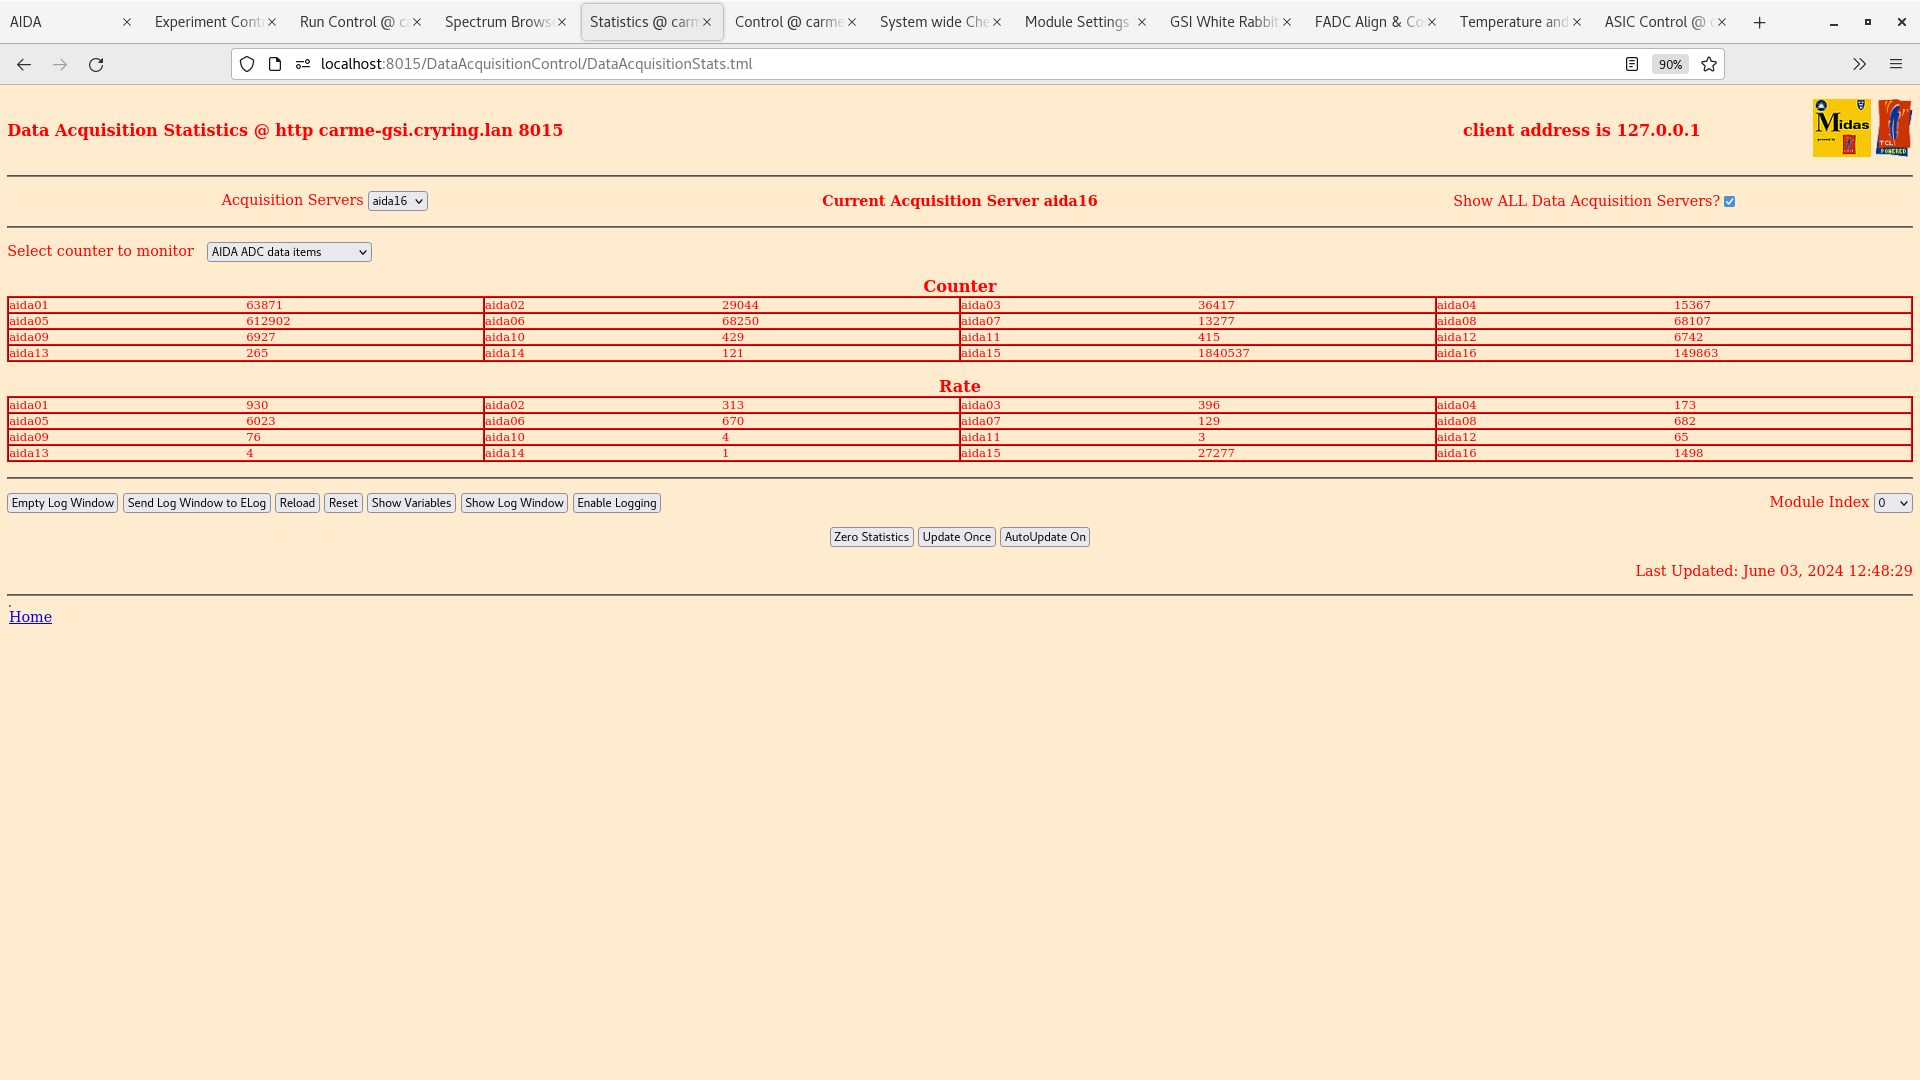
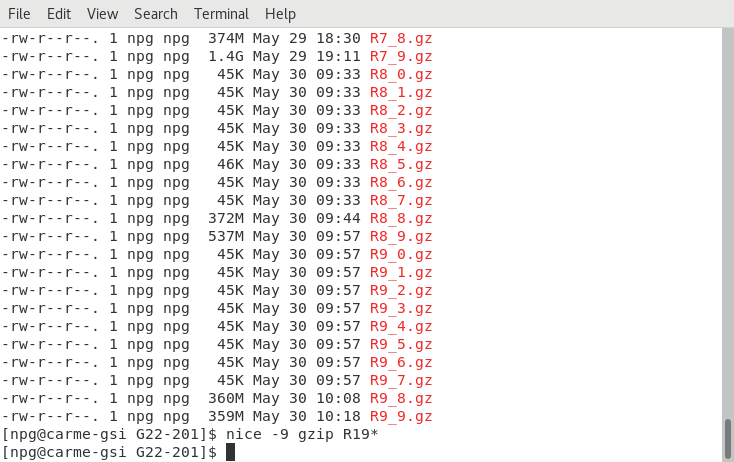
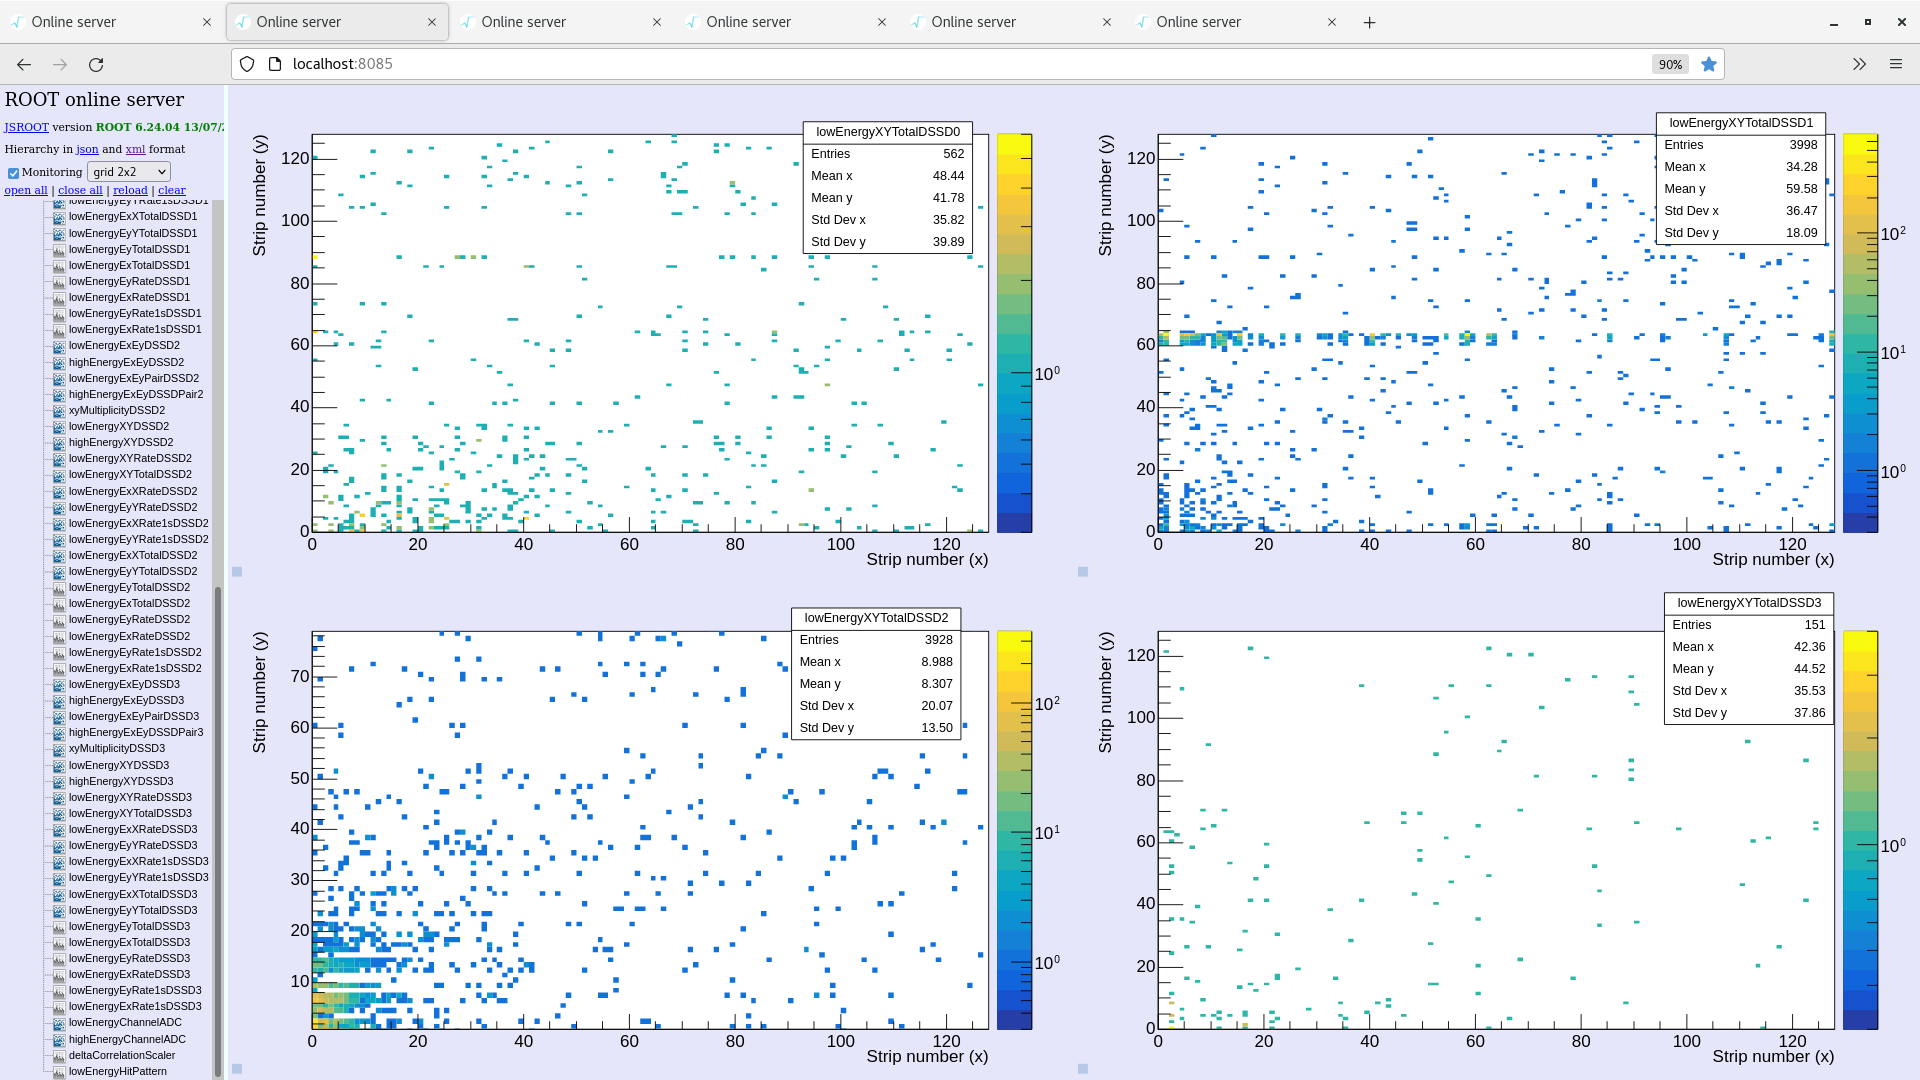
12:46 (attachments 1-4)
Run 27 started - Beam no target
Beam energy = 3 MeV
Horizontal beam position = 7.0 mm, vertical beam position = 0.0 mm.
Beam intensity at inj ~ 2.5e7
Detectors are positioned IN pneumatic only. Left arm = 62.71, right arm = 64.60 mm
Histograms and stats zero'd, monitoring code restarted.
Beam in the ring ~ 7 minutes.
Beam on BPM looks to be better than at previous energy.
Pressure in YR09 E target ~ 4.5e-11 mbar.
Merger OK, Tape server OK
ADC data item statistics looks as before. OK
FEE temperatures look OK
System checks OK
Leakage current stable
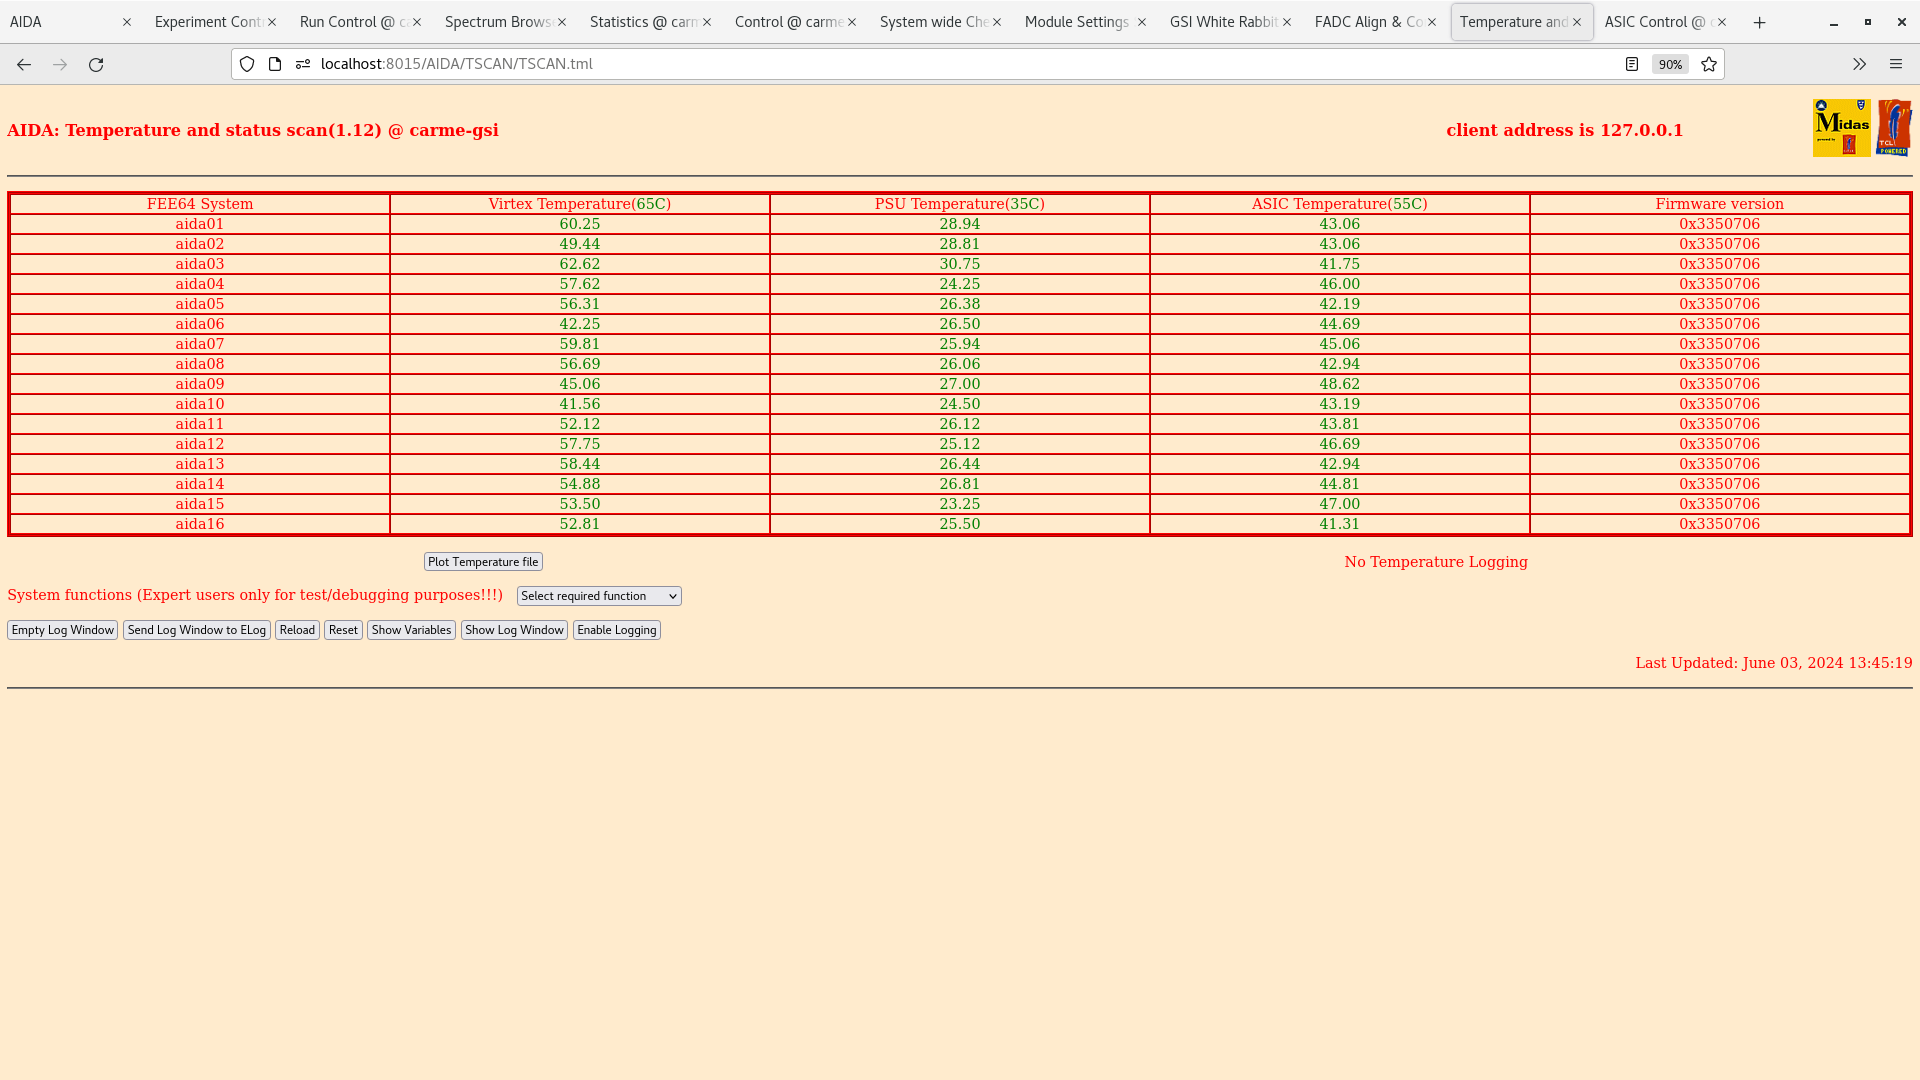
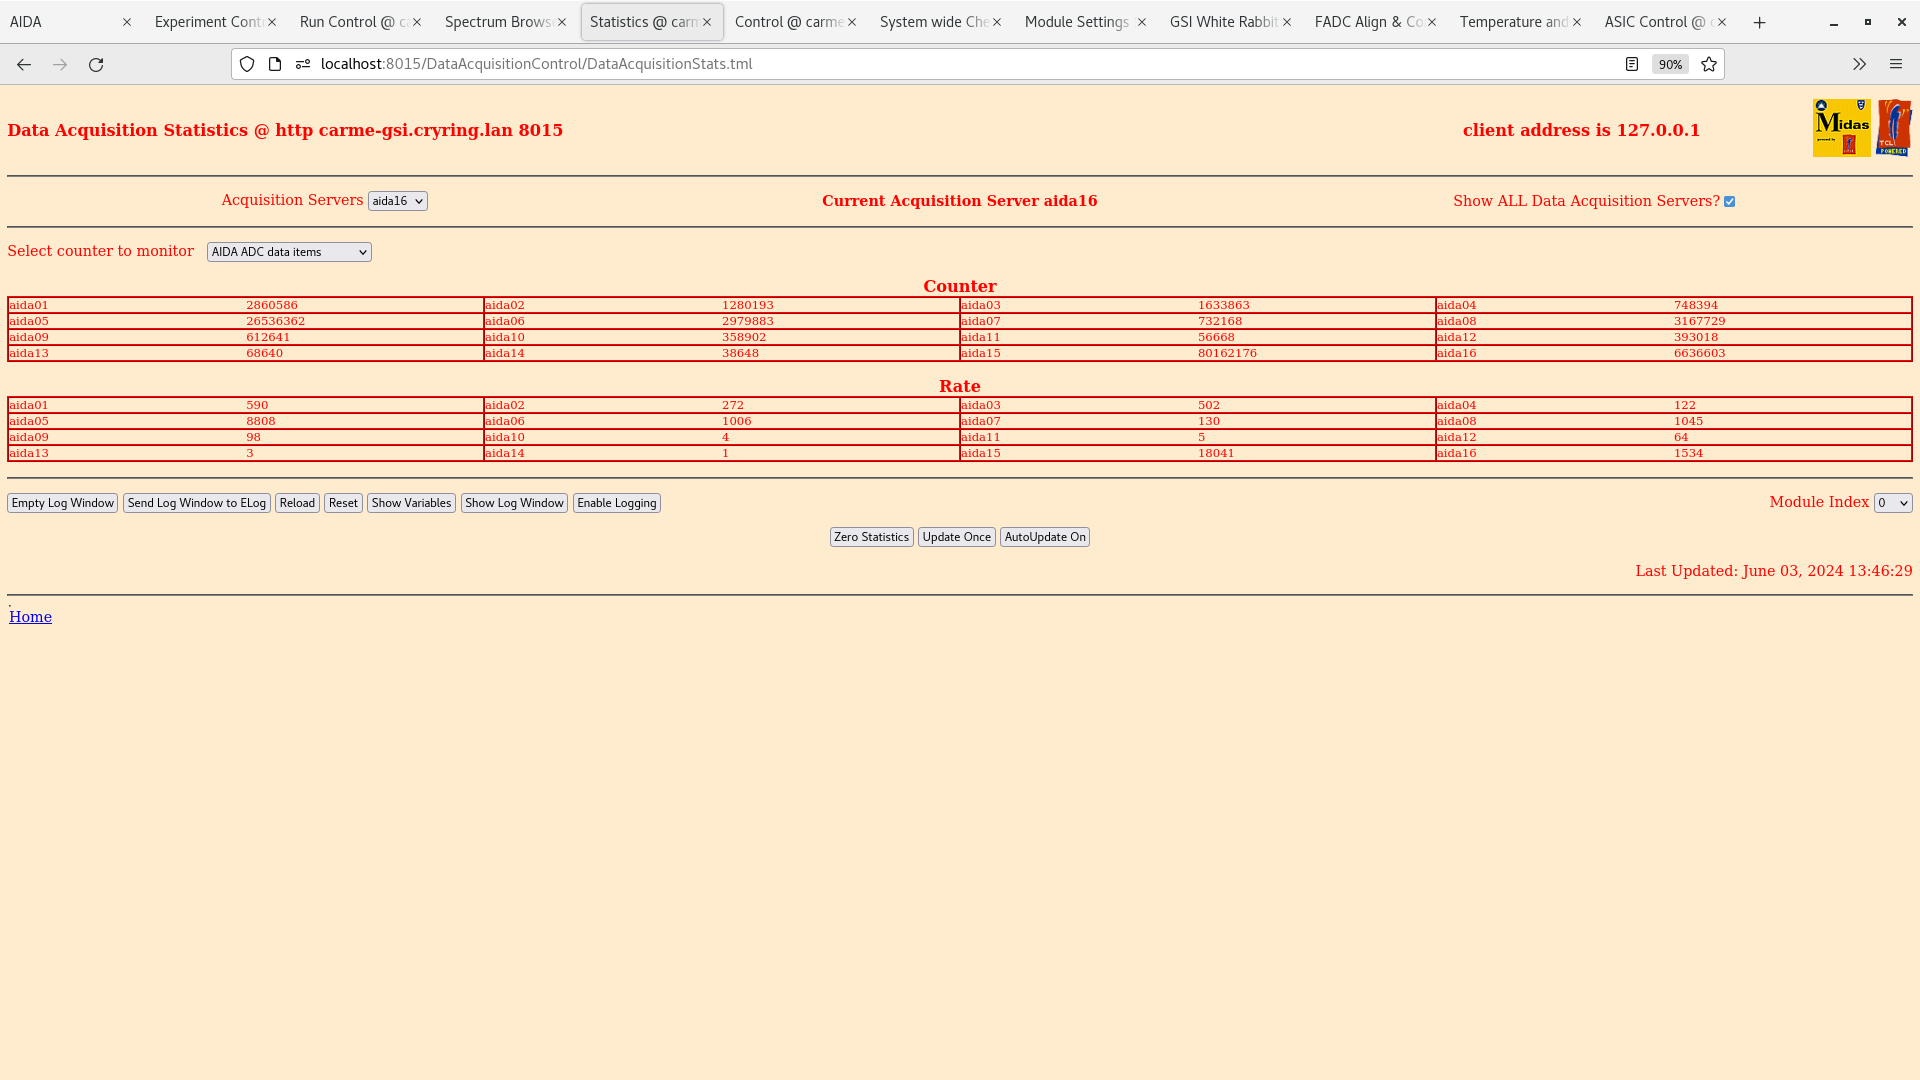
13:45 (attachments 5-8)
Merger OK, Tape server OK
ADC data item statistics looks as before. OK
FEE temperatures look OK
System checks OK
Leakage current stable
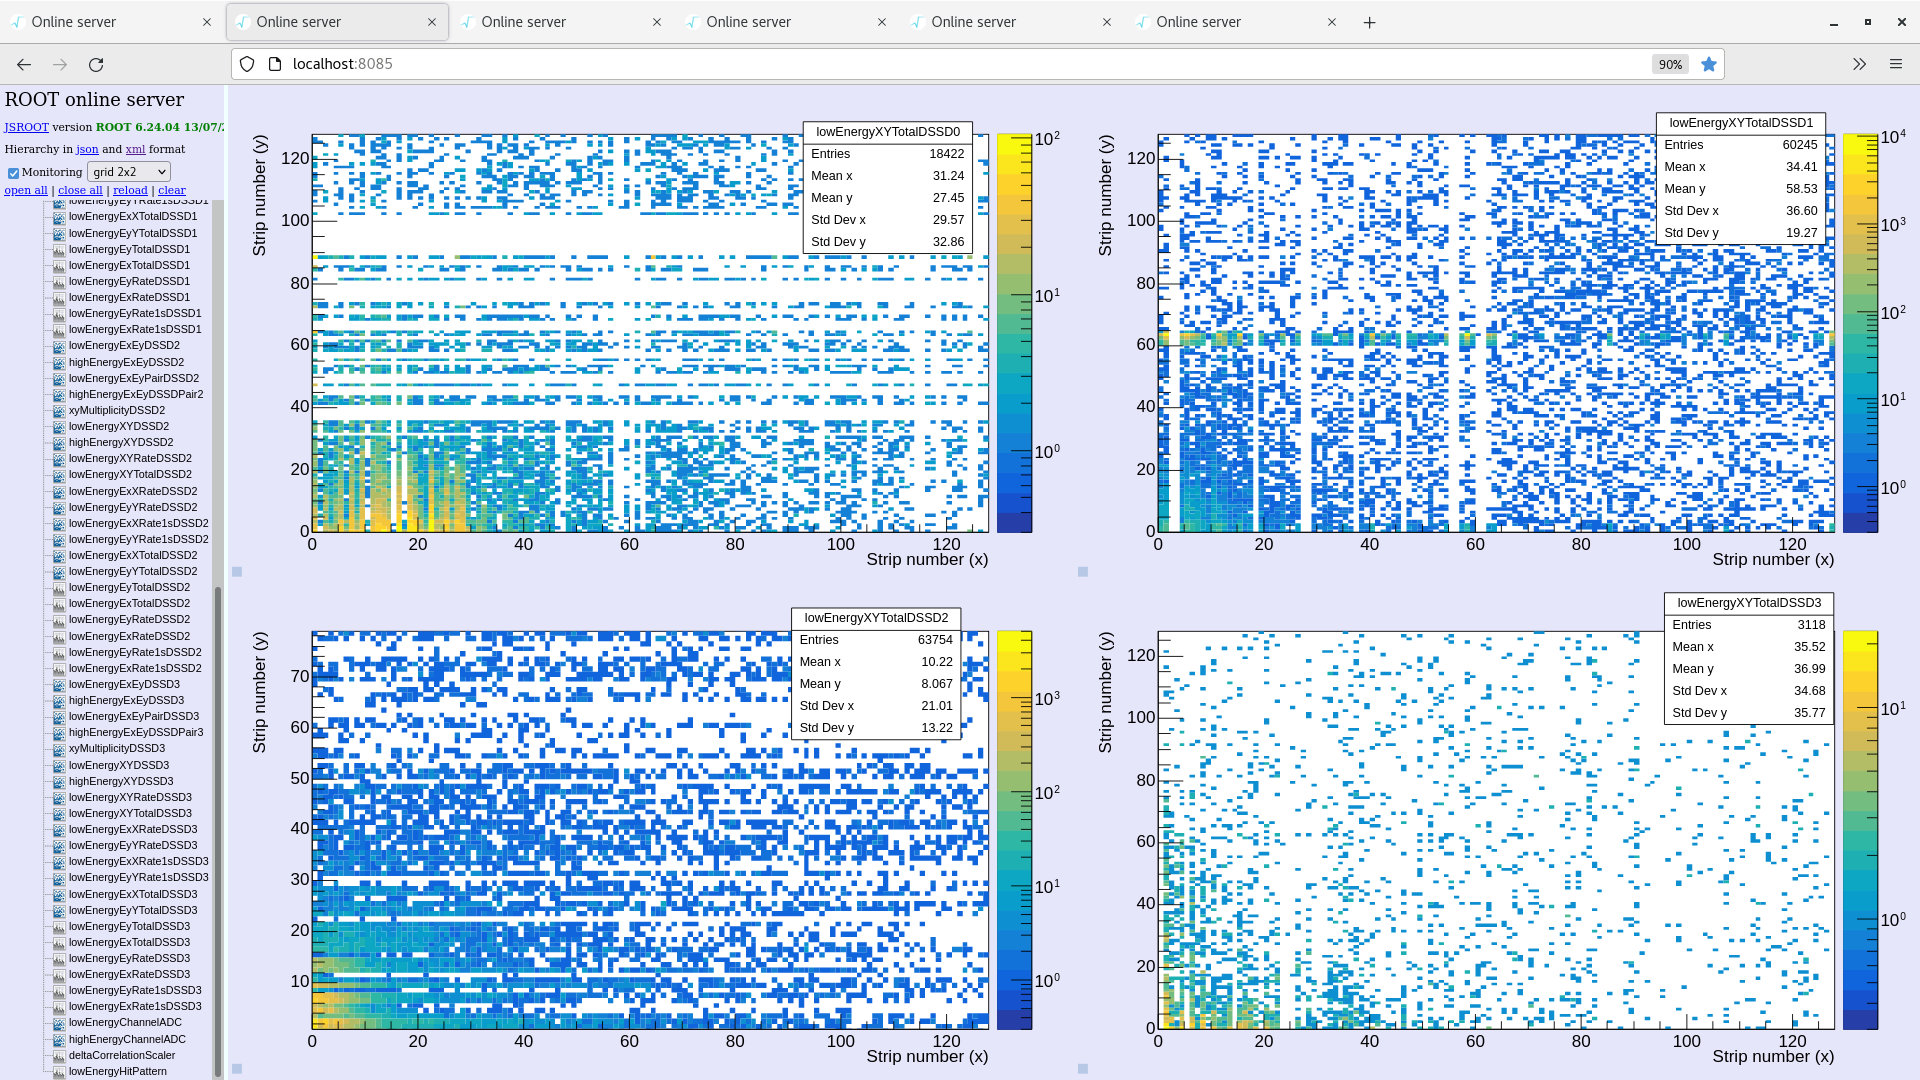
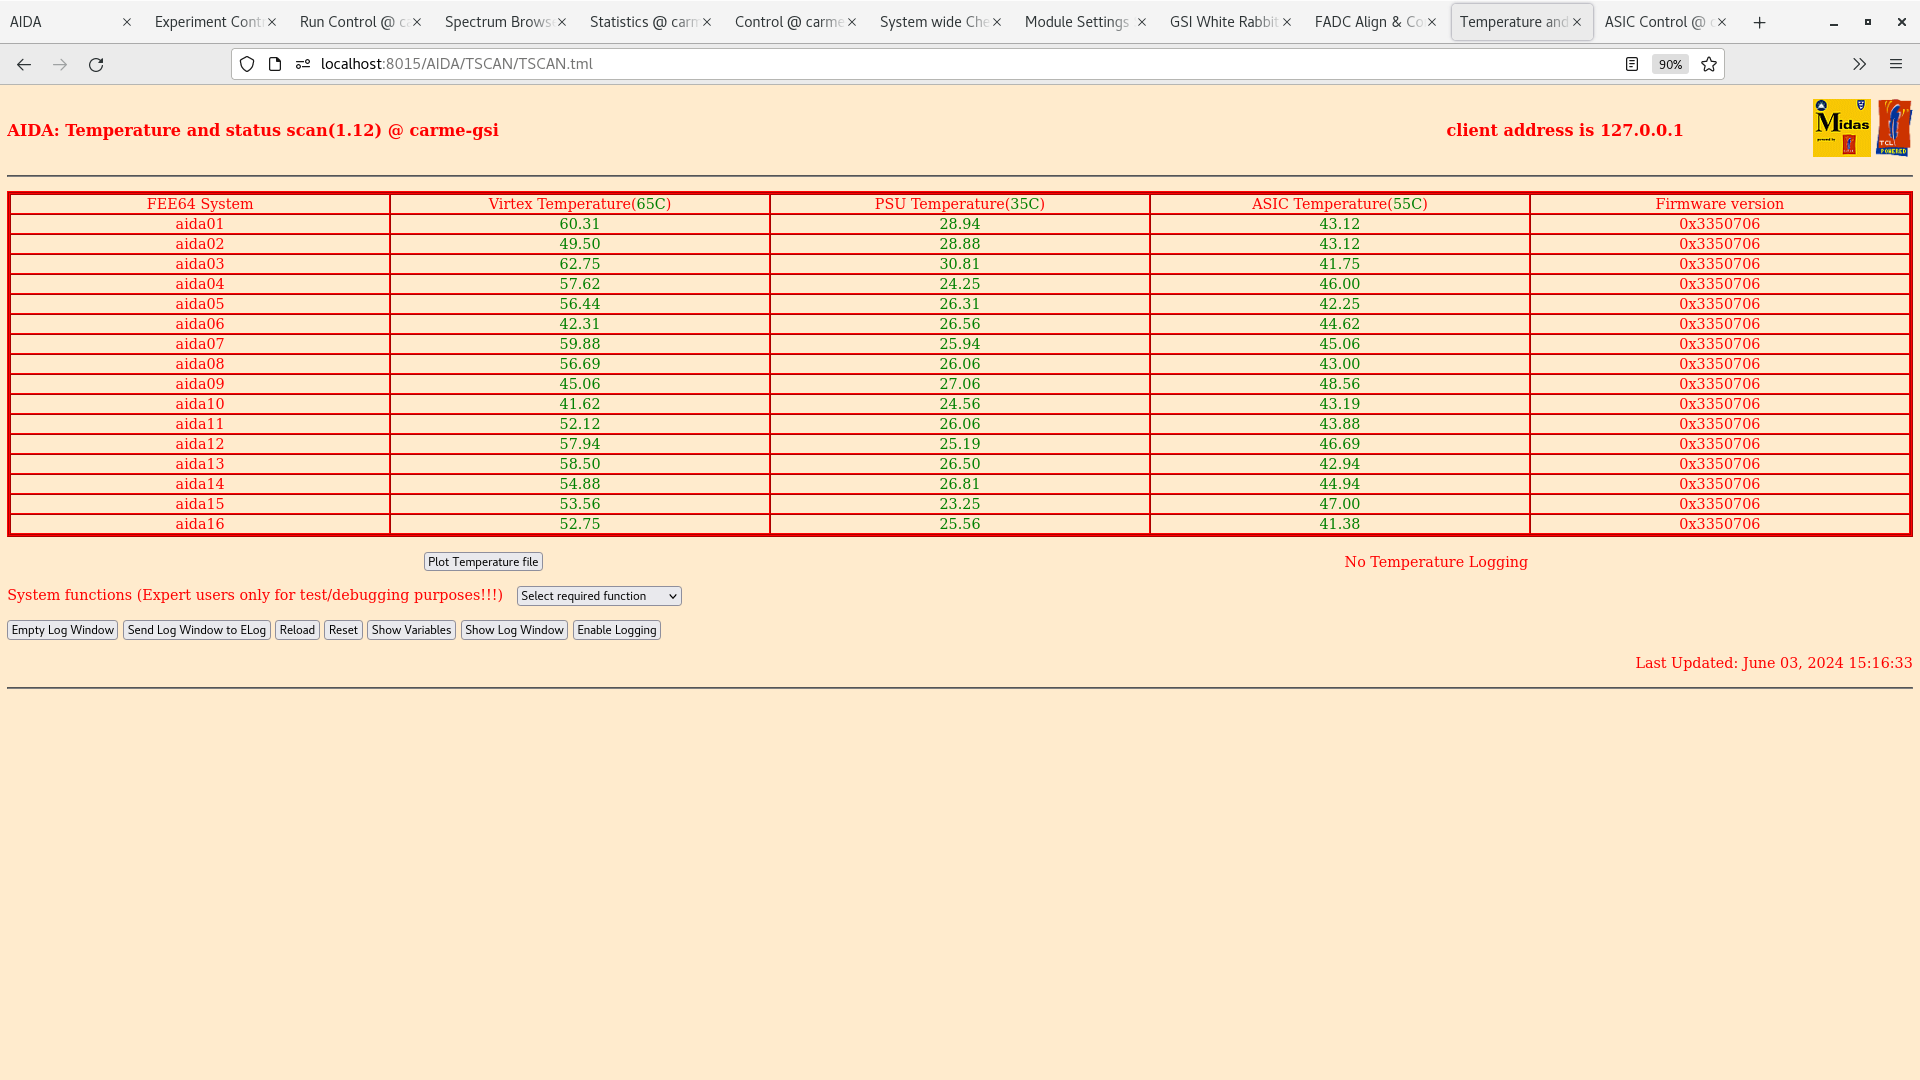
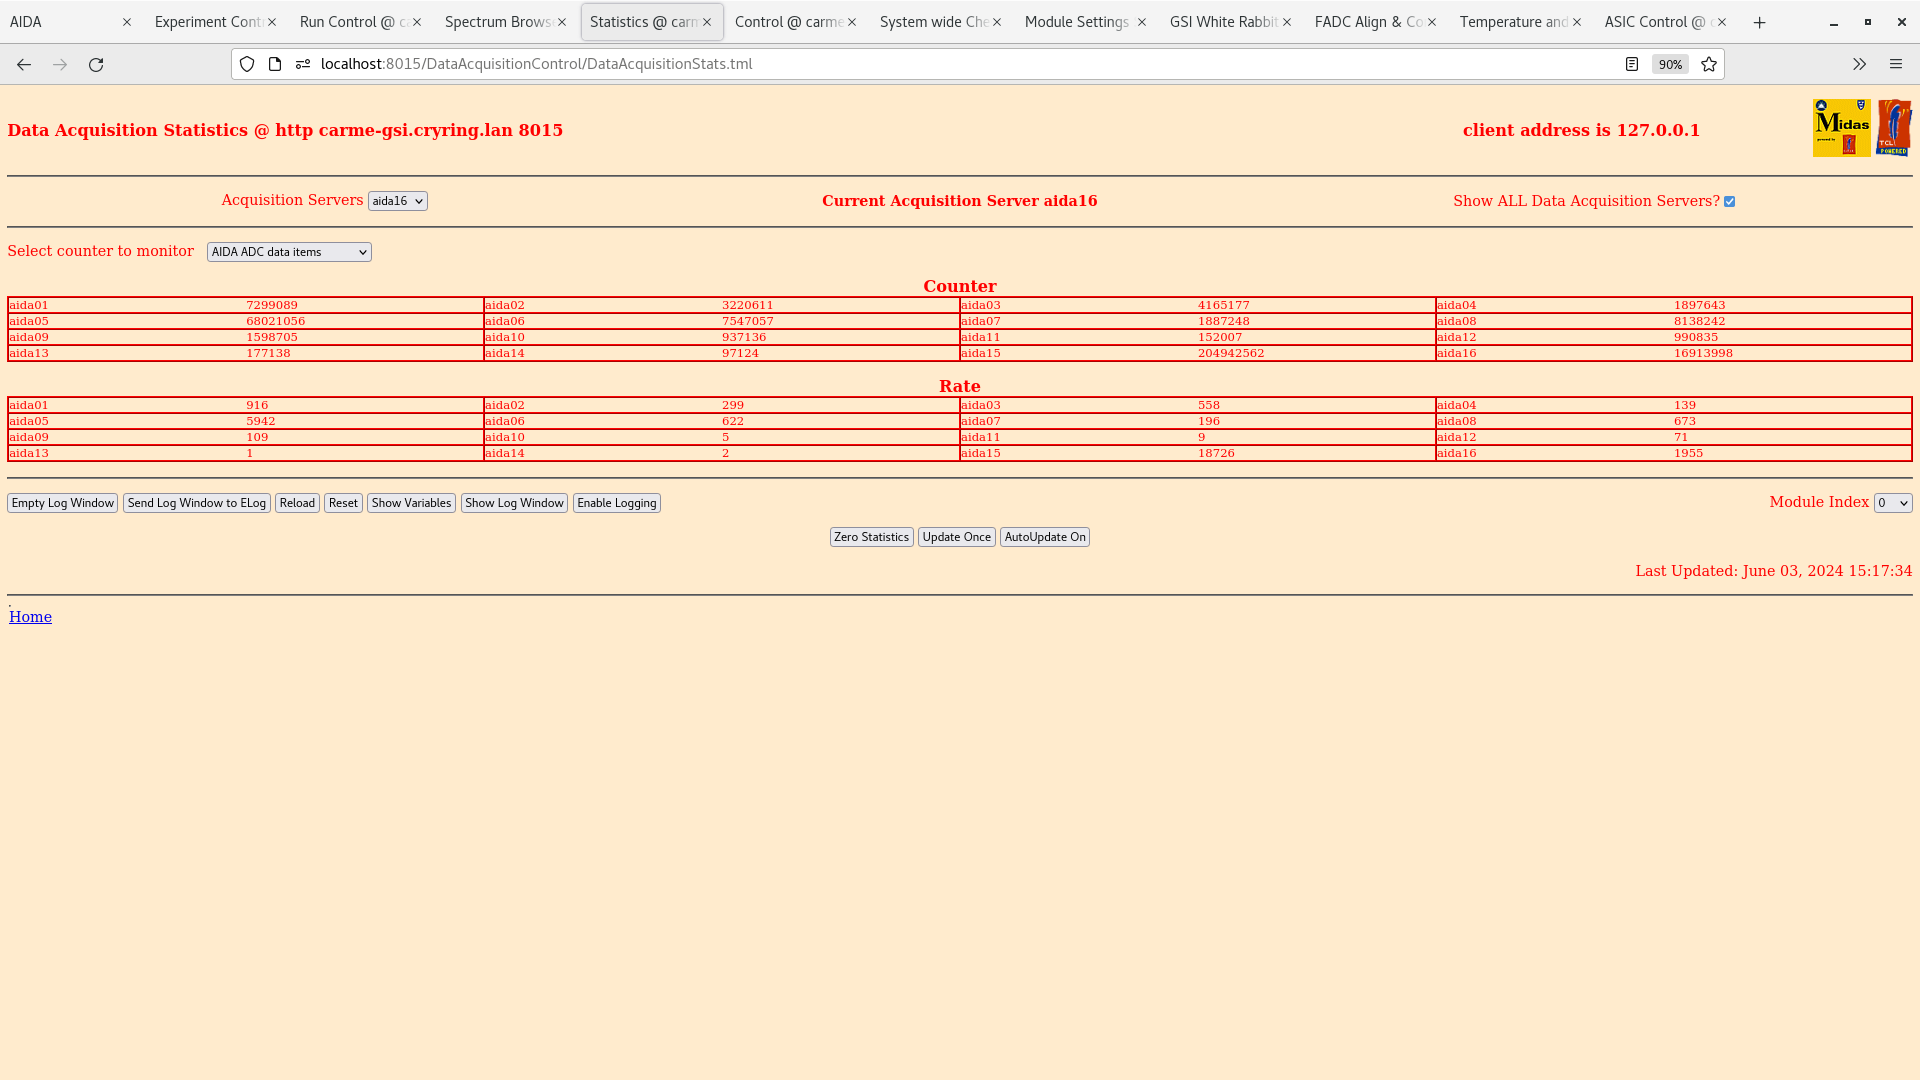
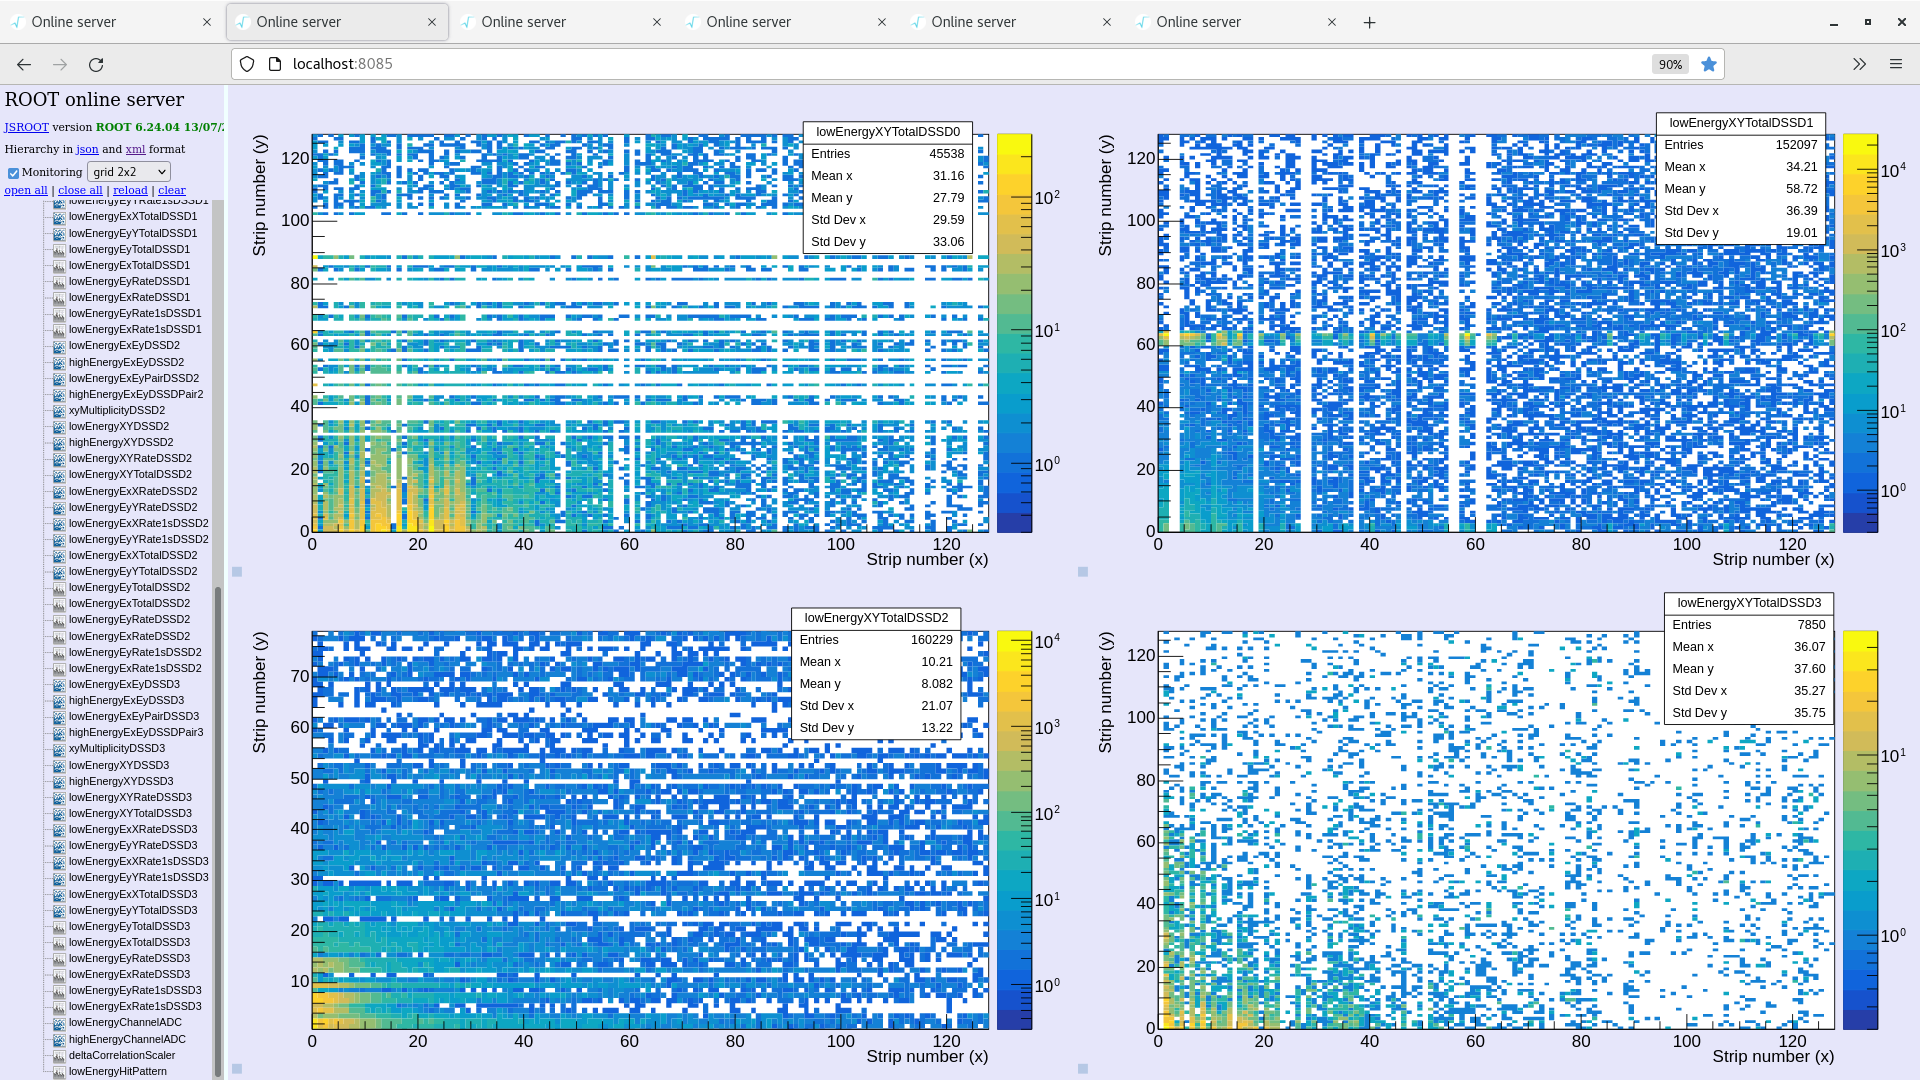
15:15(attachments 9-12)
Merger OK, Tape server OK
ADC data item statistics looks as before. OK
FEE temperatures look OK
System checks OK
Leakage current stable
Target density 1e10 atoms/cm2. Still working on the target.
|
| Attachment 1: Screenshot_from_2024-06-03_12-48-03.png
|
|
| Attachment 2: Screenshot_from_2024-06-03_12-48-37.png
|
|
| Attachment 3: Screenshot_from_2024-06-03_12-49-13.png
|
|
| Attachment 4: Screenshot_from_2024-06-03_12-49-47.png
|
|
| Attachment 5: Screenshot_from_2024-06-03_13-45-42.png
|
|
| Attachment 6: Screenshot_from_2024-06-03_13-46-49.png
|
|
| Attachment 7: Screenshot_from_2024-06-03_13-47-32.png
|

|
| Attachment 8: Screenshot_from_2024-06-03_13-47-51.png
|
|
| Attachment 9: Screenshot_from_2024-06-03_15-16-51.png
|
|
| Attachment 10: Screenshot_from_2024-06-03_15-17-49.png
|
|
| Attachment 11: Screenshot_from_2024-06-03_15-18-19.png
|

|
| Attachment 12: Screenshot_from_2024-06-03_15-22-14.png
|
|